Version
2. CloverDX AI Assistant
Introduction
CloverDX AI Assistant is an agentic collaborator embedded into CloverDX Designer. It can help you build your solutions using natural language directly within Designer. It is not just a graph builder though – it can do much more. It can collaborate with you in three broad categories of work:
-
Solution architect: it can work on solutions that are much bigger than just a single job. The Assistant can help you build complex solutions based on specification provided in specification files (which are typically markdown, but it will ingest Word documents, too). It will suggest architecture; help you build the solution and even document it for you including data flow diagrams to make it easy to follow and understand.
-
Development companion: the Assistant can help you while building your graphs – modify them based on a prompt, help you understand what the graphs are doing, improve CTL code, generate sample data and more. You can think of the Assistant as your everyday pair-programmer who is ready to help you turn natural language prompts into working graphs.
-
Troubleshooter: the Assistant can also help you understand job failures. Not just the ones that it has created, but any job. It has full access to your Server’s logs, tracking data and more. It can help you diagnose the problem, suggest a fix or even implement it for you.
|
CloverDX AI Assistant is released as a technology preview in CloverDX 7.5.0. It is present in Designer but remains inert until you apply an Assistant license key and configure an AI provider in Designer preferences (it will not do anything on its own). As a technology preview, it is under active development. Its behavior, interfaces, and defaults may change in future releases, sometimes in incompatible ways. Use it in dev/test environments only, not in production. Treat it as a tool for evaluation and non-critical work, and review everything it produces before relying on it. Use it with caution: the Assistant can read and modify files and run jobs in the CloverDX Server project you connect it to. Gathering feedback on how teams want to govern the Assistant is one of the goals of this technology preview. Contact your Account representative if you wish to provide feedback that could help us improve future versions of the Assistant. |
The Assistant itself is available via Assistant View – a view usually docked to the right side of your Designer window.
Figure 46. Designer Assistant shown in a sidebar after running through a number of tasks that modified an existing project.
|
If you close the Assistant view by mistake, you can get it back by resetting your perspective via main menu item. Alternatively, you can reopen the view by going to and searching for Clover Assistant in the Show view dialog. |
The Assistant requires CloverDX Designer where it runs as well as CloverDX Server since it uses Server’s Model Context Protocol (MCP) API to work with projects. The Assistant requires connectivity to an LLM (which is typically hosted in the cloud), however only the Designer requires this access, the Server does not have to be publicly accessible – it only needs to be accessible from the Designer.
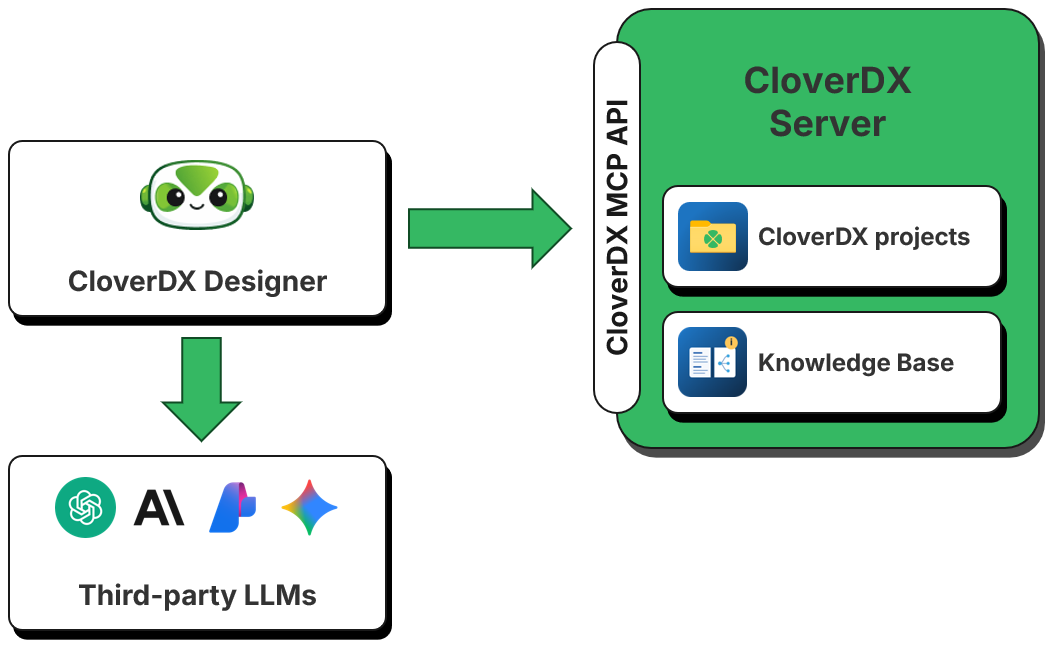
Figure 47. Architecture of CloverDX AI Assistant in Designer.
The diagram above shows basic building blocks required for the Assistant to work. The Assistant works with several distinct "components" that are shown on the diagram:
-
CloverDX Designer which is the central part of the Assistant. Designer provides the user interface for the Assistant and runs all the orchestration as needed. Technically, the Assistant runs fully within the Designer and only calls outside to access Large Language Models (LLM) or Model Context Protocol (MCP) Server.
-
CloverDX Server which provides Assistant’s agents with the tools to work with CloverDX jobs, investigate data, research knowledge base and more via its Model Context Protocol (MCP) Server. CloverDX Server provides more than 50 tools that can be used by agents.
The knowledge base hosted by CloverDX Server provides the Assistant with information about components, usage patterns, design patterns or even skills (like data profiling) that the Assistant can use. See below for more details about how the library works and how to manage it.
CloverDX Server also provides storage for CloverDX projects that the Assistant works with. Each CloverDX project corresponds to a sandbox on the Server. Read more about sandboxes and how they work in Working with CloverDX Server projects.
-
External Large Language Models (LLMs) provide the AI backend for the Assistant. Multiple different models can be used by Assistant’s agents depending on agent type and its configuration.
Each Assistant user has their own instance of Designer with their own LLM configuration. However, the tools are shared by all users using single CloverDX Server and the Server administrator can configure MCP to allow/disallow specific tools if needed via MCP tool permissions.
|
CloverDX AI Assistant requires a license to activate. See more details about the licensing requirements and activation in Activating CloverDX AI Assistant. Additionally, since the Assistant uses third party Large Language Models (LLMs), you will need to connect it to your own account with one of the supported LLM providers such as OpenAI, Anthropic, Google, or others. See more details about this configuration in CloverDX AI Assistant Configuration. |
AI Assistant Quick Start
|
Since LLMs are not deterministic and there are differences between different LLM providers or even versions of the same model, you may get results that look different than what is shown on screenshots in this section. For example, your Assistant may produce responses with different wording, diagrams with slightly different layout (but same flow), etc. However, in all cases, the outputs should carry the same meaning. |
Enabling the Assistant
Before you can use the Assistant, you must activate it (provide a license). Once activated, you’ll need to configure the access to Large Language Model (LLM) that powers the Assistant. The Assistant provides helpful guides that will tell you whether any of these steps still need to be completed.
Once the Assistant is fully activated and configured, you will see an intro screen like this:
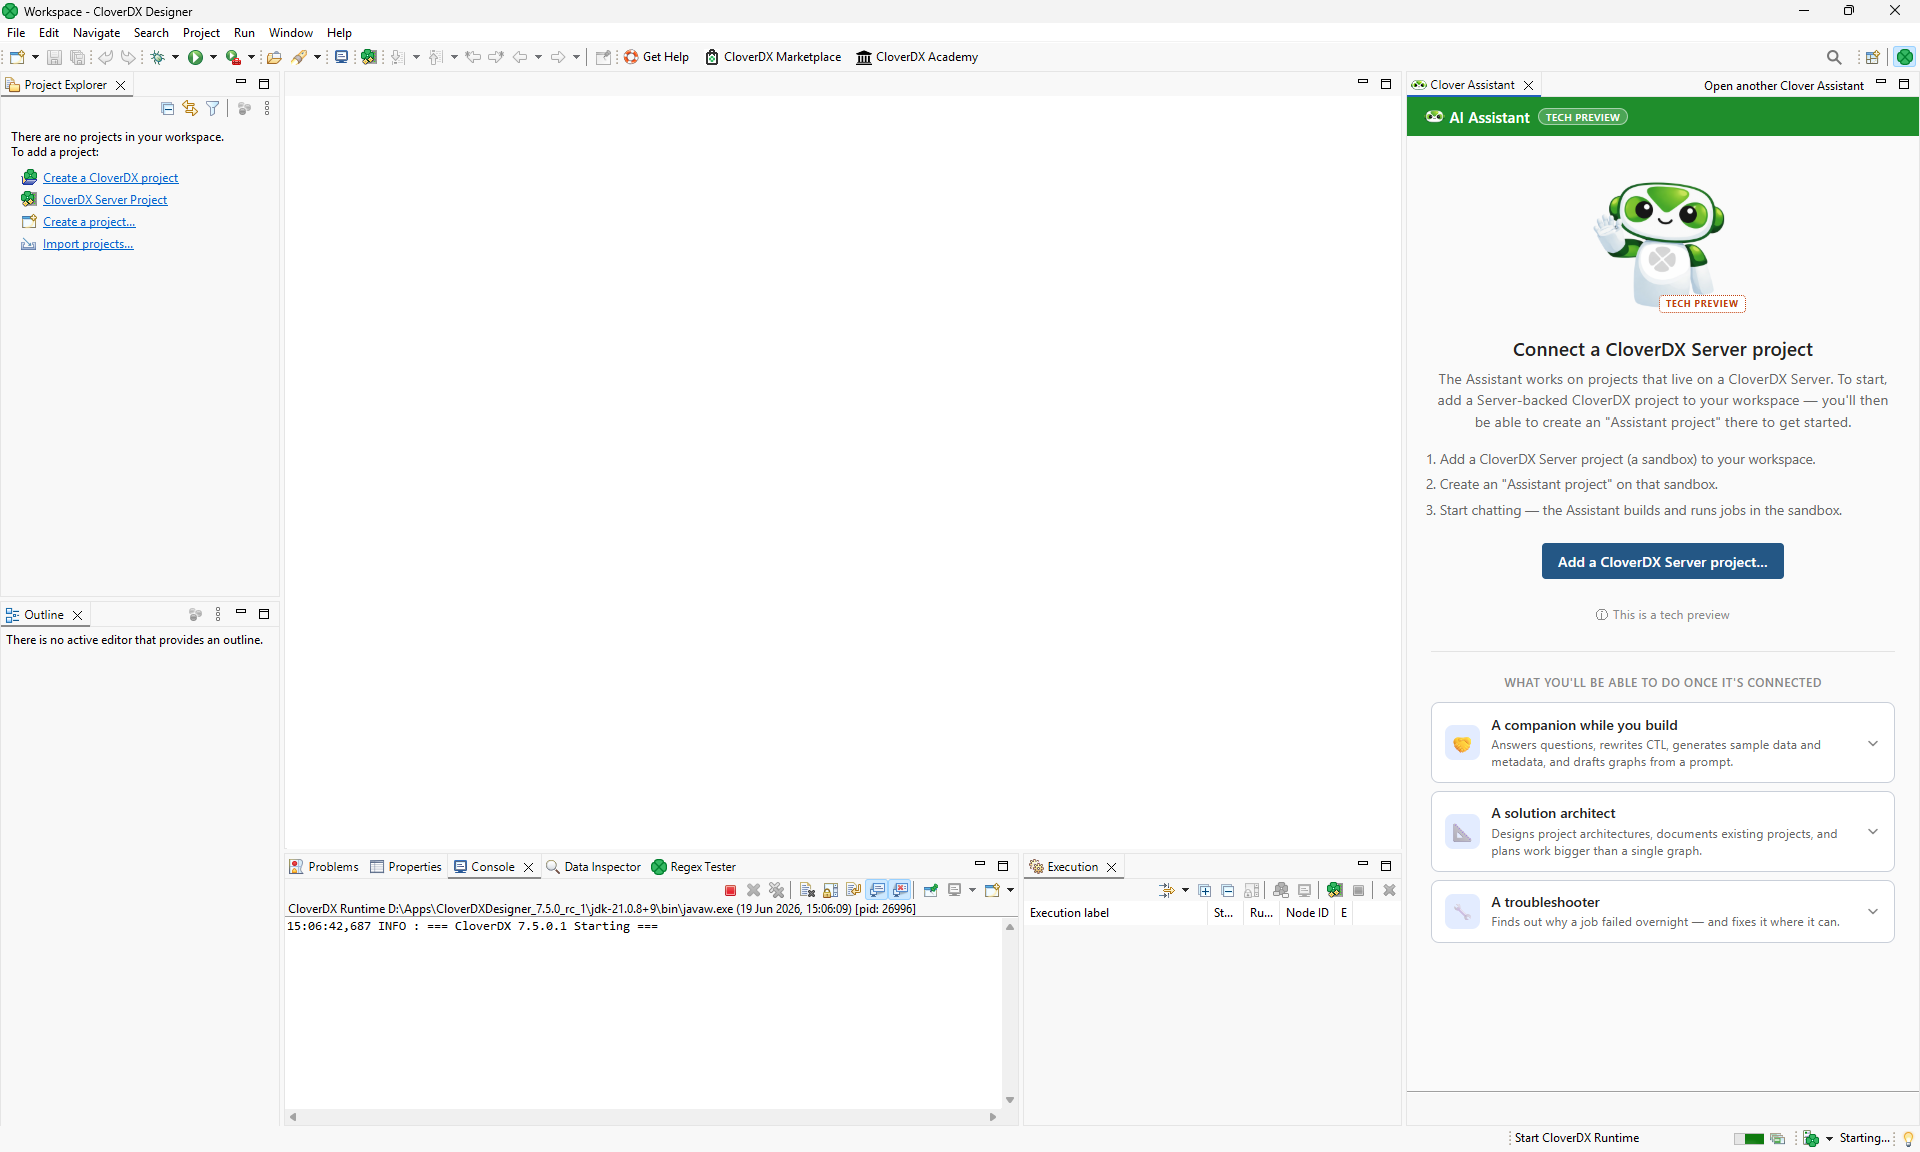
Figure 48. Assistant view in Designer right after it has been activated in an empty workspace (without any projects).
To start working with the Assistant, you’ll have to either create a new Server project or import or open an existing one. In this quick start we’ll use an example project called DWHExample. This project is part of every CloverDX Server installation by default.
To allow the Assistant to work with this project, you only need to create it as a project in Designer via . Use the Wizard to create a Designer project linked to DWHExample project on your Server. Once done, your Project Explorer should look like this:
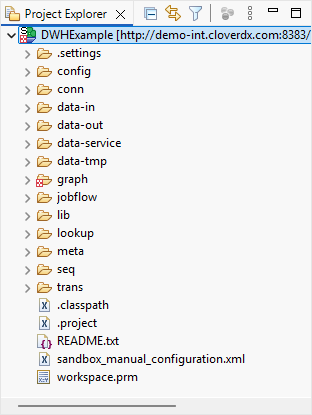
Figure 49. Project Explorer view right after creating the DWHExample project in Designer.
To learn more about projects in Designer see Projects chapter.
After the project has been created, you’ll see that your Assistant view has changed and will now list the DWHExample project. Click on the button to create a new assistant project.
Using Assistant for project discovery and research
As the first task in the quick start, let’s figure out more about what the DWHExample does. You can start with a prompt like this:
Explain the architecture of the DWH project - draw a diagram of the data flow for me.
You will get a result similar to this one:
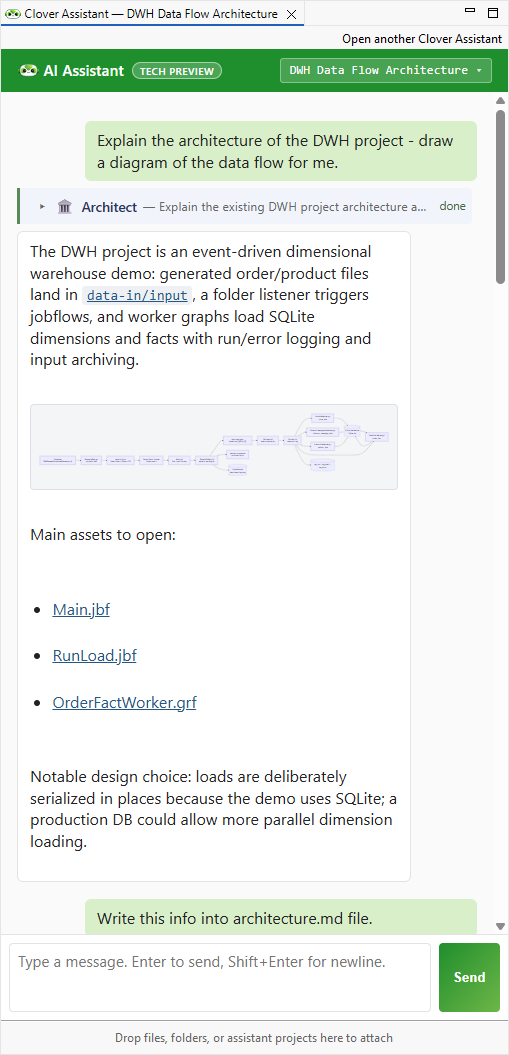
Figure 50. Assistant view showing results of the above prompt. Notice the diagram shown directly in the view.
|
Click on the diagram to focus on it. The diagram viewer will then allow you to zoom-in/out, move around the diagram etc. You can also make the Assistant view larger by either resizing it or maximizing it by clicking on the Maximize button in the top right corner of the Assistant view. |
As the Assistant is working on its task, you will see it call different agents – each agent has its own set of skills and is visualized in slightly different way so that you can see what was done at a glance. Learn more about different types of agents in Agent types section below.
You can then continue the discussion with the Assistant further – for example, ask the Assistant to save the output to a file:
Write this info into architecture.md file.
As you are discovering the project, the Assistant may ask you to verify some facts that it was not able to determine by itself. For example, you may see something like the following animation which shows the Assistant asking two questions and the user providing answers to both:
Figure 51. Assistant view showing questions and the user providing answers.
Questions are stored in DECISIONS.md file and each question gets a stable id like D001. You can answer these kinds of questions at any time or even ask follow-up questions of your own to help you when responding.
As the Assistant is working, you’ll see different agents generate their output. You can always review their output in detail by expanding section of each agent’s response:
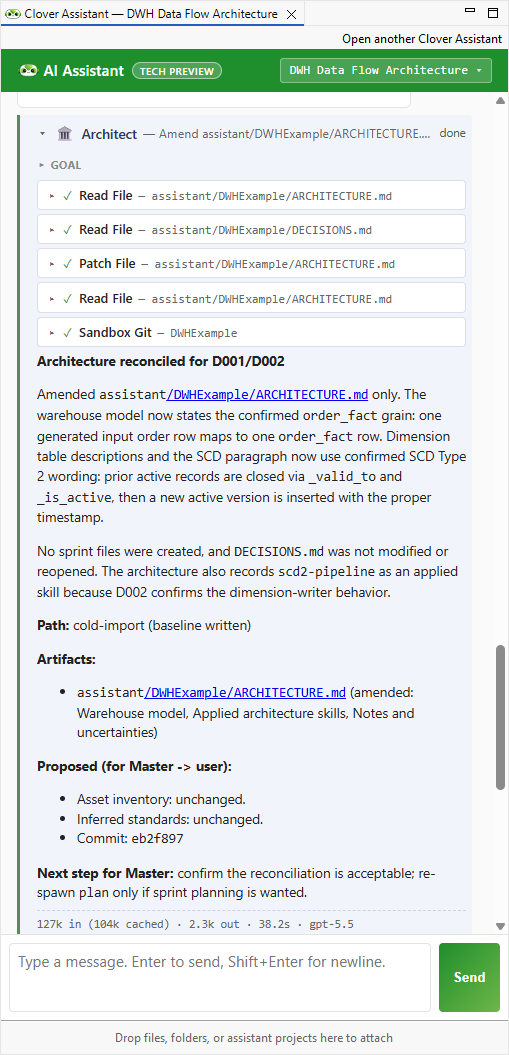
Figure 52. A full response from the Architect agent shows which tools the agent used and the response providing details of what it figured out. Links in the response are clickable and will open editors for given files.
In this example we did not modify any graphs or other jobs in the project – all changes were written to various MD files that serve as Assistant’s long-term memory.
Using Assistant to modify the project
Assistant can do much more than just figure out what the project is doing – it can help you design new solutions or modify the existing ones. As an example, let’s revisit the warehouse example. The Assistant in our discovery session responded that the warehouse uses SQLite database – this was done to make the example easy to use without any external dependencies on a database.
Let’s try to modify the project so that it uses more powerful database – PostgreSQL. To make this easier to follow, we’ll start a new session for this so that we do not mix project discovery with its changes. To create a new session, click on the session switcher drop down in the top right corner of the Assistant’s view:
Figure 53. Starting a new Assistant session.
To start our implementation, we’ll use the following prompt in the new session:
I'd like to update the warehouse to use PostgreSQL database instead of SQLite. Assume that the DWHConnection will be modified by hand to connect to PostgreSQL database instead of SQLite. Update the project to take advantage of PostgreSQL. Assume larger volumes of data will be loaded since Postgre can handle it better than SQLite.
The result of this prompt is more complex than the previous example with architecture discovery. In this case, the Architect planned multiple sprints to accomplish the migration to PostgreSQL. Each sprint represents a partial deliverable that has its own scope and acceptance criteria. During the development, Master agent will go over the sprints and will plan development tasks for each sprint dispatching Architect or other types of agents as needed. Sprints use numbering schema where each sprint has an identified S001.
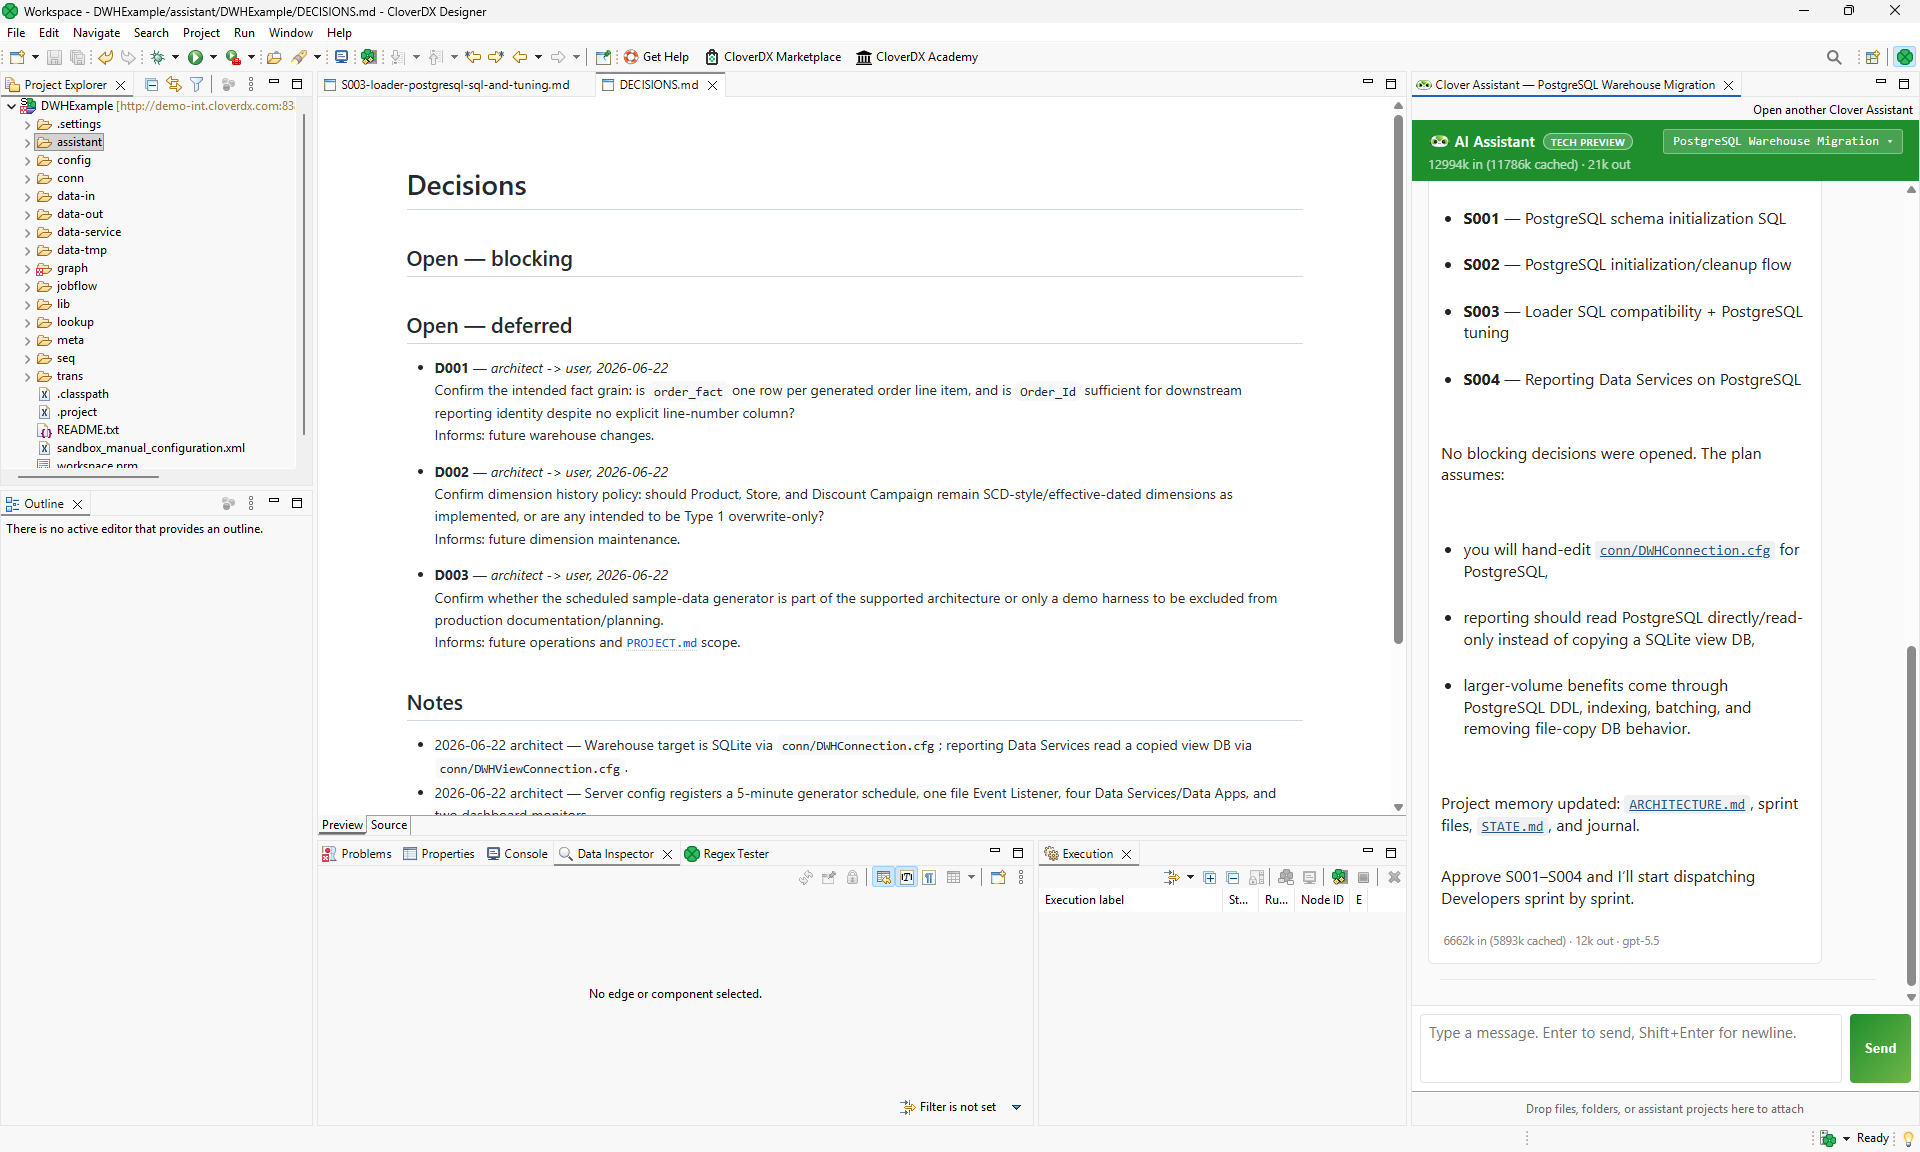
Figure 54. Assistant proposed four sprints to convert the warehouse to PostgreSQL. Also shown is the
Decisions.md file showing open questions. Although none of them are blockers, they should be responded to before implementation starts.Sprints are all stored in Markdown files in assistant/sprints folder in CloverDX project. You can see these files in Project Explorer:
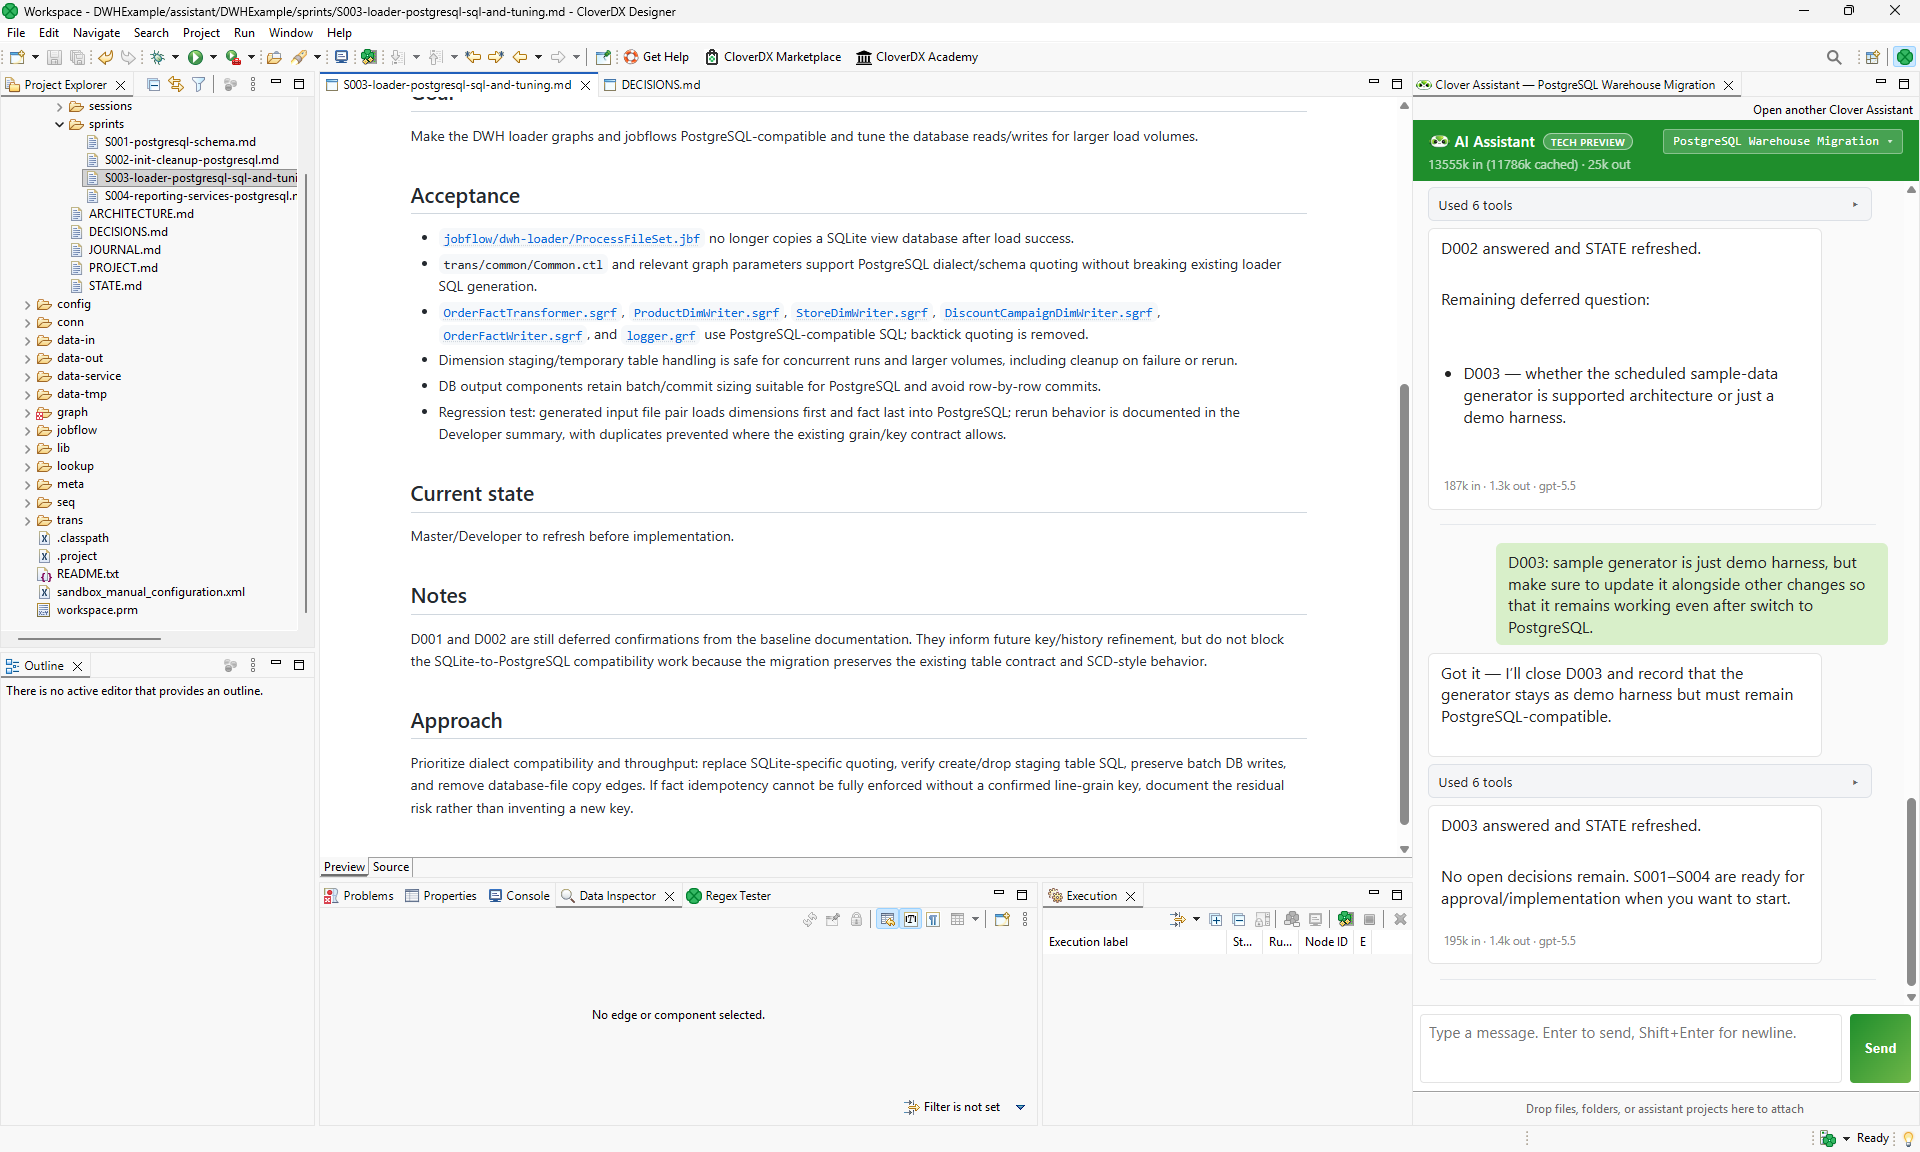
Figure 55. Markdown files representing sprints in Project Explorer with S003 specification shown in the main view.
To start the implementation, simply ask the Assistant to start:
Start with S001.
The Assistant will then call agents as needed to implement the requirements of the first sprint. Once done, it will produce a summary of what was done and will offer you the ability to review the output and continue with the next sprint.
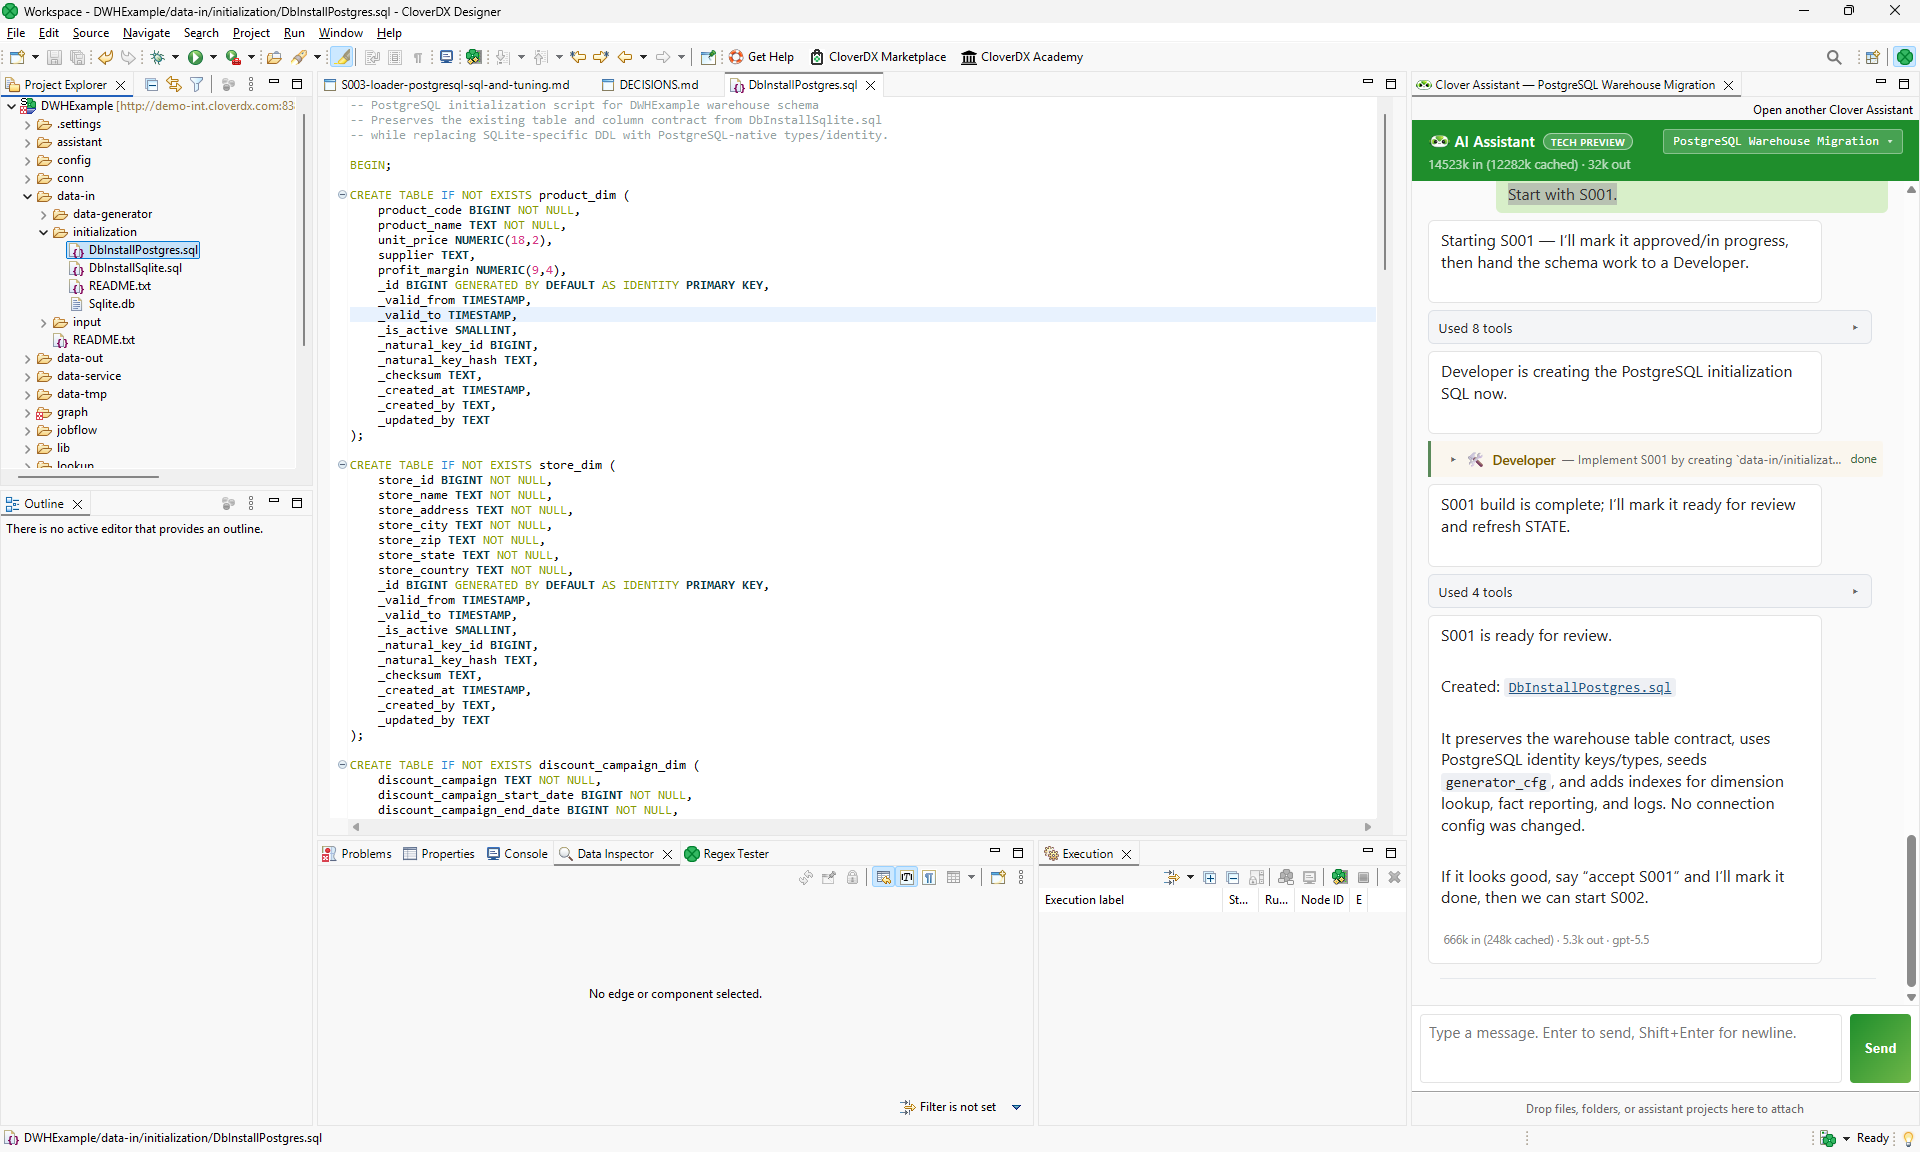
Figure 56. First sprint is finished and the Assistant offers the ability to review the results and continue with the next sprint.
As the implementation progresses, the Assistant will keep track of what was done in the files in the assistant project. It will update STATE.md after every implementation so you can easily see what was done. It will also update other files as needed – DECISIONS.md, ARCHITECTURE.md, and so on.
The Assistant may also ask you to validate various outputs or confirm its decisions. In those cases, it will stop and give you time to respond. It can even happen that some implementation steps fail:
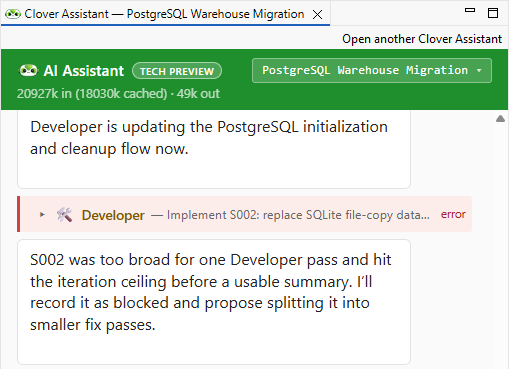
Figure 57. Developer was not able to handle the task as it was too big.
In case of failure like the above, the Assistant will automatically slice it into smaller chunks of work and will try again. It may ask you for confirmation or additional information to help it narrow down the scope of each change.
You can keep working with the Assistant in this kind of iterative way until all sprints are finished.
Agent types
The Assistant uses multiple different agents with each focusing on different tasks. Separating agents like this helps each of them stay focused on its goal and deliver its results faster and more precisely. Each agent is powered by a Large Language Model (LLM) and can also access knowledge base which helps it understand what it should be doing.
Each agent produces an output that can be reviewed by expanding the agent’s section in the Assistant view. Different types of agents are visualized with different colors in the Assistant view – this will allow you to quickly see what is going on and follow the work as it is being performed even without having to read everything that is shown in the view.
Currently, the Assistant uses six different agent types:
-
Master: this is the main agent you interact with when you are using CloverDX Assistant. It handles conversation, project memory updates, quick explanations, etc. Master delegates most of work to other agents as needed and then provides the summary of sub-agent responses back to you.
-
Architect is for design, planning, and documentation. It turns requirements into a CloverDX architecture, opens or records design decisions, proposes sprint-sized work packages, reviews existing assets against the design, and can reverse-engineer and document an existing sandbox. It does not build graphs or jobflows; it defines what should be built and why.
-
Developer is for implementation. It creates, edits, fixes, validates, and runs CloverDX assets such as graphs, jobflows, subgraphs, metadata, CTL transforms, Data Services, and Data Apps. If a graph needs even a tiny change, Developer owns it because it has the CloverDX authoring and validation workflow.
-
Data Inspector is for understanding input or output data files. It profiles CSV, Excel, delimited text, JSON-lines, and similar structured data, reporting columns, inferred types, sample rows, delimiters, encoding hints, row counts, nulls, data quality issues, or likely PII when requested. It is intentionally separate, so large data samples do not clutter the main conversation.
-
CTL Author is used behind the scenes by Developer to work with CTL2 code. It writes, reviews, or fixes CTL code in various places and ensures that the syntax is correct.
-
Troubleshooter is for read-only diagnosis when something fails or behaves unexpectedly. It examines run history, logs, tracking, edge debug data, server logs, scheduler/listener context, and performance indicators to identify the likely root cause. It recommends a fix but does not edit or rerun assets itself; if an asset change is needed, Master hands that diagnosis to Developer.
Different kind of Agents can run on top of different LLMs. Our basic recommendation is to use higher-end, frontier models for the Architect and previous generation/smaller models for other agents. The following table provide quick overview of our defaults (as of June 2026) – you are, of course, free to use other types of models if you’d like.
| Agent | OpenAI LLM | Anthropic LLM | Google LLM |
|---|---|---|---|
Master |
gpt-5.5 |
Opus 4.8 |
Gemini 3.1 Pro |
Architect |
gpt-5.5 |
Opus 4.8 |
Gemini 3.1 Pro |
Developer |
gpt-5.4 |
Sonnet 4.6 |
Gemini 3.5 Flash |
Data Inspector |
gpt-5.4 |
Sonnet 4.6 |
Gemini 3.5 Flash |
CTL Author |
gpt-5.4 |
Sonnet 4.6 |
Gemini 3.5 Flash |
Troubleshooter |
gpt-5.4 |
Sonnet 4.6 |
Gemini 3.5 Flash |
Assistant projects and sessions
The Assistant works with the concept of assistant projects. Each assistant project represents a self-contained piece of work – whole data pipeline or even smaller changes like a report update. The Assistant maintains a durable memory for each project – the goal, scope, key decisions, architecture, and a journal of work done.
Each assistant project belongs to a CloverDX project in your Designer workspace. CloverDX projects are in turn linked to sandboxes on a Server. While this may seem complicated, it is relatively simple since all artefacts are represented as files. You can then think of a CloverDX project as a directory on your computer, the sandbox is then a directory on your CloverDX Server and these directories are automatically synced by CloverDX Designer.
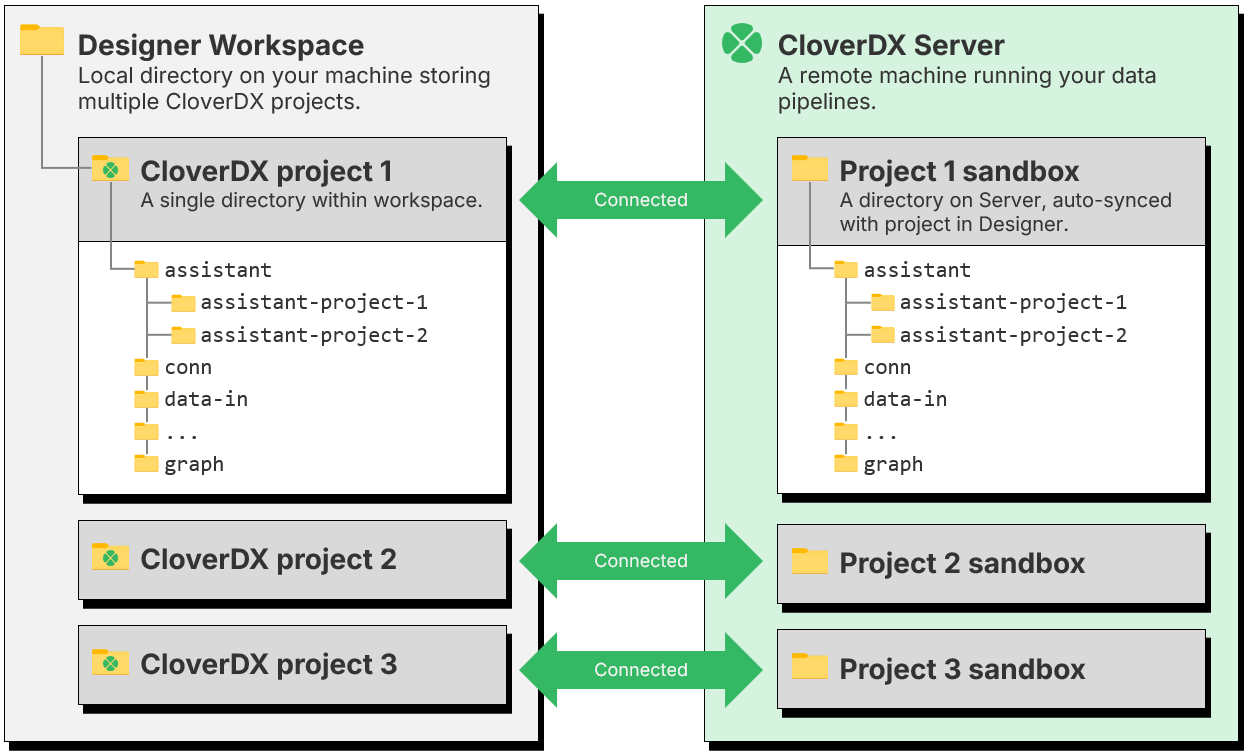
Figure 58. Relationships between projects in Designer, assistant projects and sandboxes on Server.
Assistant projects have additional structure inside – various files and directories can help you and the Assistant understand what the project is about, what was done and more. You do not have to maintain these files – the Assistant will do that for you.
When you create a new assistant project, the Assistant will create all markdown files in assistant/<project_name> folder and keep them up to date as you work. The files in the assistant project are the long-term memory the Assistant keeps.
At the same time, the Assistant maintains a server-side git repository which keeps track of all changes that it is making. This includes assets the Assistant is working on (graphs, metadata files, etc.) as well as memory files in the assistant project. This allows the Assistant to go back in history to review past decisions or even return to a previous state if needed. These git repositories are kept in .git-assistant folders in your sandbox.
The Assistant uses sessions to help you distinguish between different streams of work within a project. Sessions are separate from each other and the Assistant does not see chat history from one session when working on another. This can help you keep multiple implementations separate without having to worry about mixing them up or confusing the agent by having too many things in one chat.
You can manage projects and sessions through the AI Assistant view. New projects can be created in sandboxes by clicking on the plus symbol next to each sandbox name in the view. Clicking on an existing project will open it and load the latest sessions from the project into the Assistant view.
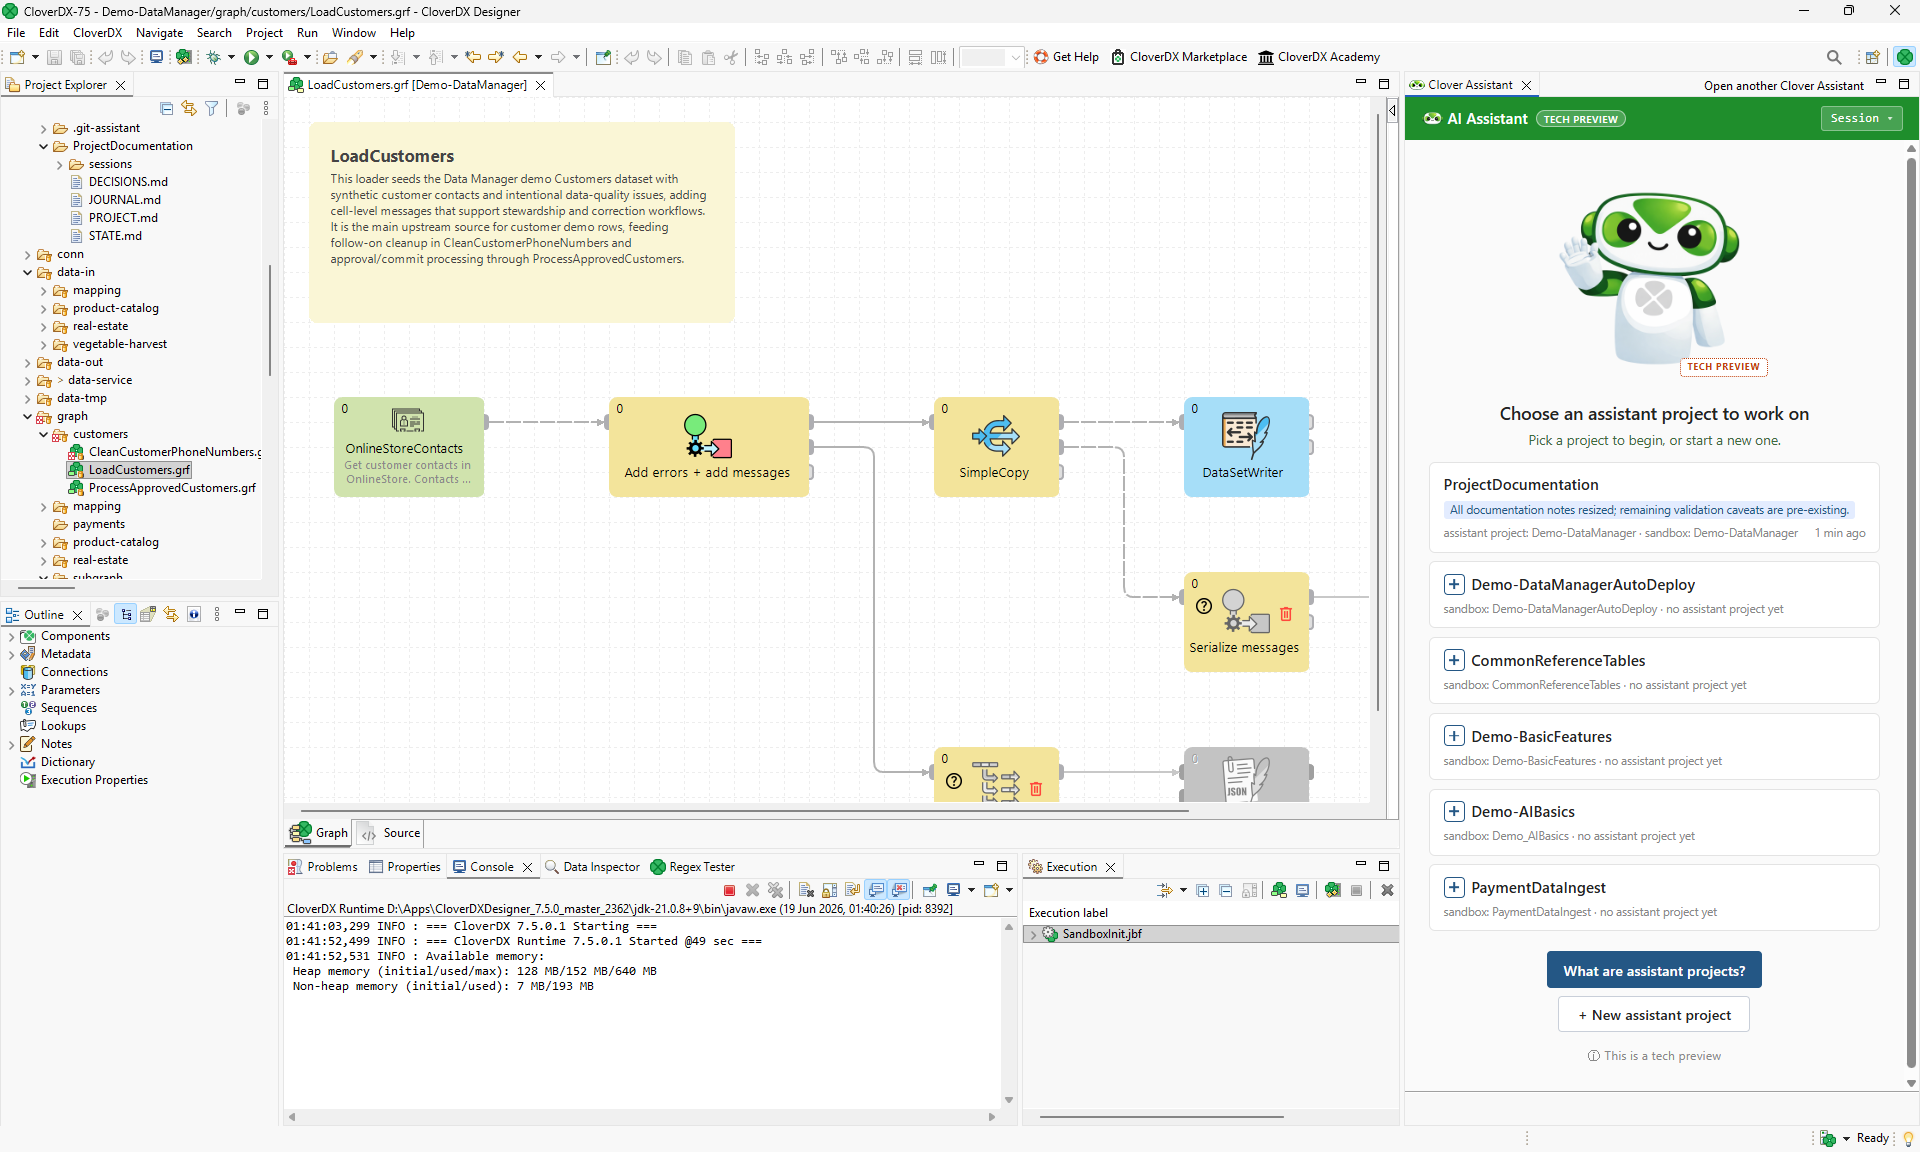
Figure 59. Assistant view showing an existing assistant project ProjectDocumentation in Demo-DataManager project and five other sandboxes which do not have any assistant projects yet.
The projects and sessions can also be managed via switcher accessible by clicking on a dropdown button in top right corner of the Assistant view:
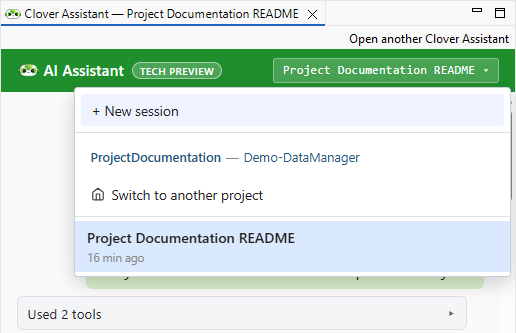
Figure 60. Managing sessions or projects via menu in the Assistant view.
The standard layout of the assistant project is the following:
-
Directory
sessions: stores per-session chat transcripts. You do not need to work with these files directly - the Assistant nicely renders their content in the Assistant panel in Designer. -
Directory
sprints: specification documents for each sprint. The Assistant uses sprints to partition large and complex work into manageable pieces and usessprintsdirectory to keep track of the scope of each sprint. The files in this folder are created automatically and managed as needed by the Assistant. Note that this folder may not be created at all for simple assistant projects. -
ARCHITECTURE.md: design document for the assistant project – provides overview of the project’s purpose, its sources and targets, business logics, etc. -
DECISIONS.md: open/answered decisions with each decision having a stable id (like "D001") so that it can be referred to later if needed. -
JOURNAL.md: a simple append-only event log, every change the Assistant makes is noted here. -
PROJECT.md: basic information about the assistant project – its goals, scope, enforced standards, and more. -
STATE.md: a markdown file which describes the current state of the project – active sprints, open questions, etc.
All these files can be quite useful to review – especially if you are coming back to a project after a while or if you need to collaborate on a project with someone else.
Assistant’s knowledge base - CloverDXMCPKnowledge
CloverDX Assistant uses a special library called CloverDXMCPKnowledge which provides knowledge base to the Assistant. This knowledge base contains information about components, design patterns, various skills and more to help the Assistant create and debug CloverDX jobs.

Figure 61. Libraries module showing the CloverDXMCPKnowledge installed on the Server.
The library is installed automatically for you as soon as you install CloverDX 7.5 or newer – regardless of whether it is an update of an existing instance or a clean deployment. Each build of CloverDX Server carries with it its own version of the library which will be automatically deployed to your instance during installation.
You can have more than version of the library installed – the Assistant will simply use the latest version (the one with the highest version number).