Version
CloverDX MCP Server
What is MCP?
MCP (Model Context Protocol) is an emerging standard that enables AI agents to interact with external services and data sources. It provides a standardized way for AI models to access tools, resources, and context from various applications, allowing them to perform tasks beyond their base capabilities.
CloverDX provides MCP out of the box starting with CloverDX 7.3.0 and also allows exposing MCP on older instances (version 6.0 to 7.2) via CloverDX MCP proxy. The ability to expose older versions of CloverDX as MCP servers via MCP proxy is especially useful for production instances where the upgrades to newer versions may not be that simple while MCP proxy only requires minimal configuration. This allows you to take advantage of the MCP integration for all Server instances newer than CloverDX 6.0 which was released in April 2023.
|
In CloverDX 7.5.0 we’ve significantly expanded the scope of the MCP Server by adding more than 40 new tools. Given this capability expansion, we are releasing the MCP APIs in CloverDX 7.5.0 as a technology preview. MCP Server and its tools are under active development. Tools may change in future releases, sometimes in incompatible ways, even be completely removed. Use the MCP in dev/test environments only, not in production. Treat it as a tool for evaluation and non-critical work, and review everything it produces before relying on it. Use it with caution since it is possible to edit files, run jobs or even read data flowing through them via MCP. Gathering feedback on how teams use the MPC Server in CloverDX is one of the goals of this technology preview. Contact your Account representative if you wish to provide feedback that could help us improve future versions of the MCP Server. |
CloverDX MCP Server exposes a comprehensive set of tools that enable AI agents to fully interact with CloverDX:
-
Sandbox Management: browse, read, write, and organize files within CloverDX sandboxes.
-
Job Execution: run graphs and jobflows, wait for results, monitor status, and abort running jobs.
-
Graph Editing: create and modify CloverDX graphs and jobflows using structured XML operations.
-
Server Diagnostics: access server logs, performance metrics, and internal system database.
-
Component Reference: discover and configure CloverDX component types.
-
Knowledge Base: access the CloverDX knowledge library and manage project-scoped knowledge entries.
-
External Databases: query and inspect databases accessible via JDBC.
-
Support: report issues directly to the CloverDX Support Portal.
For the complete list of available tools, see MCP Tools Reference.
This allows AI agents to help with common development and maintenance tasks such as:
-
Building and editing CloverDX integration graphs and jobflows
-
Troubleshooting failed jobs by analyzing logs and tracking data
-
Monitoring server health and performance metrics
-
Automating routine administrative queries
-
Generating reports on job execution patterns
Setting up MCP on CloverDX Server
When setting up MCP, you will need to enable it on CloverDX Server and then also in your AI client. The following sections provide quick instructions to guide you through the configuration process.
Configuration of CloverDX MCP Server depends on the version of CloverDX you are working with. If you would like to expose CloverDX 7.3 or newer via MCP, you can use built-in functionality - see Configuration for CloverDX 7.3 and Newer section below for more details. For older CloverDX version you will have to set-up additional proxy instance of CloverDX Server with special free license to provide the MCP-compatible API. Follow the instructions in Configuration for CloverDX 6.0 to 7.2 below for more details.
To configure the client, please follow the instructions in Client Setup section.
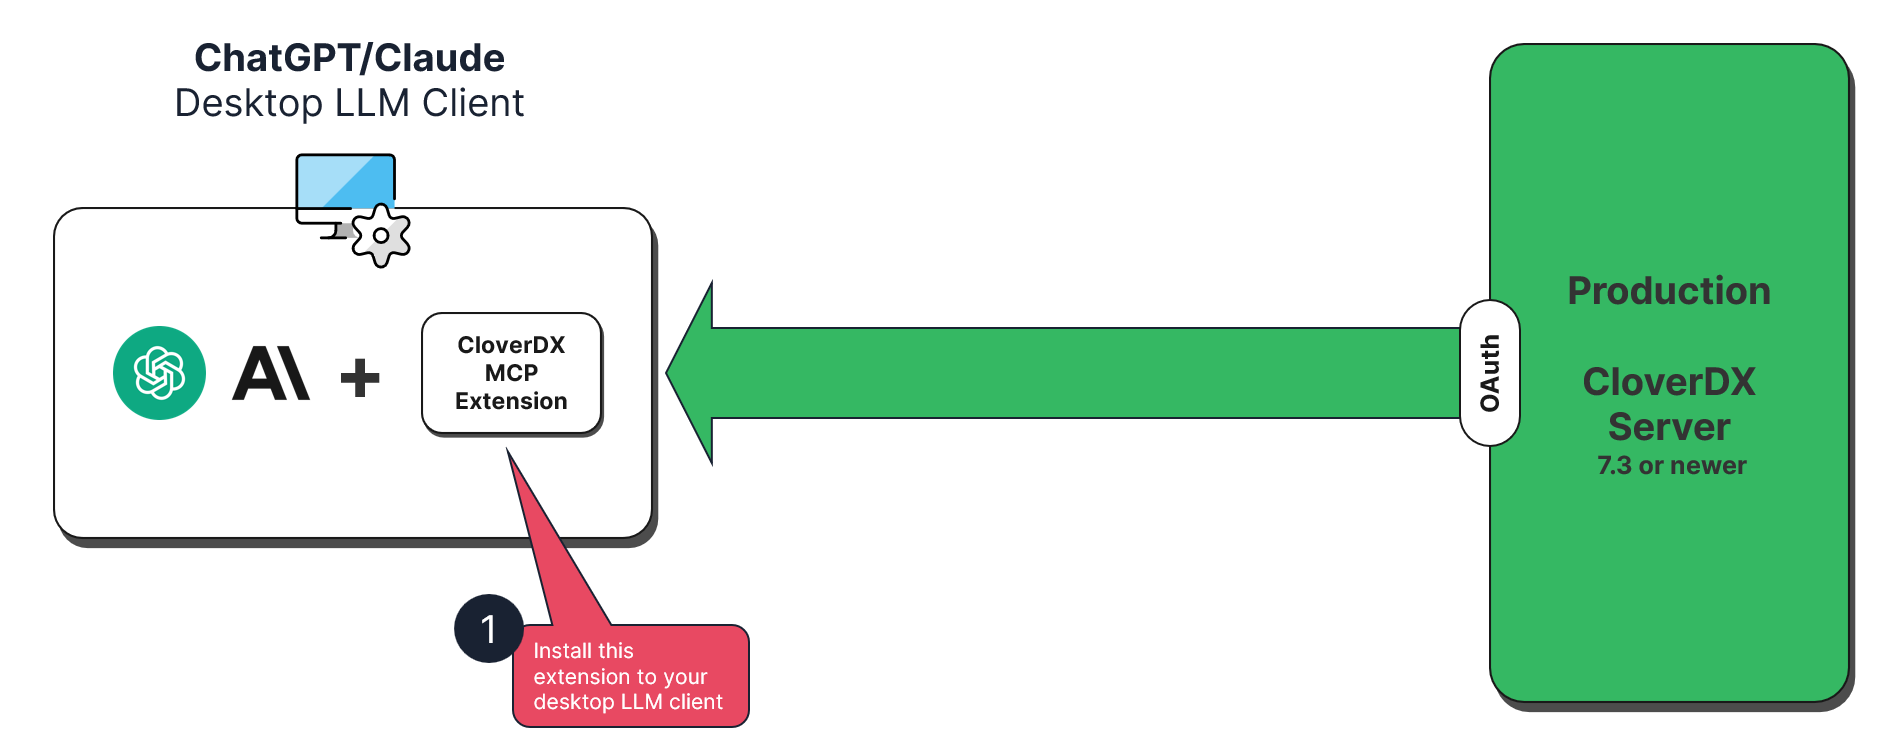
Configuration for CloverDX 7.3 and Newer
CloverDX 7.3 and newer expose MCP-compatible APIs out of the box and only require minimal configuration to enable it. The following diagram provides overview of the architecture.
The configuration for CloverDX 7.3 has two parts - you need to enable the MCP Server and then configure access to it. To enable the MCP Server, set value of clover.mcp.enabled configuration property to true. Since this needs to be done in CloverDX configuration file, it will require Server restart.
The access can be configured in two different ways:
-
Access with OAuth2 authentication: fully secured access which requires setting up OAuth2 user authentication on CloverDX Server. This is suitable for production deployments where security is important.
-
Anonymous access: simpler set-up that does not provide any account security and is therefore not suitable for production deployments. This is most useful in development or test environments where there is no risk of exposing production data or secrets.
Authentication with OAuth2 (Default & Recommended)
By default, MCP requires OAuth2 authentication between the client application (the AI client) and CloverDX Server.
Prerequisites:
-
OAuth2 must be configured in CloverDX Server (Configuration → Setup → OAuth2 Authentication).
-
User account used for MCP must have OAuth2 authentication enabled.
-
MCP user account must have sufficient permissions to access data exposed via MCP. By default, it is enough for the user to belong to All users group. Note that for installation you will need administrator permissions, however, the administrator should not be the same user as the one used for actual MCP communication.
Configuration:
-
Enable MCP by setting
clover.mcp.enabledtotrue. -
Configure OAuth2 in CloverDX Server, see OAuth2 Authentication for more details.
-
Configure your client application with valid OAuth2 Bearer token.
Once this is done, please follow with the Client Setup.
Anonymous Access (Testing Only)
For testing or development environments, you can enable anonymous access to bypass authentication. This is much simpler to configure but does not provide any security and anyone will be able to access your CloverDX Server via MCP.
Anonymous access requires clover user on the Server to be enabled.
|
Anonymous access must only be used in secure, non-production environments. When anonymous access is enabled, anyone can connect to your CloverDX Server via MCP without any authentication. |
Configuration:
Configure the following in CloverDX configuration file:
-
Enable MCP by setting
clover.mcp.enabledtotrue. -
Enable anonymous access by setting
clover.mcp.anonymous.access.enabledtotrue
Given the above, the complete set-up for anonymous access looks like this:
# Enable MCP functionality.
clover.mcp.enabled = true

# Enable anonymous access.
clover.mcp.anonymous.access.enabled = true
Once this is done, please follow with the Client Setup.
Configuration for CloverDX 6.0 to 7.2
Versions of CloverDX older than CloverDX 7.3 do not have built-in support for MCP. However, for versions 6.0 to 7.2 you can still take advantage of MCP by configuring CloverDX MCP proxy. This will allow you to use MCP for example on production instances where the upgrade process may be lengthy since the proxy requires minimal configuration.
To configure the proxy, you will need to deploy additional instance of CloverDX Server 7.3 which will serve as the proxy server. This instance can be very small (it will never run any jobs) and will use a special free MCP-only license (i.e., you do not have to get additional DXUs to for this instance). In the end you will be running two CloverDX Servers:
-
Target (legacy) server: this is the server you wish to work with - for example your production instance. This can be any CloverDX version starting with CloverDX 6.0.x up to CloverDX 7.2.x.
-
MCP proxy server: this is a small instance of CloverDX Server that only translates API requests between MCP client and the target CloverDX Server. This instance does not require any significant resources (you can even run it on your machine) and will use free MCP-only license and therefore does not incur any additional licensing cost. It can also be configured with just Derby backend database since it will never be running any jobs and will not require any clustering functionality. This further reduces the footprint of the proxy instance.
The following diagram provides overview of this architecture:
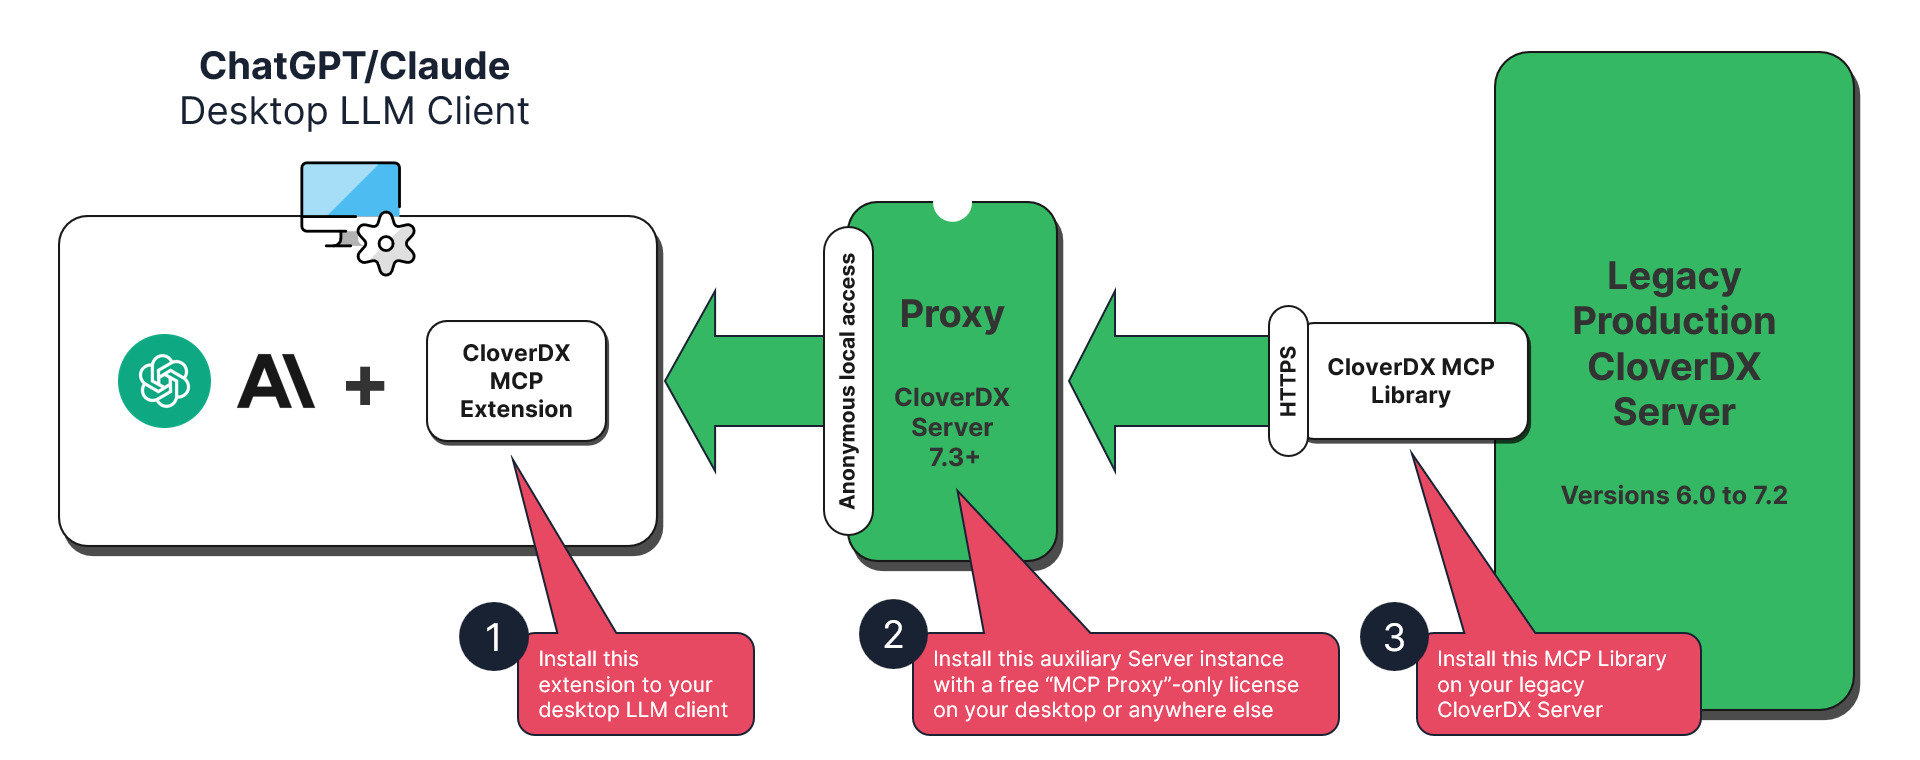
Step 1: Configure the Proxy Server (7.3+)
The proxy server needs standard MCP configuration plus remote connection settings.
-
Enable MCP on the proxy setting
clover.mcp.enabledtotrue. -
For the proxy instance (especially if you set it up on your machine), you can use anonymous access to simplify the configuration. Enable it by setting
clover.mcp.anonymous.access.enabledtotrue. However, OAuth2 is available as well for greater security. -
Enable the "remote MCP" by setting
clover.mcp.remote.enabledtotrue`. -
Configure access to your target server. This requires three properties in your CloverDX configuration file:
clover.mcp.remote.url,clover.mcp.remote.userandclover.mcp.remote.password.
Complete configuration when using anonymous access may look like this:
# Enable MCP functionality.
clover.mcp.enabled = true

# Enable anonymous access.
clover.mcp.anonymous.access.enabled = true

# Turn this Server into MCP proxy by enabling remote MCP.
clover.mcp.remote.enabled = true

# URL of the remote MCP server (your 6.0 to 7.2 target server).
clover.mcp.remote.url = https://your-target-server.example.com/clover

# Username for authentication to the remote MCP server.
clover.mcp.remote.user = mcp-bridge-user

# Password for authentication to the remote MCP server.
clover.mcp.remote.password = your-secure-password
If you want to use OAuth2 when using proxy, you must configure OAuth2 on the proxy server (clients connect to proxy, not to the older target server, so the target does not need OAuth2). To do this, enable and configure OAuth2 on the proxy server. You must also configure a user with sufficient permissions with OAuth2 (this is the same as the non-proxy setup as described above). When using OAuth2, also make sure you set clover.mcp.anonymous.access.enabled = false in the configuration file.
|
For best security and control, create a dedicated user account on the target Server. In the configuration example above, this is the Additionally, we also recommend encrypting access credentials to this user by using CloverDX secure-cfg-tool. |
Step 2: Configure the Target Server (6.0 to 7.2)
The target server needs the CloverDX MCP Bridge Library installed and initialized. This library exposes the API needed by the MCP proxy server.
-
Log in to your target server as administrator.
-
Open the Libraries module, click on Install library from repository and select CloverDX Marketplace from the Repository drop-down.
-
Find the latest version of CloverDXMCPBridgeLib and install it (use the default name for installation).
-
Wait for the installation to complete.
-
Once the library is installed, it needs to be configured and initialized. Follow the installation instructions for the library in CloverDX Marketplace (these instructions may differ depending on the library version).
Once the library is installed and configured, you will be able to connect your client to the target server via MCP proxy.
Client Setup
This section describes how to connect AI applications to your CloverDX Server using MCP. Currently supported clients include Claude Desktop and ChatGPT web applications.
|
Authentication Requirements:
|
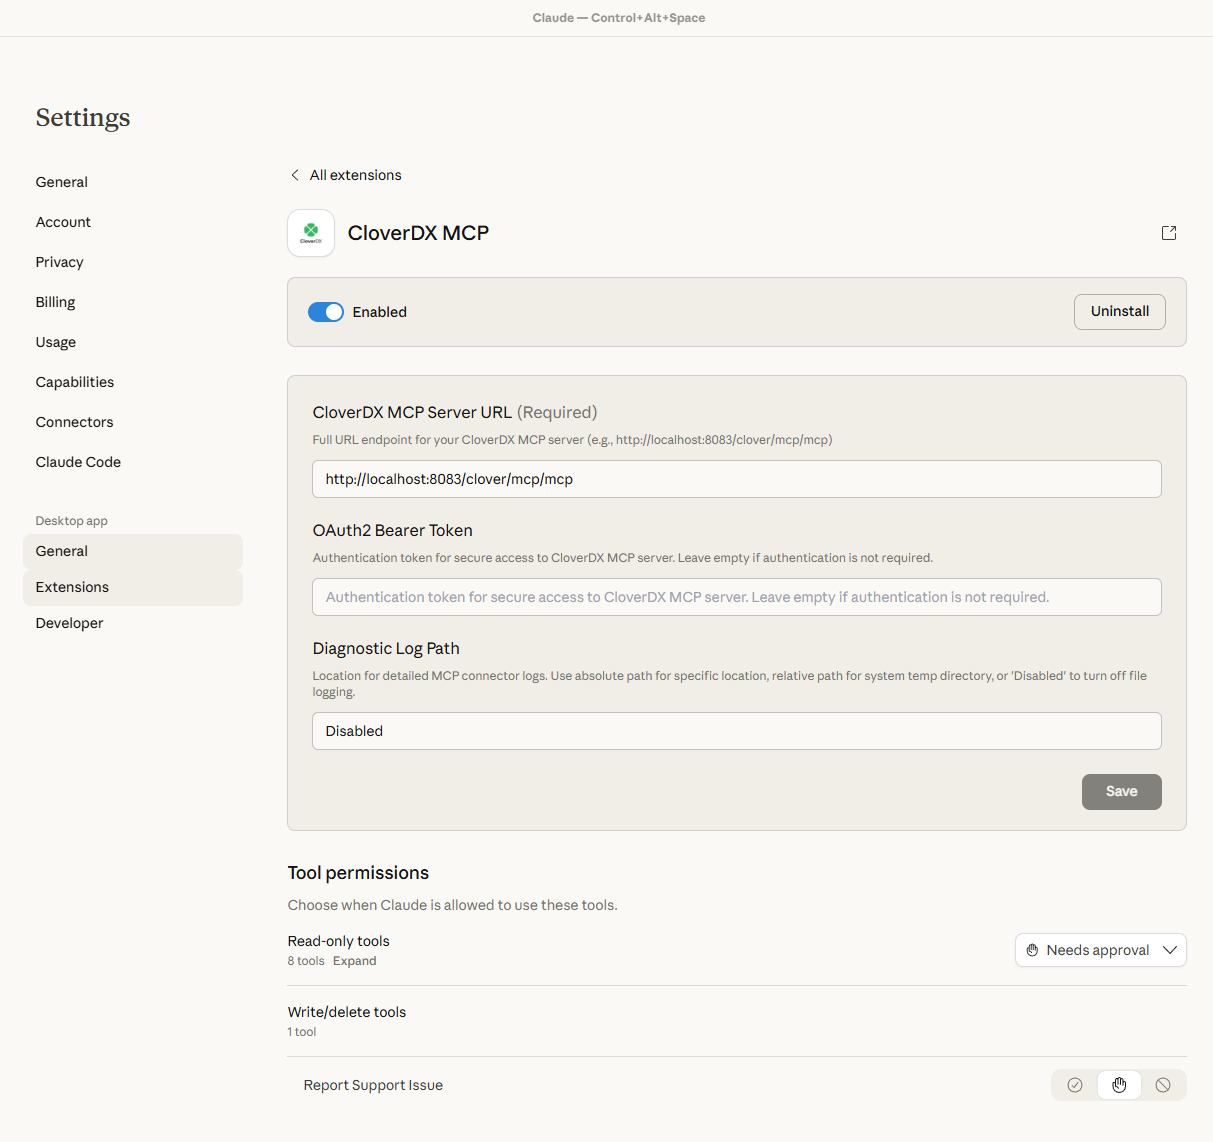
Claude Desktop Application
To use CloverDX MCP Server with Claude, you will need:
-
Claude desktop app installed - https://www.claude.com/download.
-
CloverDX MCP Extension file (
CloverDX-MCP.mcpb) you can download from Customer Portal → Downloads page.
To correctly the Claude client to use CloverDX Server MCP, follow these steps:
-
Open the Claude desktop app
-
Navigate to Settings → Extensions
-
Install the CloverDX MCP Extension
-
If you already have some extensions installed, you can drag the
CloverDX-MCP.mcpbfile into the Extensions area. -
If you do not have any extensions yet, click on Advanced Settings, then scroll down Extension Developer and click on the Install Extension button. Now you can navigate to the
CloverDX-MCP.mcpbfile and click Install.
-
-
Fill in the following configuration fields:
-
CloverDX MCP Server URL: this is the URL of your CloverDX Server. Write as
https://your-server.example.com:port/clover/mcp/mcp- make sure to include the/clover/mcp/mcpsuffix since that is the complete lociiton of the MCP API. -
OAuth2 Bearer Token: this is only required with you use OAuth2 authentication on your CloverDX Server. Leave empty if using anonymous access.
-
Diagnostic Log Path: optional location for log files that can be useful for troubleshooting and debugging. You can leave this empty.
-
-
Click Save.
-
Toggle the extension switch to Enabled.
Usage
-
Start a new chat in the Claude desktop app
-
You can choose which MCP prompt to use from the available options, or leave it unselected.
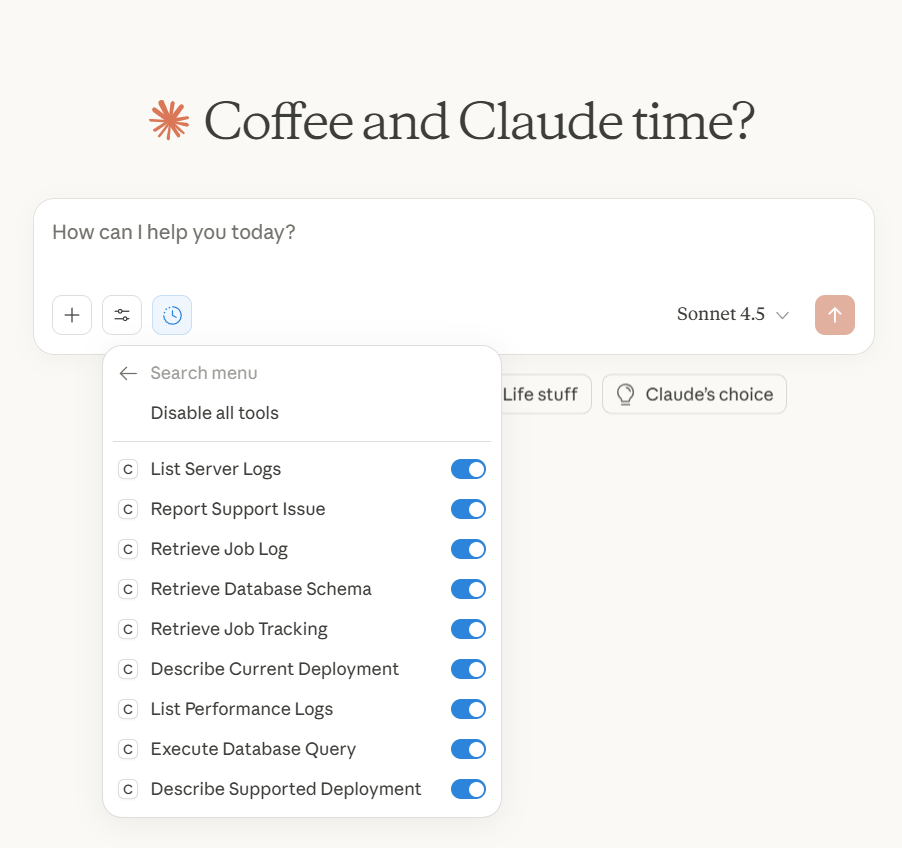
Figure 138. CloverDX MCP tools available in Claude client.
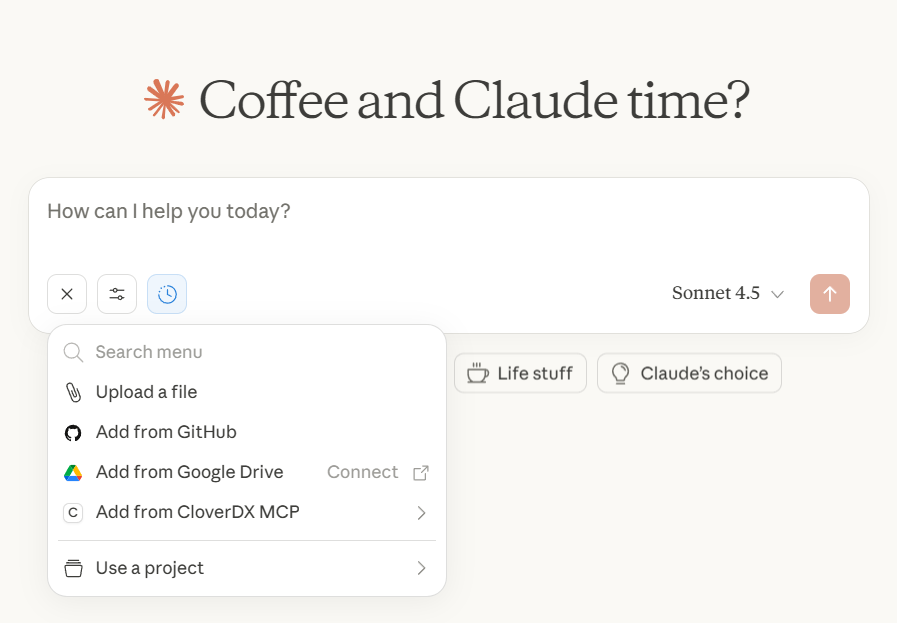
Figure 139. Add from CloverDX MCP menu provides access to example prompts provided by CloverDX MCP extension.
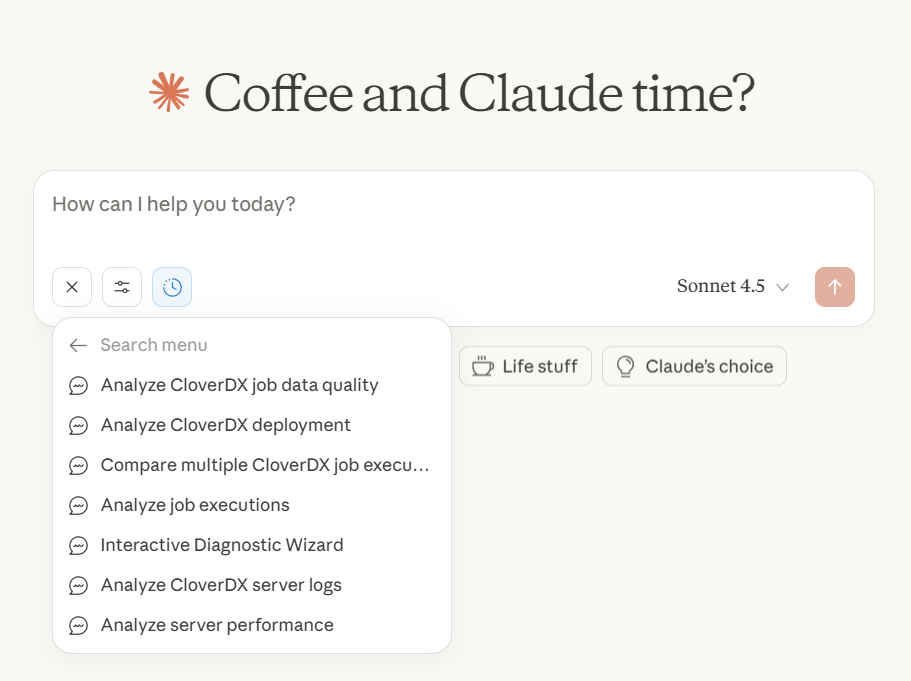
Figure 140. Example prompts provided by CloverDX MCP extension in Claude client.
ChatGPT web Application
To use CloverDX MCP Server from OpenAI ChatGPT client (https://chatgpt.com/), you will need the following:
-
ChatGPT subscription: a premium ChatGPT plan (Plus or above) is required since connectors are not supported in the Free and Go subscriptions plans.
-
Authentication requirements: OAuth2 is supported with 'authorization code' type grant. (
Use PKCE) option must be enabled in the CloverDX Server OAuth2 Authentication configuration. -
CloverDX Server must use the HTTPS protocol, HTTP-only is not supported by OpenAI/ChatGPT.
For local test environments, you can use a tunneling application such as ngrok (https://ngrok.com/) to expose your local HTTP server via HTTPS.
To configure the ChatGPT client, follow these steps:
-
Click on your profile name in the ChatGPT web app
-
Select Settings → Apps
-
Scroll down to Advanced settings and expand it
-
Enable Developer mode
-
Click the Back button to return to the Apps view
-
Click the Create app button next to Advanced settings
-
Fill in the connector configuration:
-
Name:
CloverDX Server(or any descriptive name) -
MCP Server URL: Your CloverDX MCP endpoint
-
Authentication: Select "OAuth" option if you want to use OAuth2 Authentication
-
Select "Advanced OAuth settings"
-
Fill in 'OAuth2 Client ID' with some short text
-
Copy 'Callback URL' and add it to your OAuth2 provider application configuration
-
-
-
Click Create
MCP tools permissions
By default, all MCP tools are available to authenticated users. You can restrict which tools are exposed using the following configuration properties in the CloverDX configuration file.
Read-only mode (clover.mcp.read.only): when set to true, write tools are blocked and only read-only tools are exposed to AI agents. This is the simplest way to limit AI agent access and is suitable for production environments where you want to allow monitoring and diagnostics without permitting write operations. Individual tool overrides take priority over this setting.
# Block all write tools. Only read-only tools are exposed.
clover.mcp.read.only = true
Individual tool control: for fine-grained control, you can enable or disable specific tools by name regardless of the read-only mode setting:
# Comma-separated list of tool names to enable regardless of other settings.
clover.mcp.tools.individual.enabled = sandbox_write_file,job_run

# Comma-separated list of tool names to always disable.
clover.mcp.tools.individual.disabled = db_execute_query,sandbox_delete_file
Tool names used in these properties must match exactly the names in the MCP Tools Reference table.
A Server restart is required for permission changes to take effect.