Version
13. Working with CloverDX Server projects
With CloverDX Designer and CloverDX Server fully integrated, you can access Server sandboxes directly from the Designer without having to copy them back and forth manually.
Designer takes care of all the data transfers for you - you can directly edit graphs, run them on the Server, edit data files, metadata, etc. You can even view live tracking of a graph execution as it runs on the Server.
|
Remember that the version of CloverDX Designer and CloverDX Server must match. |
You can connect to your CloverDX Server by creating a CloverDX Server Project in CloverDX Designer. For detailed information, see CloverDX Server Project.
To learn how you can interchange graphs, metadata, etc. between a CloverDX Server sandbox and a standard CloverDX project, see the following links:
CloverDX server project basic principles
-
A sandbox must exist on CloverDX Server. If a sandbox does not exist, you can create it from CloverDX Designer. See CloverDX Server Project.
-
For each CloverDX Server sandbox, only one CloverDX Server project can be created within the same workspace. If you want to create more than one CloverDX Server projects for a single CloverDX Server sandbox, each of these projects must be in different workspace.
-
In one workspace, you can have more CloverDX Server projects created using your Designer.
Each of these CloverDX Server projects can even be linked to different CloverDX Server.
-
CloverDX Designer uses HTTP/HTTPS protocols to connect to CloverDX Server. These protocols work well with complex network setups and firewalls. Remember that each connection to any CloverDX Server is saved in your workspace. For this reason, you can use only one protocol in one workspace. You have your login name, password and some specified user rights and/or keys.
In case the Server login credentials were changed while connected to a Server project, Designer throws an exception. In such a case, convert the project to local and then to Server again and provide correct login credentials.
-
Remember that if multiple users are accessing the same sandbox (via Designer), they must cooperate to not overwrite their changes made to the same resources (e.g. graphs). If anyone changes the graph or any other resource on CloverDX Server, the other users may overwrite such resources on Server. However, a warning is displayed and each user must decide whether they really want to overwrite such resource on CloverDX Server. The remote resources are not locked and the user must decide what should be done in the case of such a conflict.
Connecting via HTTP
With the HTTP connection, you do not need to configure CloverDX Designer. Simply start the CloverDX Designer and you can create your CloverDX Server projects using the default connection to Server: http://localhost:8080/clover where both login name and password are clover (note that the URL depends on the chosen application server).
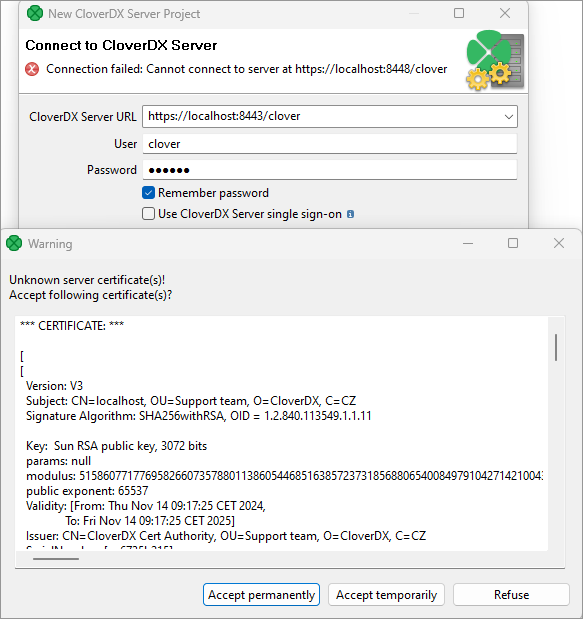
Connecting via HTTPS
When connecting to a server URL over HTTPS, you will be prompted to choose how to proceed: accept the server certificate permanently, accept it temporarily, or reject it.
If you choose to accept the certificate permanently, a truststore (permanentTrustStore.jks) is created within the .eclipse directory. The location of this directory depends on the operating system:
-
Windows:
C:\Users\<username>\.eclipse -
Linux and macOS:
~/.eclipse
The exact location of the truststore file within the .eclipse directory may vary depending on the Eclipse version. Use the search feature to locate the permanentTrustStore.jks file within the directory.
Connecting via proxy server
You can make use of your proxy server to connect to CloverDX Server, too.
|
The proxy server has to support HTTP 1.1. Otherwise all connection attempts will fail. |
To manage the connection, navigate to
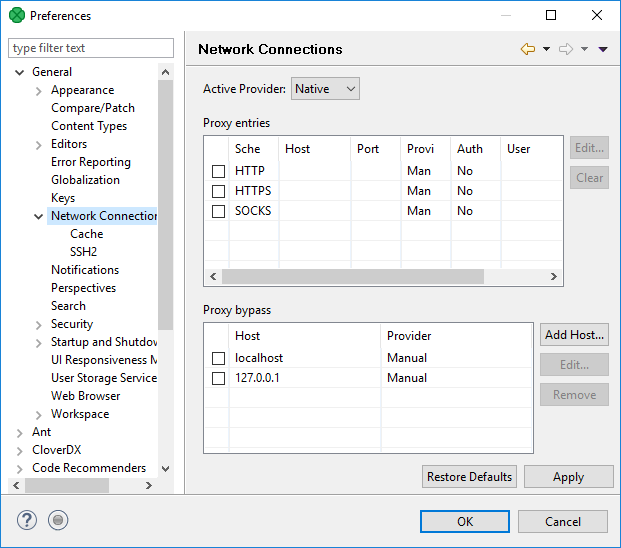
Figure 129. Network connections window
For more information on handling proxy settings, go to the Eclipse website.
Working offline
CloverDX Server handles short network outage. You can work with graphs or move files even if you temporarily cannot connect. When Designer reconnects to the Server, the changes are synchronized.
When you are working offline, you cannot run graphs, view new debug data in Data Inspector or extract metadata from databases.
When connection fails, the Server notifies you with a message. The message appears in the right bottom corner. Furthermore, the project name color changes to red.

Figure 130. Connection failed
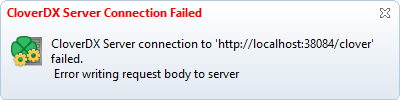
Figure 131. Connection failed
When Designer reconnects to the server, you are informed with a message again. The project name color changes back to black.

Figure 132. Connection reestablished
Handling conflicts
If more users edit the same file, a conflict occurs. In such a case, the Designer informs the user and the user should resolve it.
Conflicts are rare and you can avoid them with a suitable workflow: it is not a good idea for more users to work within the same sandbox at the same time, unless they communicate well with each other to avoid conflicts and unintentional overwriting of files.
When a conflict is detected new files appear.
The file names are derived from the conflicted file name, timestamp and conflict-denoting suffix.
For example, a conflict in MyFile.grf creates MyFile_2016-02-25_13_45_56_conflict_local.grf and MyFile_2016-02-25_13_45_56_conflict_remote.grf.
You should resolve conflict yourself. You are asked to choose one of the options: Open in compare editorResolve the conflict using the local file, or Resolve the conflict using remote file.
Placeholder files
Placeholder file is a dummy file in Designer. A file exceeding a user-defined size limit becomes a placeholder file. The placeholder file can be viewed in Project Explorer, but it cannot be modified within Eclipse. The file content only exists on CloverDX Server. When you open the placeholder file, you can view the several lines from the file in a special editor.
Placeholder file saves disk space - you download files up to specified size. The files exceeding the limit are displayed in Project Explorer as placeholder files: you see that the file exists, but its content is only on the Server. You can download the content of placeholder file from CloverDX Server explicitly. The file size limit can be changed in CloverDX Server integration.
As you copy, move, rename, or delete the placeholder file, the corresponding file on CloverDX Server is copied, moved, renamed, or deleted.

Figure 133. Placeholder file
|
Placeholder vs. placeholder file
We use two similar terms in our documentation: placeholders and placeholder files. Placeholder is a replaceable part of a text - variable. It is used within configuration, mostly in the CloverDX Server documentation. Placeholder file is a mock-up of a data file. You can view the placeholder file in Project Explorer in Designer, but the file content is only on the Server. |
Project configuration
Project configuration allows you to configure properties on per-project basis: connection to CloverDX Server and files that should not be synchronized.
The per project configuration can be changed from the main menu under item.
CloverDX connection information
This window displays the configuration of connection of the current CloverDX project: you can view the CloverDX Server URL, user, and sandbox.
This window serves to inform you about the project configuration.
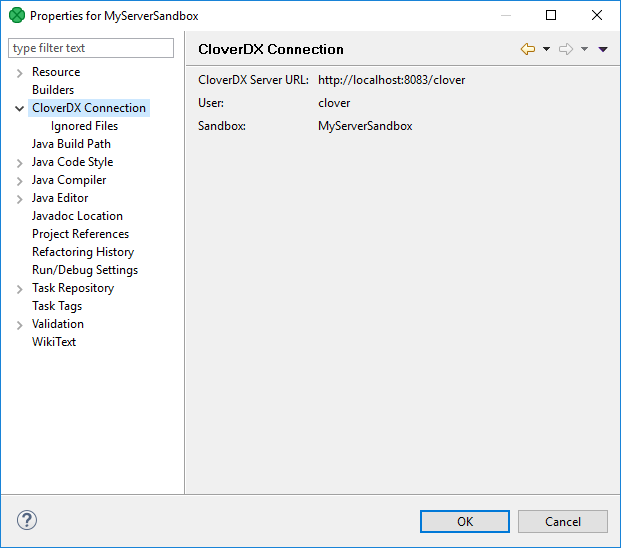
Figure 134. CloverDX connection
Ignored files
Ignored files allows you to avoid synchronization of particular files.
This is a per-project configuration of ignored files. See Ignored files in workspace configuration.
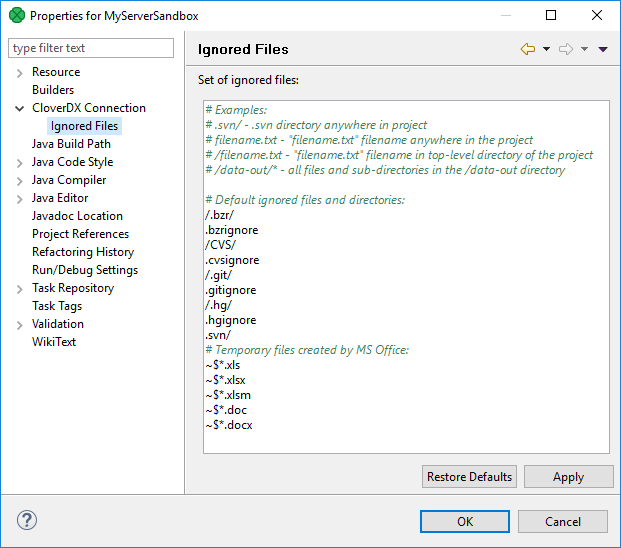
Figure 135. CloverDX Connection