
Version
7. Import
CloverDX Designer allows you to import already prepared CloverDX projects, graphs and/or metadata. If you want to import something, select from the main menu, or right-click in the Project Explorer pane and select from the context menu.
After that, the following window opens. When you expand the CloverDX category, the window will look like this:
Figure 101. Import Options
Import CloverDX projects
Import CloverDX Project from URL
If you have a link from which you can download a CloverDX project, you can use the Import CloverDX Project from URL action. This action downloads the CloverDX project and automatically imports it to the CloverDX workspace.
You can find the action in the main menu ( ) or you can right-click in the Project Explorer pane and select from the context menu.
After that, the following window opens. You can paste the URL to this dialog:
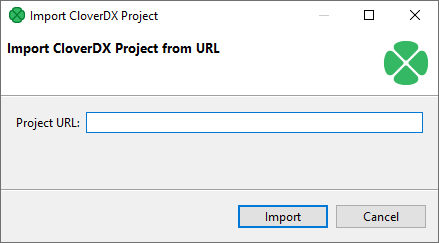
Figure 102. Import CloverDX Project from URL dialog
Alternatively, you can drag and drop a link from a browser to the Project Explorer pane of CloverDX Designer.
Action Import CloverDX Project from URL is available since CloverETL 5.5.0.
Import CloverDX projects
If you select the Import CloverDX Project from Archive, Directory, or Library item, you can click the Next button and you will see the following window:

Figure 103. Import Projects
You can find some directory or compressed archive file (the right option must be selected by switching the radio buttons).
If you locate the directory, you can also decide whether you want to copy or link the project to your workspace. If you want the project be linked only, you can leave the Copy projects into workspace checkbox unchecked. Otherwise, it will be copied. Linked projects are contained in more workspaces.
If you select some archive file or library, the list of projects contained in the archive will appear in the Projects area. You can select some or all of them by checking the checkboxes that appear along with them.
Import from CloverDX Server sandbox
CloverDX Designer now allows you to import any part of CloverDX Server sandboxes. To import, select the Import from CloverDX Server Sandbox option. After that, the following wizard will open:

Figure 104. Import from CloverDX Server sandbox wizard (Connect to CloverDX Server)
Specify the following three items: CloverDX Server URL, your username and password. Then click Reload. After that, a list of sandboxes will be available in the Sandbox menu. Select any of them and click Next. A new wizard will open:
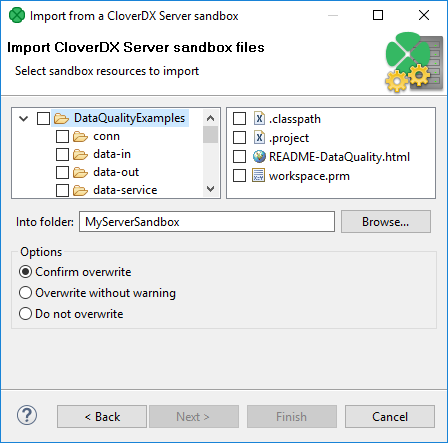
Figure 105. Import from CloverDX Server sandbox wizard (List of files)
Select the files and/or directories that should be imported, select the folder into which they should be imported and decide whether the files and/or directories with identical names should be overwritten without warning or whether overwriting should be confirmed or whether the files and/or directories with identical names should not be overwritten at all. Then click Finish. Selected files and/or directories will be imported from CloverDX Server sandbox.
Import graphs
If you select the Import graphs item, you can click the Next button and you will see the following window:

Figure 106. Import graphs
You must select the right graph(s) and specify the source and target folder for copying the selected graph(s). By switching the radio buttons, you decide whether a complete folder structure or only selected folders should be created. You can also order to overwrite the existing sources without warning.
|
You can also convert older graphs from 1.x.x to 2.x.x version of CloverETL Designer and from 2.x.x to 2.6.x version of CloverETL Engine. |
Import metadata
Metadata can be imported from:
For detailed information about metadata, see Metadata.
Metadata from XSD
If you select the Import metadata from XSD item, you can click the Next button and you will see the following window:

Figure 107. Import metadata from XSD
Select the right metadata and specify the source and target folder for copying the selected metadata. By switching the radio buttons, you decide whether a complete folder structure or only selected folders should be created. You can also order to overwrite existing sources without warning. You can specify the delimiters or default field size.
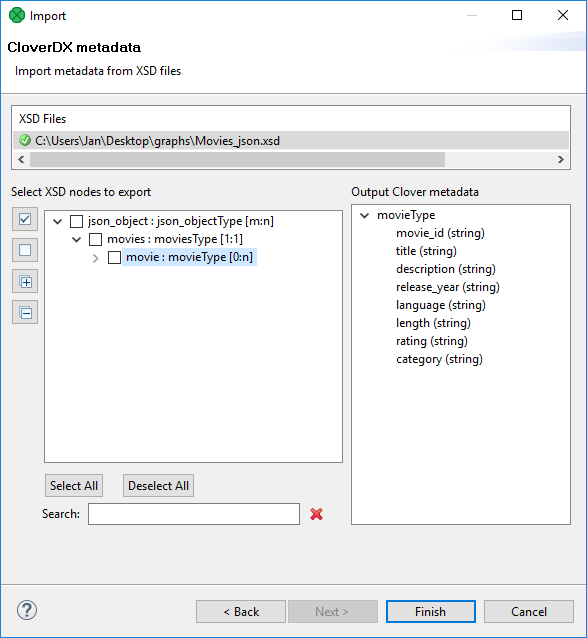
Figure 108. Import metadata from XSD - Review
You can review the metadata to be imported. Import the metadata using the Finish button.
Metadata from DDL
If you select the Import metadata - transform from DDL item, you can click the Next button and you will see the following window:

Figure 109. Import Metadata from DDL
Select the right metadata and specify the source and target folder for copying the selected metadata. By switching the radio buttons, you decide whether complete folder structure or only selected folders should be created. You can also order to overwrite existing sources without warning. You need to specify the delimiters.