Email address which can be used by CloverDX administrator or by CloverDX Server for automatic notifications. See Send an Email for details.
Version
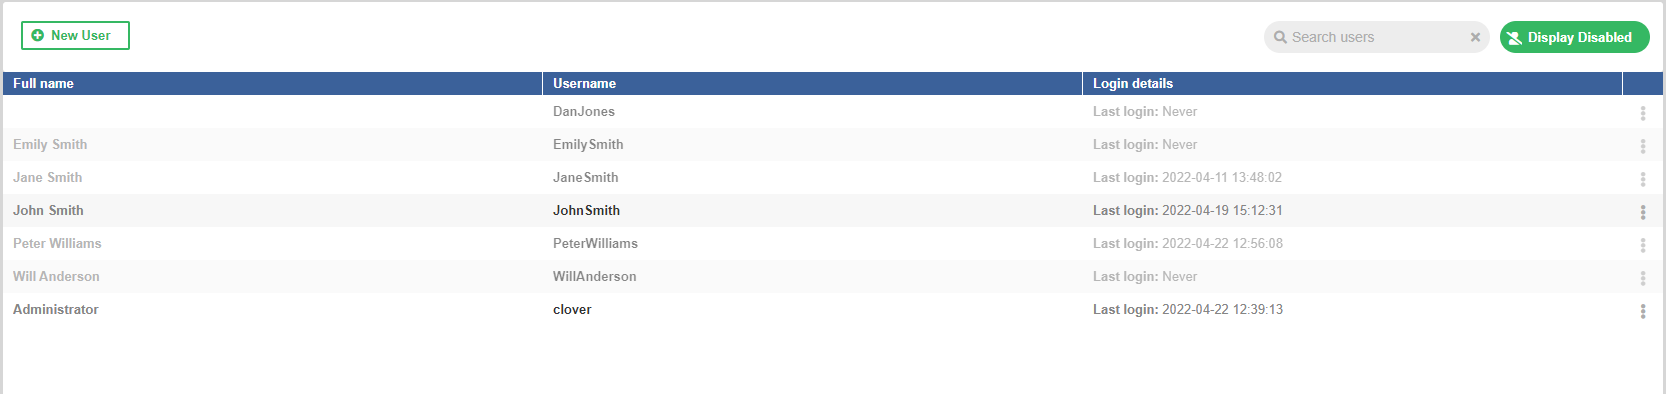
Users
In CloverDX Server user records can be created or modified in the Users section under the Configuration menu in the Server console. The Users section is also the core of access control: by assigning users to user groups, administrators can control the level of access the users have. For more information about groups and permissions refer to the Groups chapter.
After default installation with an empty database, the clover admin user is created automatically, and is assigned to the internal clover domain.
| User name | Password | Note |
|---|---|---|
clover |
clover |
Since this user has admin rights, the password should be changed after installation. |
Note that users who should have access to the Users section need to be assigned to a user group that has the List user permission enabled. Depending on the other user-related rights setup, the Users section of the Configuration menu allows users to perform the following:
Create New User
Only users assigned to a user group that has the Create user permission enabled can create new users. To create a new user, click on the New user button. See below for a list of required and optional user attributes and additional options when creating new user records:
| Attribute | Description | Required |
|---|---|---|
Username |
A common user identifier. Must be unique, should contain only letters and numbers. |
Yes |
Domain |
Domain to which the user is assigned.
By default, only the internal |
Yes |
First name |
User’s first name. |
No |
Last name |
User’s last name. |
No |
No |
||
Send welcome email |
Sends an email to the newly created user. When SMTP is configured under Configuration > Setup > Email, this option will be turned on by default. If SMTP is not configured, this option will not be available. |
No |
Passwords are stored in an encrypted form for security reasons, which means that they cannot be retrieved from the system database. If a user forgets their password, it needs to be changed by a user who has the appropriate permissions to perform this action. See the Change credentials section for more information. |
Yes |
|
Verify password |
Verify the entered password. |
Yes |
Require password change |
If selected, the newly created user must change their password at the next sign-in. This option is turned on by default. |
No |
Edit User Records
Only users assigned to a user group that has the Edit user permission enabled can edit any existing user record. Users with only the Edit own profile and password permission can edit just their own user records.
To edit a user record either click on the ⋮ button at the end of the user record that needs to be edited and select the Edit option or click on the user record to display the Overview tab and click on the Edit icon there.
The following can be changed when using the Edit option:
-
Domain
-
First name
-
Last name
-
Email address
Change Credentials
Only users assigned to a user group that has the Change passwords permission enabled can perform this action for any user record. Users with only the Edit own profile and password permission can change their credentials in their user profile.
To change credentials of a user either click on the ⋮ button at the end of the user record and select the Change credentials option or click on the user record to display the Overview tab and click on the Change credentials icon there.
The following can be changed when using the Change credentials option:
-
Username
-
Password
Note that when changing a username, a new password must be entered at the same time.
| Changing a user’s credentials will automatically log out the affected user from all their active sessions and force them to log in again. |
Disable / Enable Users
Since user records have various relations to the logs and history records, users cannot be deleted but can be disabled. This means that their user record will not be displayed in the list of users by default, and they will not be able to log in. Only users assigned to a user group that has the Delete user permission enabled can disable and enable users.
To disable or enable a user either click on the ⋮ button at the end of the user record and select the Disable (for enabled users) or Enable (for disabled users) option or click on the user record to display the Overview tab, then click on the ⋮ button there and select the Disable or Enable option there. Disabled users are automatically logged out from all their active sessions.
To display disabled users in the list of users, click on the Display Disabled button in the right upper corner of the Users section. Disabled users come up in grey font in the user list.
Unlock User
To protect against brute force attacks on users' credentials, CloverDX Server enforces a policy that will lock users after a certain number of failed login attempts. To learn more about this feature and how to unlock a user, refer to the User Lockout section.
Send Welcome Email
Welcome emails can be sent automatically during user creation if SMTP connection is set up under Configuration > Setup > Email. For existing user records, welcome email can be sent manually by clicking on the ⋮ button at the end of the user record and selecting the Send welcome email option.
Invalidate User’s Password
This option will invalidate a user’s current password after logging in and force them to change it. To invalidate a user’s current password, click on the ⋮ button at the end of the user record and select the Invalidate password option.
| Invalidating a user’s password will automatically log out the affected user from all their active sessions and force them to log in again. |
Assign Users to Groups
Assignment to User groups gives users appropriate permissions. Only users assigned to a user group that has the Groups assignment permission enabled can access this form and assign users to user groups. To learn more about groups and permissions, see Groups.
| Any change in user assignment to groups will automatically log out the affected users from all their active sessions and force them to log in again. |