Version
33. Lookup Tables
Lookup tables are data structures that allow fast access to data stored using a known key or SQL query. This way you can reduce the need to browse a database or data files.
|
Remember that you should not use lookup tables in the |
All data records stored in any lookup table are kept in files, in databases or cached in memory.
Lookup tables can be internal or external (shared).
-
Internal: See Internal Lookup Tables.
Internal lookup tables can be:
-
Externalized: See Externalizing Internal Lookup Tables.
-
Exported: See Exporting Internal Lookup Tables.
-
-
External (shared): See External (Shared) Lookup Tables.
External (shared) lookup tables can be:
-
Linked to the graph: See Linking External (Shared) Lookup Tables.
-
Internalized: See Internalizing External (Shared) Lookup Tables.
-
Types of Lookup Tables
Lookup tables can be accessed using CTL functions, see Lookup Table Functions.
Lookup Tables in Cluster Environment
To understand how lookup tables work in Cluster environment, it is necessary to understand how Clustered graphs are processed - split into several separate graphs and distributed among Cluster nodes. Details are available in the Parallel Data Processing section. In short, Clustered graph is executed in several instances according to a transformation plan, i.e. worker graphs. A transformation plan is the result of a transformation analysis, where component allocation, usage of partitioned sandbox and occurrences of Clustered components are taken into consideration. A transformation plan says how many instances of the graph, on which Cluster nodes will be executed. Moreover, it defines how the worker graphs should be updated for Clustered run, which components actually will be running in the particular worker and which will be removed.
CloverDX Server Cluster environment does not provide any special support for lookup tables. Each Clustered graph instance creates its own set of lookup tables. Lookup tables instances do not cooperate with each other. So, for example, in the case of SimpleLookupTable, each instance of a Clustered graph has its own SimpleLookupTable instance which loads data from a specified data file separately. So data file is read by each Clustered graph and each instance has a separate set of cached records. DBLookupTable works seamlessly in Cluster environment - internal cache for databases responses is managed by each worker graph separately.
Be aware of writing data records into a lookup table using the LookupTableReaderWriter component. In this case, it is important to consider which worker does the writing, since the lookup table update is performed only locally. So ensure the LookupTableReaderWriter component runs on all workers where the update lookup will be necessary.
Internal Lookup Tables
Internal lookup tables are part of a graph, they are contained in the graph and can be seen in its source tab.
Creating Internal Lookup Tables
To create a new internal lookup table, right click Lookups in the Outline Pane and select .
A Lookup table wizard opens. After selecting the lookup table type and clicking Next, you can specify the properties of the selected lookup table.
More details about lookup tables and types of lookup tables can be found in corresponding sections below.
Or see Types of Lookup Tables.
Externalizing Internal Lookup Tables
Externalization is a conversion of an internal lookup table to an external one. The newly created external lookup table is linked to the original graph. So that you would be able to use the same lookup table within other graphs.
To externalize an internal lookup table into an external (shared) file, right-click the desired internal lookup table item in the Outline pane within Lookups group and select Externalize lookup table from the context menu. If your lookup table contains internal metadata or internal database connection, the wizard allows you to externalize them as well.
In the first step, choose a name for lookup table configuration and directory to be placed to.
The lookup table configuration is usually stored in the lookup directory within the project.
If the lookup table uses internal metadata, you will export it in the second step of the wizard.
You will be offered file name and meta directory to store external (shared) metadata.
If the lookup table uses an internal database connection, the wizard will guide you through export of the database connection.
The suggested directory for database connections is conn.
After that, the internal metadata (and internal connection) and lookup table items disappear from the Outline pane Metadata (and Connections) and Lookups group, respectively, but at the same location, new entries appear, already linked the newly created external (shared) metadata (and the connection configuration file) and lookup table files within the corresponding groups.
The same files appear in the meta, conn and lookup subdirectories of the project, respectively, and can be seen in the Project Explorer pane.
Externalizing Multiple Lookup Tables at Once
You can even externalize multiple internal lookup table items at once. To do this, select them in the Outline pane and after right-click, select Externalize lookup table from the context menu. The process described above is repeated until all the selected lookup tables (along with the metadata and/or connection assigned to them, if needed) are externalized.
You can choose adjacent lookup table items when you press Shift and then press the Down Cursor or the Up Cursor key. If you want to choose non-adjacent items, use Ctrl+Click at each of the desired connection items instead.
Exporting Internal Lookup Tables
Export of an internal lookup table creates an external (shared) lookup table as a copy of internal lookup table. The original lookup table is left untouched within the graph and the newly created lookup table is not linked.
You can export an internal lookup table into external (shared) one by right-clicking any of the internal lookup tables items in the Outline pane and selecting Export lookup table from the context menu.
The lookup folder of the corresponding project will be offered for the newly created external file.
You can change the file name and click Finish to create the file.
After that, the Outline pane lookups folder remains the same, but in the lookup folder in the Project Explorer pane the newly created lookup table file appears.
You can export multiple selected internal lookup tables in a similar way as it is described in the previous section about externalizing.
|
Externalizing vs. Exporting
Externalizing converts an internal object to external one.
The external object is created and linked to the graph.
The internal object is deleted.
It is similar to Export creates a new external object.
The new external object is not linked to the graph.
The internal object is still available.
Is is similar to |
External (Shared) Lookup Tables
External (shared) lookup tables can be shared across multiple graphs. This allows an easy access, but removes them from a graph’s source.
Creating External (Shared) Lookup Tables
In order to create an external (shared) lookup table, select
Expand the item and select the Lookup table item.
After that, the New lookup table wizard opens.
In this wizard, you need to select the desired lookup table type, define it and confirm.
You also need to select the file name of the lookup table within the lookup folder.
After clicking Finish, your external (shared) lookup table has been created.
See Types of Lookup Tables or particular lookup table type.
Linking External (Shared) Lookup Tables
Linking of an external lookup table is adding a link to the external table to the graph. In a graph, you can use internal lookup tables or linked external lookup tables only. So you have to create an external (shared) lookup table first and than you can link it to an existing graph. A single external (shared) lookup table can be linked to multiple graphs.
Right-click either the Lookups group or any of its items and select from the context menu.
After that, a File selection wizard displaying the project content will open.
Expand the lookup folder in this wizard and select the desired lookup table file from all the files contained in this wizard.
Linking Multiple External Lookup Tables at Once
You can even link multiple external (shared) lookup table files at once. Right-click either the Lookups group or any of its items and select from the context menu.
After that, the File selection wizard displaying the project content will open.
Expand the lookup folder in this wizard and select the desired lookup table files from all the files contained here.
You can select adjacent file items when you press Shift and press the Down Cursor or the Up Cursor key.
If you want to select non-adjacent items, use Ctrl+Click at each of the desired file items instead.
Internalizing External (Shared) Lookup Tables
Internalization of an external lookup table creates an internal copy of the lookup table within the graph.
To internalize any linked external (shared) lookup table file into internal lookup table, right-clicking such external (shared) lookup table items in the Outline pane and select Internalize connection from the context menu.
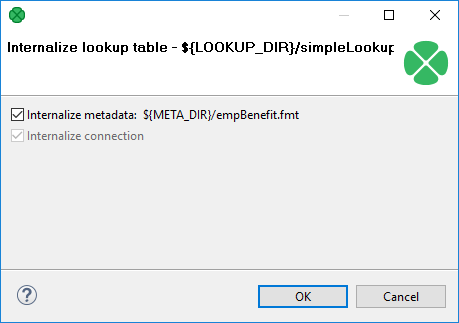
After that, the following wizard opens which allows you to internalize metadata assigned to the lookup table and/or its DB connection (in the case of Database lookup table). The internalization of metadata or datatabase connection is optional, the internal lookup table can work with external metadata or database connection.
Figure 217. Lookup Table Internalization Wizard
Click OK.
After that, the selected linked external (shared) lookup table items disappear from the Outline pane Lookups group, but at the same location, newly created internal lookup table items appear. If you have also decided to internalize the linked external (shared) metadata assigned to the lookup table, their item is converted to internal metadata item which can be seen in the Metadata group of the Outline pane.
However, the original external (shared) lookup table file still remains to exist in the lookup subdirectory.
You can see it in this folder in the Project Explorer pane.
Internalizing Multiple Lookup Tables at once
You can even internalize multiple linked external (shared) lookup table files at once. To do this, select the desired linked external (shared) lookup table items in the Outline pane. After that, you only need to repeat the process described above for each selected lookup table. You can select adjacent items when you press Shift and press the Down Cursor or the Up Cursor key. If you want to select non-adjacent items, use Ctrl+Click at each of the desired items instead.
Types of Lookup Tables
After opening the New lookup table wizard, you need to select the desired lookup table type.
| Lookup Table | Whole Table in Memory | Allows Duplicated Key Values |
|---|---|---|
Yes |
Yes |
|
No |
Yes |
|
Yes |
No, but intervals may overlap |
|
No |
Yes |
|
Yes |
Yes |
Simple Lookup Table
All data records stored in simple lookup table are kept in memory. For this reason, to store all data records from the lookup table, sufficient memory must be available. If data records are loaded to a simple lookup table from a data file, the size of the available memory should be approximately at least 6 times bigger than that of the data file. However, this multiplier is different for different types of data records stored in the data file.
Simple lookup table allows storing multiple data records with the same key value. If you do not allow storing duplicated values, the last value will be stored.
Creating Simple Lookup Table
In the first step of the wizard, choose Simple lookup.
In the next step, set up the required properties: in the Table definition tab, give a Name to the lookup table, select the corresponding Metadata and the Key that should be used to look up data records from the table.
Optionally, you can select a Charset and the Initial size of the lookup table (512 by default). You can change the default value by changing the Lookup.LOOKUP_INITIAL_CAPACITY value in defaultProperties.
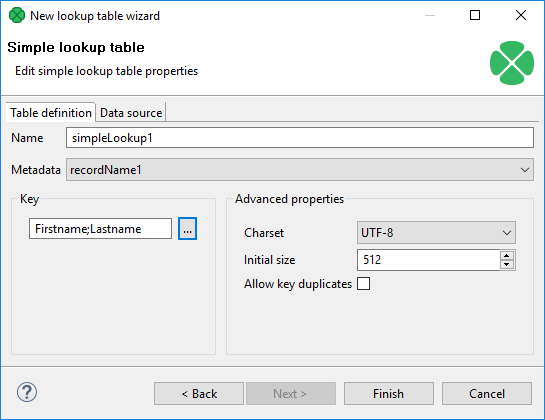
Figure 218. Simple Lookup Table Wizard
Key
After clicking the button on the right side from the Key area, you will be presented with the Edit key dialog which helps you select the Key. The list on the left side contains metadata fields and their data types. The list on the right side contains metadata fields that form the key.
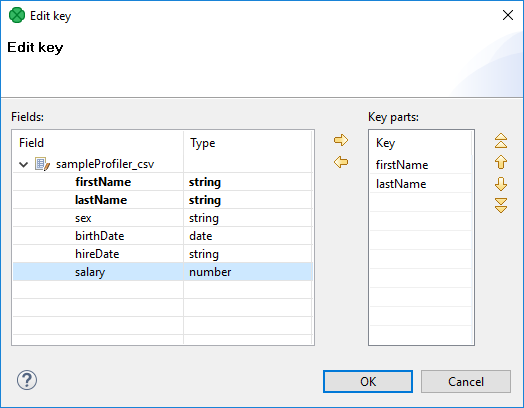
Figure 219. Edit Key Wizard
To add a metadata field to the key, drag the field from the list on the left and drop it to the list on the right. Any highlighted metadata field can be added to the list with an arrow too.
You can move the field name(s) into the Key parts pane by highlighting the field name(s) in the Field pane and clicking the Right arrow button. You can keep moving more fields into the Key parts pane.
You can also change the position of any of them in the list of the Key parts by clicking the Up or Down buttons. The key parts that are higher in the list have higher priority. When you have finished, you only need to click OK.
You can also remove any key part by highlighting it and clicking the Left arrow button.
Data Source Tab
In the Data source tab, you can either locate the file URL or fill in the grid after clicking the Edit data button. After clicking OK, the data will appear in the Data text area. If you use LookupTableReaderWriter to fill in the table, you do not need to specify data on the Data source tab.

Figure 220. Simple Lookup Table Wizard with File URL
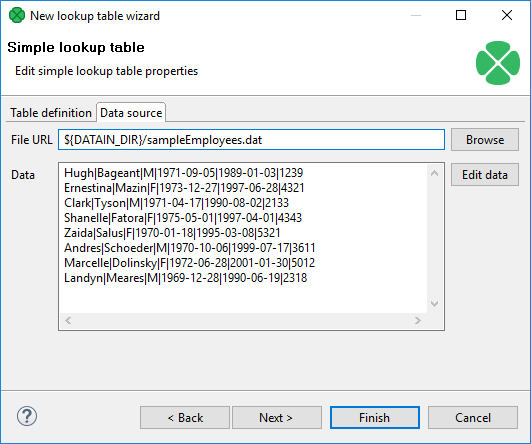
Figure 221. Simple Lookup Table Wizard with Data
You can set or edit the data after clicking the Edit data button.
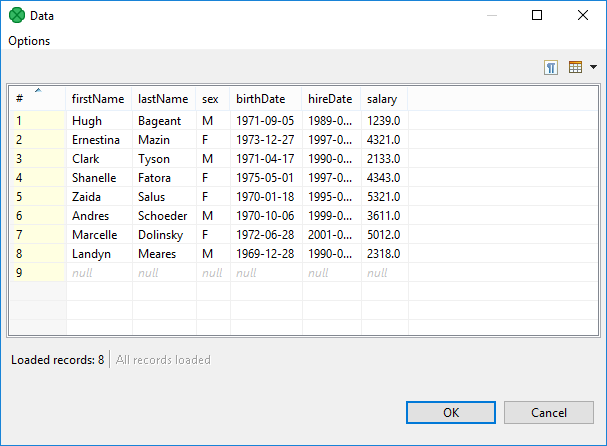
Figure 222. Changing Data
After that, click OK and then Finish.
Simple lookup table is allowed to contain data specified directly in the grid, data in the file or data that can be read using LookupTableReaderWriter.
|
Remember that you can also check the Allow key duplicates checkbox. This way, you are allowing multiple data records with the same key value (duplicate records). If you want to have only one record per each key value in Simple lookup table, leave the checkbox unchecked (the default setting). If only one record is selected, new records overwrite the older ones. In such a case, the last record is the only one that is included in Simple lookup table. |
Database Lookup Table
This type of lookup table works with databases and unloads data from them by using a SQL query.
Database lookup table reads data from the specified database table.
The key used to search records from this lookup table is the where fieldName = ? [and …] part of the query.
Data records unloaded from the database can be cached in memory keeping the LRU order (the least recently used items are discarded first). To cache them, you must specify the number of such records (Max cached records).
You can cache only the record found in the database, or you can cache both records found as well as records not found in the database. To save both, use Store negative key response checkbox. Then, the lookup table will not search through the database table when the same key value is given again.
Database lookup table allows to work with duplicate records (multiple records with the same key value).
Creating Database Lookup Table
In the first step of the wizard, choose the Database lookup radio button and click Next.

Figure 223. Database Lookup Table Wizard
Then, in the Database lookup table wizard, give a Name to the selected lookup table, and specify Metadata and DB connection.
|
Remember that Metadata definition is not required for transformations written in Java. In them, you can simply select the no metadata option. However, with CTL it is necessary to specify Metadata. |
Type or edit a SQL query that serves to look up data records from the database. When you want to edit the query, click the Edit button and, if your database connection is valid and working, you will be presented with the Query wizard, where you can browse the database, generate a query, validate it and view the resulting data.
|
To specify a lookup table key, add a " |
Then, you can click OK and Finish. See Extracting Metadata from a Database for more details about extracting metadata from a database.
Range Lookup Table
You can create a Range lookup table only if some fields of the records create ranges. That means the fields are of the same data type and they can be assigned both start and end. You can see this in the following example:

Figure 224. Appropriate Data for Range Lookup Table
Range lookup table does not allow multiple records with the same interval. The intervals may overlap, therefore one value can match more values from the lookup table.
Creating Range Lookup Table
When you create a Range lookup table, you check the Range lookup radio button and click Next.
Then, in the Range lookup table wizard, give a Name to the selected lookup table, and specify Metadata.

Figure 225. Range Lookup Table Wizard
You can select Charset and decide whether Internationalization and what Locale should be used.
By clicking the buttons at the right side, you can add either of the items, or move them up or down.
You must also select whether any start or end field should be included in these ranges or not. You can do it by selecting any of them in the corresponding column of the wizard and clicking.
When you switch to the Data source tab, you can specify the file or directly type the data in the grid. You can also write data to lookup table using LookupTableReaderWriter.
By clicking the Edit button, you can edit the data contained in the lookup table. At the end, you only need to click OK and Finish.
|
Remember that Range lookup table includes only the first record with identical key value. |
There is an example on Range Lookup Table in LookupJoin.
Persistent Lookup Table
This type of lookup table serves a great number of data records.
The data records are stored in files; only a few records are cached in main memory.
These files are in JDBM format (http://jdbm.sourceforge.net). When you specify the file name, two files will be created: with db and lg extensions.
Persistent lookup table can work in two modes: with key duplicates and without key duplicate. If you switch between the modes, you should delete and refill the lookup table.
Without key duplicates
With the Allow key duplicates property unchecked, the persistent lookup table does not allow storing multiple records with the same key value. You can choose whether to store the first one or the last with the Replace checkbox.
This is the default option.
With key duplicates
With Allow key duplicates property enabled, you can store multiple records with the same key to the table. The Replace property is not used. Key duplicates in persistent lookup table are available since 4.3.0.
Persistent lookup table internally uses B+Tree to store the records. If node is mentioned here, it is the node of the B+Tree.
Creating Persistent Lookup Table
In the first step of the wizard, choose Persistent lookup.
Then set up the required properties: give a Name to the lookup table, select the corresponding Metadata, specify the File where the data records of the lookup table will be stored and the Key that should be used to look up data records from the table.
Advanced Properties
To overwrite old records with newer ones, check the Replace checkbox. This way, the latest record with the same key is stored. Otherwise the first record with the same key would be stored.
You can disable transactions with Disable transactions. Disabling transactions increases graph performance; however, it can cause data loss if manipulation with the table is interrupted.
Commit interval defines the number of records that are committed at once. When the limit or end of phase is reached, the records are committed to the lookup table.
By specifying Page size, you are defining the number of entries (records) per node of B+Tree (in the implementation).
Cache size specifies the maximum number of nodes (of B+Ttree) in cache.
Allow key duplicates allows storing multiple records with the same key value.
|
Replace checkbox is ignored in lookup tables with key duplicates. |
Then click OK and Finish.
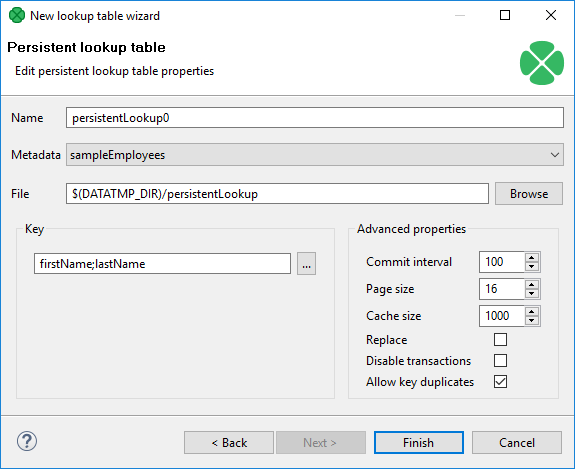
Figure 226. Persistent Lookup Table Wizard
Using Persistent Lookup Table
You can use LookupTableReaderWriter to add records to Persistent Lookup Table.
Persistent Lookup Table Configuration Tweaks
Performance of persistent lookup table can be affected by the advanced parameters. These parameters configure the internal B+Tree implementation and size of caches.
To speed up reading, increase cache size.
To speed up writing, increase commit interval.
Compatibility
| Version | Compatibility Notice |
|---|---|
4.3.0 |
You can now use Allow key duplicates to allow storing duplicated key values into the table. |
Aspell Lookup Table
All data records stored in this lookup table are kept in memory. For this reason, to store all data records from the lookup table, sufficient memory must be available. If data records are loaded to Aspell lookup table from a data file, the size of available memory should be approximately at least 7 times bigger than that of the data file. However, this multiplier is different for different types of data records stored in the data file.
If you are working with data records that are similar but not fully identical, you should use this type of lookup table. For example, you can use Aspell lookup table for addresses.
Aspell lookup table allows you to have multiple records with the same key value.
Creating Aspell Lookup Table
In the Aspell lookup table wizard, you set up the required properties. You must give a Name to the lookup table, select the corresponding Metadata, select the Lookup key field that should be used to look up data records from the table (must be of string data type).
You can also specify the Data file URL where the data records of the lookup table will be stored and the charset of data file (Data file charset). The default charset is UTF-8.
You can set the threshold that should be used by the lookup table (Spelling threshold). It must be higher than 0.
The higher the threshold, the more tolerant is the component to spelling errors.
Its default value is 230.
It is the edit_distance value from the query to the results.
Words with this value higher that the specified limit are not included in the results.
You can also change the default costs of individual operations (Edit costs):
-
Case cost
Used when the case of one character is changed.
-
Transpose cost
Used when one character is transposed with another in the string.
-
Delete cost
Used when one character is deleted from the string.
-
Insert cost
Used when one character is inserted to the string.
-
Replace cost
Used when one character is replaced by another one.
You need to decide whether the letters with diacritic marks are considered identical with those without these marks.
To do that, you need to set the value of the Remove diacritic marks attribute.
If you want diacritic marks to be removed before computing the edit_distance value, you need to set this value to true.
This way, letters with diacritic marks are considered equal to their Latin equivalents.
(Default value is false.
By default, letters with diacritic marks are considered different from those without.)
If you want best guesses to be included in the results, set Include best guesses to true.
The default value is false.
Best guesses are the words whose edit_distance value is higher than the Spelling threshold, for which there is no other better counterpart.
Then click OK and Finish.

Figure 227. Aspell Lookup Table Wizard
|
If you want to know the distance between the lookup table and edge values, you must add another field of numeric type to lookup table metadata.
Set this field to Autofilling ( Select this field in the Edit distance field combo. When you are using Aspell lookup table in LookupJoin, you can map this lookup table field to corresponding field on the output port 0. This way, values that will be stored in the specified Edit distance field of lookup table will be sent to the output to another specified field. |