Version
32. Libraries
Introduction
A CloverDX library is a redistributable package, which can contain reusable graphs, subgraphs, jobflows, data services, or metadata. Libraries offer significant improvements to code reusability and sharing in CloverDX. Because libraries can be installed multiple times, they provide an easy option to quickly clone your solutions and set them up with different parameters and permissions to control users' visibility and allowed operations for individual libraries.
Development
Libraries are developed in CloverDX Designer as projects, which are then exported to a library .clib file, and deployed to CloverDX Server.
Depending on the options selected during library export, and assigned permissions, public elements from installed libraries become available for use in CloverDX Server, CloverDX Designer, or CloverDX Wrangler.
Public elements can be:
-
Subgraphs
-
Graphs and jobflows
-
Data Services
-
Metadata
If you want to develop your custom libraries, refer to our libraries documentation for developers here.
|
You can take advantage of our ready-to-use libraries in the CloverDX Marketplace repository, which includes solutions to quickly integrate with interfaces like Hubspot or Google Drive, or solutions that can help you easily encrypt and decrypt your data or implement Python scripts. |
Usage
Subgraphs
Public subgraphs become available for use in CloverDX Designer, where they can be added as components in server projects. For more information on the usage from the Designer perspecitve, refer here.
Subgraphs exported as Data Source or Data Target Connectors become available in the Data Catalog in CloverDX Wrangler. For more information on how to configure access to individual connectors for specific user groups, see Permissions Tab.
For more information on Data Source and Data Target Connectors from the Wrangler perspective, refer to our Data Source Connectors and Data Target Connectors sections in the Wrangler documentation.
Graphs, Jobflows
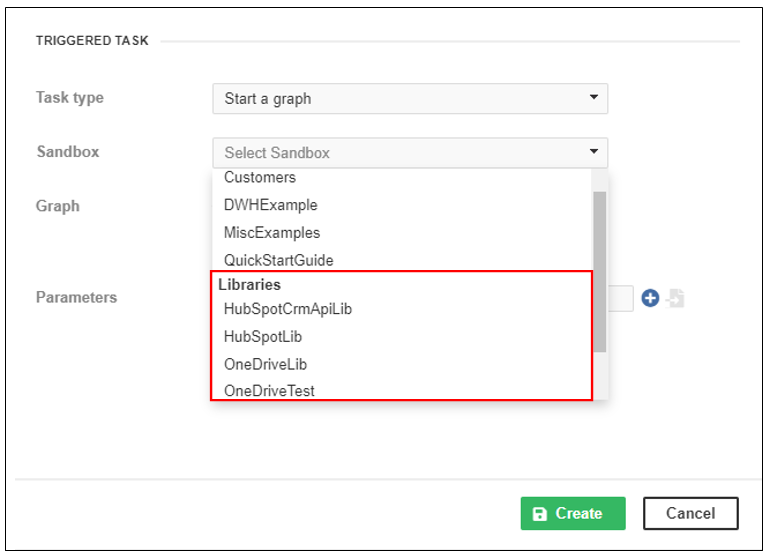
When creating a new schedule or event listener in CloverDX Server, installed libraries are available in the Sandbox dropdown, and public graphs and jobflows from the libraries are available to be selected for scheduling.
Figure 112. Libraries in schedulers
Initialization Job
A graph or jobflow selected as a library initialization job during library export can be used to set up a configuration that cannot be set ahead of time during the development process. For example, in our CloverDX Marketplace OneDrive library, an initialization graph is used to generate values for SharePoint Site ID and Drive ID parameters, which are dependent on the configured OAuth2 connection.
For more information on how to tell if a library has an initilation job and how to run it, see Initialization Job.
For recommendations on initialization job development, refer to our documenation for developers here.
Health Check Job
A graph or jobflow selected as a library Health Check job can be used to, e.g., ensure that an OAuth2 connection is still valid or that a connection to a 3rd party interface or database is working. The job is periodically run via its associated health check schedule which can be set in the installation dialog or any time later. You can also run the job manually. If the schedule fails, the library is marked as failing in the list of libraries:
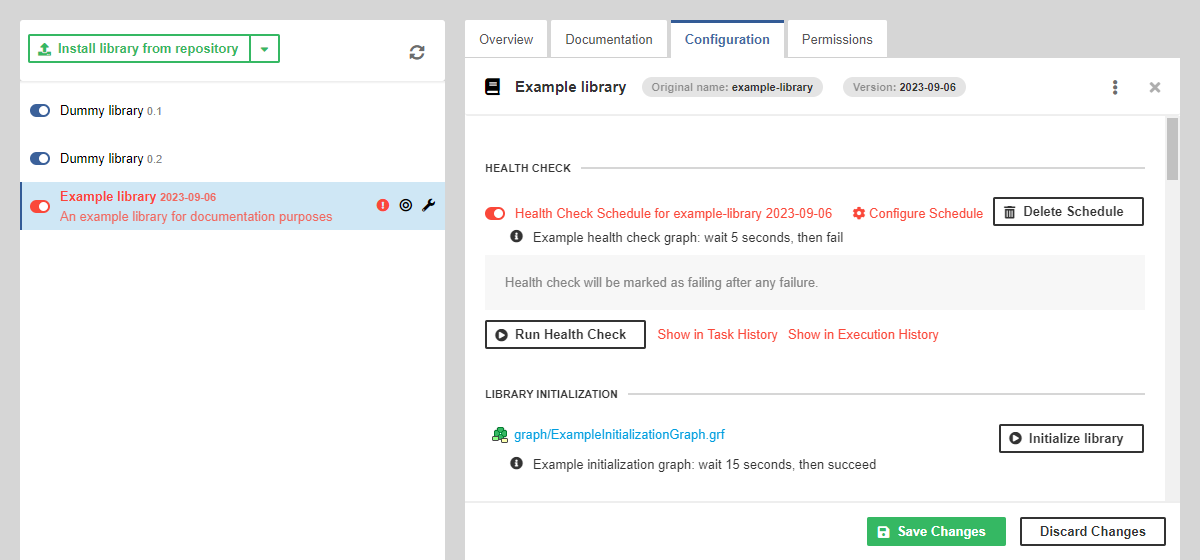
Figure 113. Library with a failing health check schedule
You can inspect the previous runs of the job in Task History and Execution History. When the library is enabled or disabled, the state change is propagated to its health check schedule. For each library, there can be only one such schedule.
For more information, see Health Check Job Configuration.
Data Services
Data services from installed libraries can be deployed in CloverDX Server.
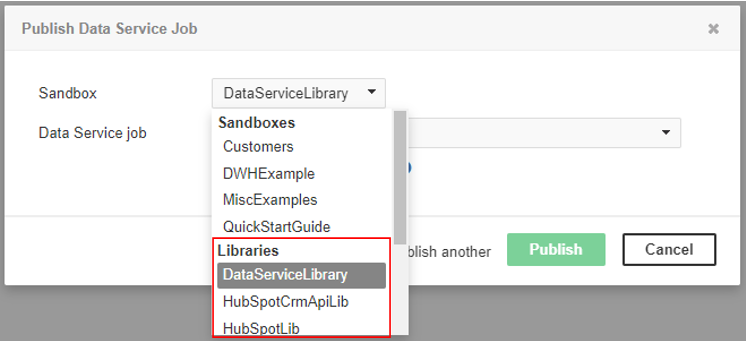
Figure 114. Libraries Data Services
Installation
Libraries can be installed in the Libraries module in the CloverDX Server console. Only users assigned to a user group that has one of the following permission combinations are allowed to install libraries:
Installed libraries create a special type of public shared sandbox with read-only permissions.
Internally, the packages are unpacked into the ${libraries.home} directory, which, by default, points to the libraries sub-directory located in ${sandboxes.home}. See sandboxes.home and libraries.home for more information.
Libraries to be installed can be loaded by either selecting a single .clib file from a local directory or by selecting them to be installed from a library repository.
| CloverDX libraries may have a specified minimum and maximum supported CloverDX version. See Incompatible library for more information. |
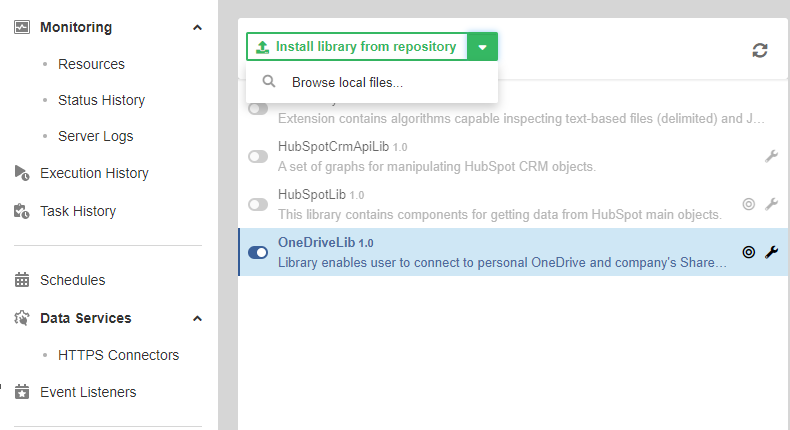
Single Library Upload
To load a single library for installation from a local directory click on the dropdown next to the Install library from repository button, and select the desired .clib file to be loaded.
Library Repository
Library repositories allow you to share your libraries.
A repository is a local or remote directory with .clib archives, each containing one library. When browsing libraries in a repository, users can easily see additional information like the library version, library description, or its public elements on the Overview tab. If a library includes a documentation page, it will be displayed on a separate Documentation tab.
Some libraries might be incompatible with your current CloverDX Server version. These libraries will be marked with a warning icon to indicate potential issues. See Library incompability for more information.
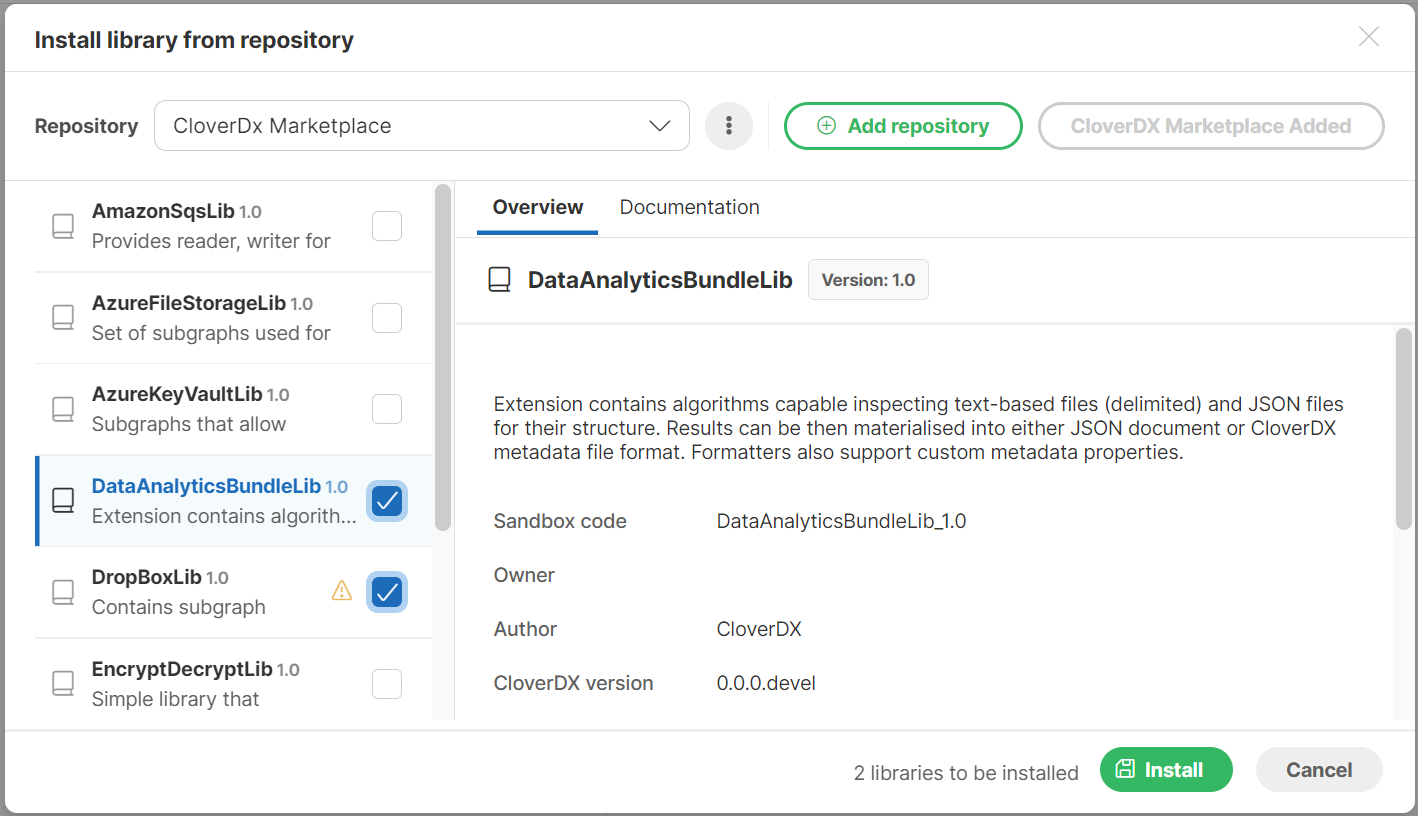
Figure 115. Library repository
Repositories can be local or remote. Currently, we support the following remote protocols: FTP, SFTP, Amazon S3, Azure Blob Storage, SMB, and SMB2.
In CloverDX Server, you can add one or more repositories by using the Add repository button and then browse through the repositories and install selected libraries.
|
Our CloverDX Marketplace, which includes a collection of CloverDX libraries that implement various functionalities, is automatically added during CloverDX Server installation with an empty database.
For existing Server installations, the CloverDX Marketplace repository can be added by clicking on the Add CloverDX Marketplace button. After performing this step, the button will become disabled and will indicate that the repository has already been added.
The CloverDX Marketplace repository (its URL is |
Installation Settings
When a library is selected to be installed, the following settings are available:
-
Enable switch: Defaults to false. We recommend installing all new libraries with this option disabled. Once a library is enabled, all public elements from the library become available for use by all authenticated users of the Server. Installing new libraries as Disabled will prevent users from using the libraries until they are fully configured. The state of the library (Enabled/Disabled) can be changed at any time in the list of installed libraries by a user assigned to a user group that has the following permissions combination:
-
Libraries administration AND Suspend sandbox AND the EXECUTE library-level permission for the given library on the Permissions Tab
-
-
Health Check: Only available if the library defines a Health Check job; defaults to false. If checked, a schedule is created to check whether the library is working properly every 24 hours (the schedule is disabled by default and its settings can be adjusted later; see Health Check configuration for more information). The schedule can be also created any time after installation, but it always requires the following permissions:
-
Libraries administration AND Create schedule AND Edit sandbox AND the WRITE library-level permission for the given library on the Permissions Tab
-
-
Library ID: If not populated, it defaults to the Library Name entered during library export. Setting a different Library ID will allow you to install the same library version multiple times. See Installation Logic for more information. Library ID does not have to be populated if you only need one instance of the library. Library IDs cannot be changed after installation.
-
Label: If not populated, it defaults to the Library Name entered during library export. Setting a different label will change the library name in all the places where the library is used (CloverDX Designer Component Palette, Data Catalog in CloverDX Wrangler, or schedulers or listeners in CloverDX Server). Labels of installed libraries can be changed on the Overview tab of a library detail after clicking on the Edit button. See Library Editing for more information.
-
Overwrite already installed libraries: This option can be used to overwrite an installed library, if the library name, version, and library ID match. See Installation Logic for more information.
Note that the library Version is not editable; it comes up as specified during library export.
| Libraries incompatible with your CloverDX version are marked with a warning icon. While installation is possible, the library’s functionality cannot be guaranteed. See Library incompability for more information. |
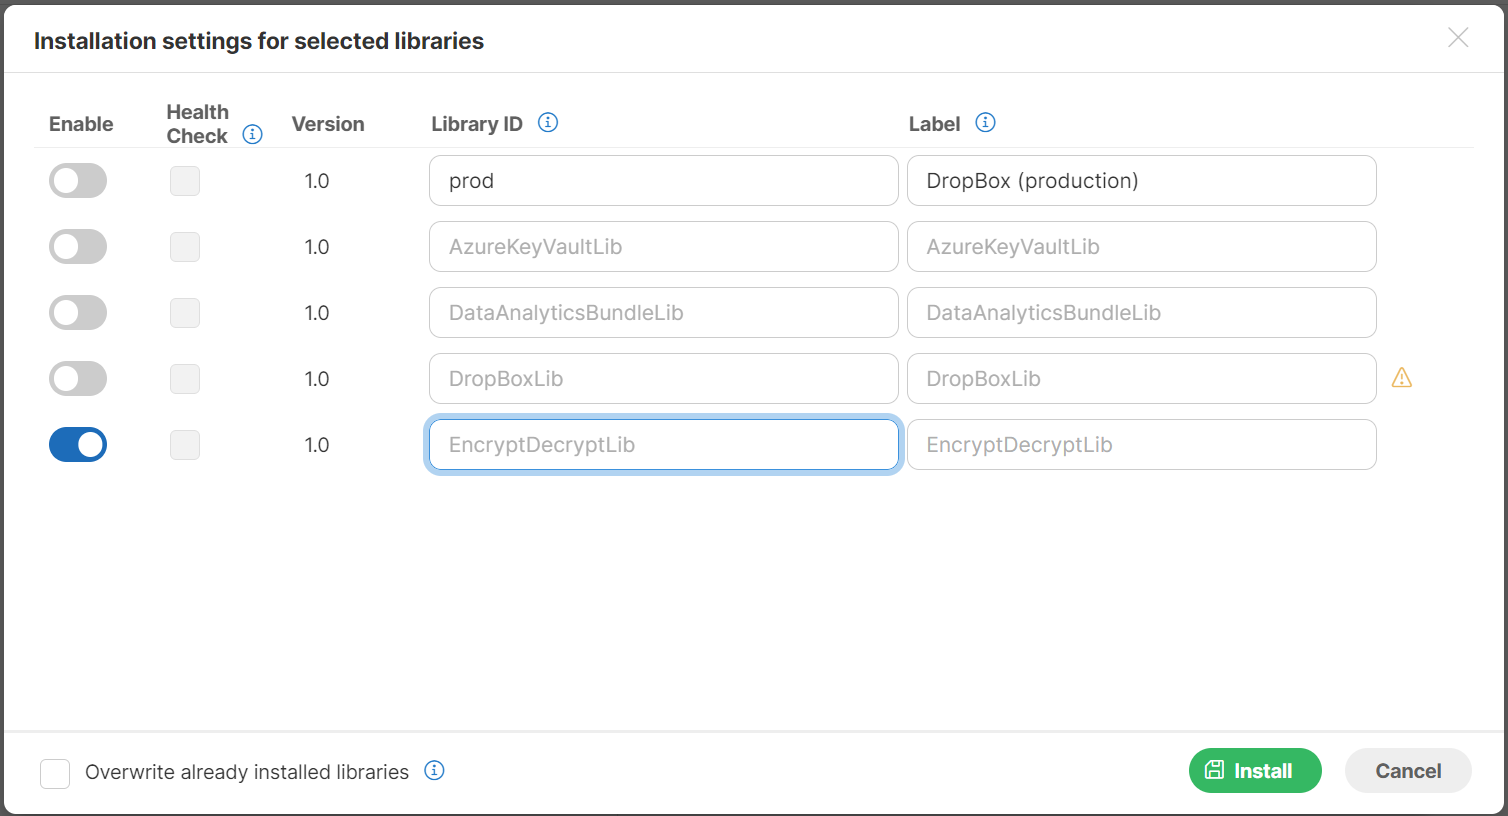
Figure 116. Library installation
Installation Logic
The Libraries module offers great variability when installing libraries, which allows you to:
-
Overwrite an existing library with an updated version of the same library.
-
Install multiple library versions.
-
Install the same library multiple times.
This provides administrators with flexibility when managing libraries: libraries can be quickly installed, updated, or copied, and each installed library instance configured with different parameters or permissions.
-
To overwrite an already installed library, the library name, version, and library ID of the new library need to match, and the Overwrite already installed libraries option needs to be selected when installing such a library. If the Overwrite already installed libraries option is not selected, the matching (already installed) libraries are skipped.
-
To install a new library version, export the library project with a different version: When exporting a project to a library in CloverDX Designer, the library version needs to be specified. The version then comes up in the list of installed libraries next to the library name. If the library project is updated and exported with a new version, when installing the new library version a new library instance will be created. Multiple versions of the same library can co-exist and be utilized as needed, or the old library version can be disabled or deleted if it is no longer needed.

Figure 117. Multiple library versions
-
To install the same library multiple times, make sure to populate a unique library ID during installation to differentiate it from the previously installed instances. See Multiple Library Instances for more information.
Multiple Library Instances
Installing multiple instances of the same library can save you time if there is a need to handle the same data from multiple sources (e.g., when pulling the same data from different databases or different connection profiles), or when using the same data source but needing a way to limit the output based on user’s level of access (e.g., limit one group of users to see only a specific set of customer information).
To provide an example of how to use multiple library instances, let’s take our Xero library, which can pull information from the Xero accounting system. Let’s assume your company has two branches, one in the United Kingdom and one in the United States. You want to make the data source connectors from the Xero library available for use in the Data Catalog in CloverDX Wrangler and want users to access data from their branch only.
Installation and configuration steps
-
Install the Xero library twice with different library IDs (Xero_UK and Xero_US).

Figure 118. Multiple instances of Xero library
-
On the Configuration tab, configure each library instance with its OAuth2 connection, and tenant ID (consult the library documentation for the configuration steps). You can also set the date format based on the country (dd/MM/yyyy or MM/dd/yyyy).

Figure 119. Configuration for UK branch
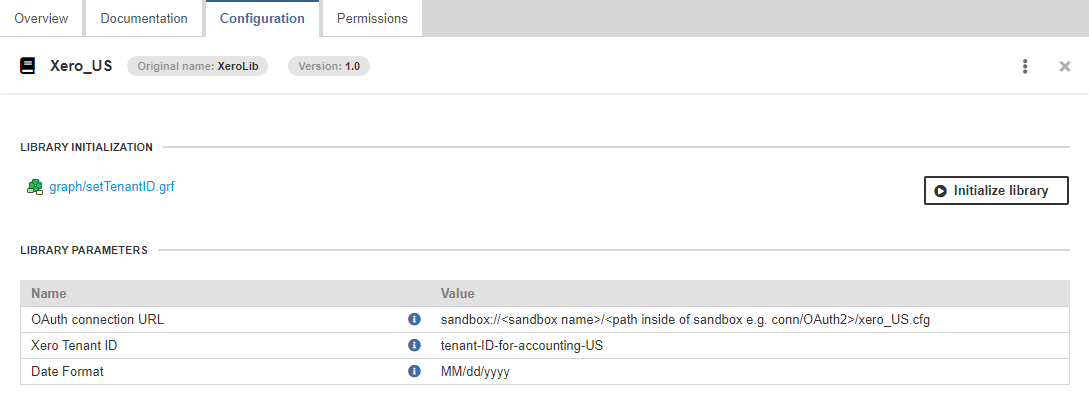
Figure 120. Configuration for US branch
-
Create new user accounts and two new user groups (in our case Accounting_UK and Accounting_US). Since these users will need access only to CloverDX Wrangler, the user groups are set up with only the default Wrangler permissions, i.e., Create sandbox and Access to the Wrangler UI.
-
On the Permissions tab set up the library-level permissions and the Data Source Connectors permissions for each library instance to be visible and available for use only to their respective user group.
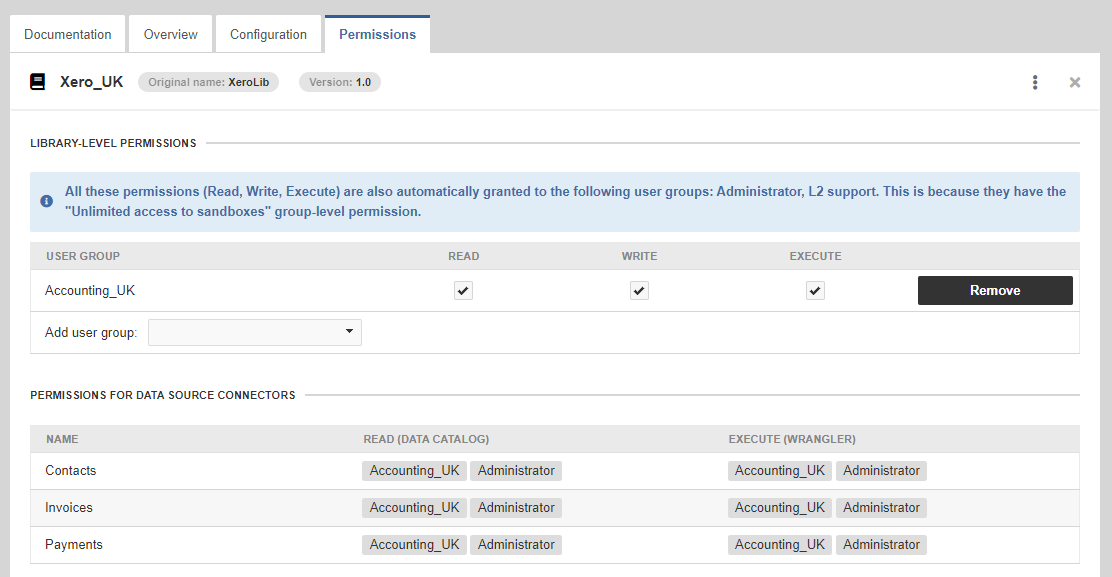
Figure 121. Permissions for UK branch
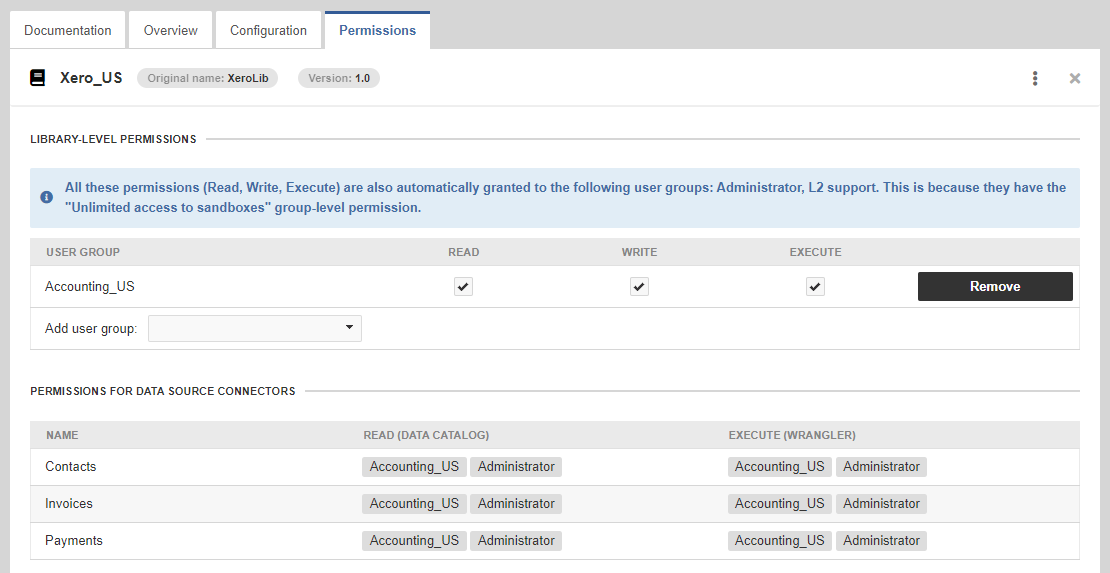
Figure 122. Permissions for US branch
-
Enable the library instances. After logging into CloverDX Wrangler, users will have access only to the data source connectors from their branch.
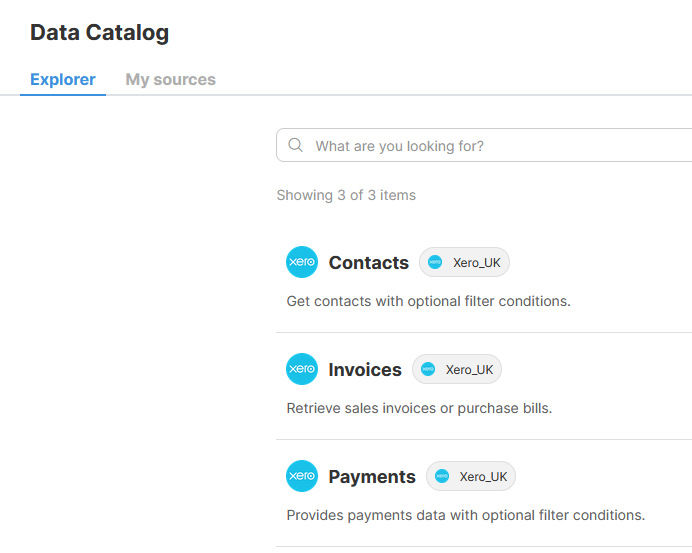
Figure 123. Wrangler Data catalog for UK branch
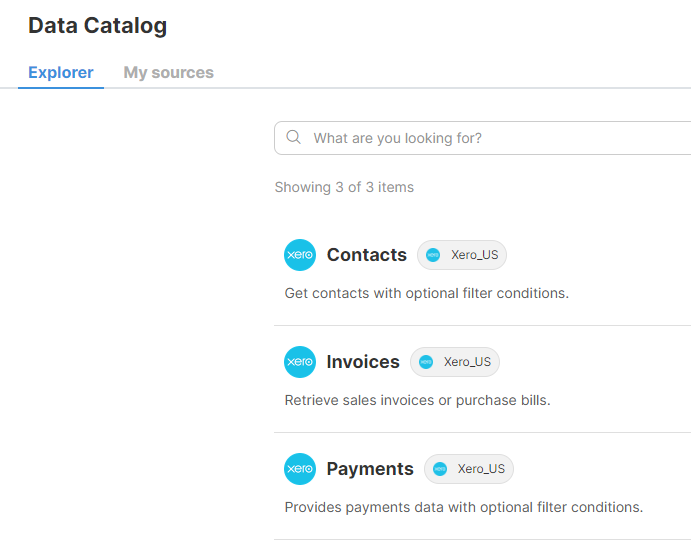
Figure 124. Wrangler Data catalog for US branch
Overview Tab
The Overview tab displays basic information about the selected library and lists the public resources the library includes.
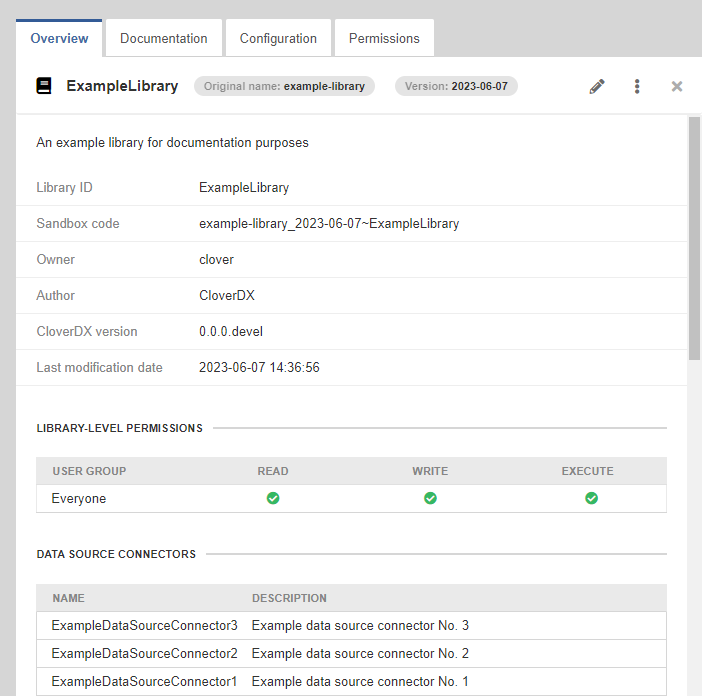
Figure 125. Library Overview tab
If your installed library is not compatible with your CloverDX version, a warning message shows up at the top of the Overview tab. See Library incompability for more information.
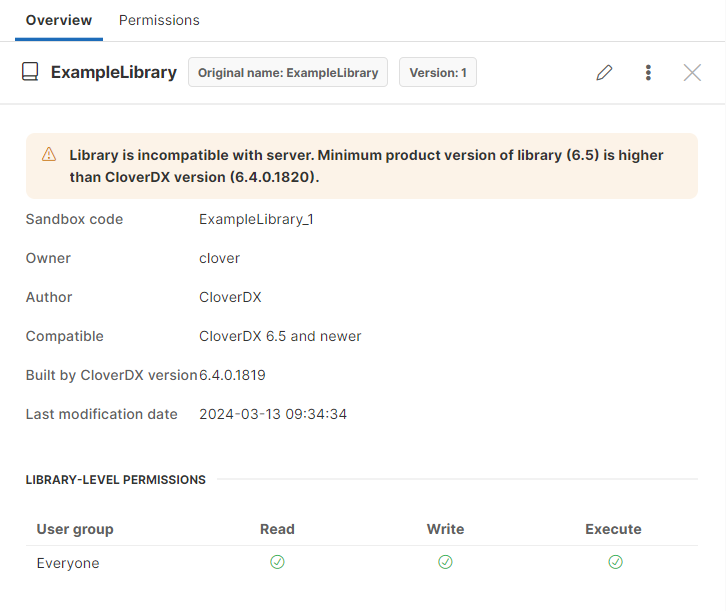
Figure 126. Library Overview tab with warning message
| Field | Description |
|---|---|
Library name displays the library name specified when exporting the project into a library, or the name that was entered in the Label field when installing the library. This is the name under which the library is available to all users (e.g., in the Scheduler or Event Listeners, or the Component Palette in the Designer). See Library Editing for more information on how to change a library name. |
|
Original name |
If a library name was changed during installation by specifying a custom Label, or if the original library name was changed by editing the library and modifying the Label, the original library name (as specified during library export), will be displayed next to the current library name. This will allow you to keep track of the original name. |
Library version |
Displays the library version specified during library export. Library versions are not editable. |
Library ID |
Library ID will be displayed when a different library ID was entered when installing the library. Library IDs can be used to install libraries multiple times. See Installation Logic for more information. |
Displays library description as specified during library export. Library descriptions are displayed when reviewing libraries in repositories or the list of installed libraries. Library descriptions can be changed. See Library Editing for more information. |
|
Sandbox code |
Displays the library sandbox name. |
Displays the username of the user who installed the library. Library owners have access to the Configuration and Permission tabs even when they are not granted the WRITE library-level permission. See Permissions Tab for more information. |
|
Author |
Displays the author of the library project as specified during library export. |
CloverDX version |
CloverDX version is automatically assigned based on the version of CloverDX Designer from which the library was exported. |
Last Modification Date |
Displays the date and time of library export from CloverDX Designer. |
Library-level Permissions |
Displays an overview of the library-level permissions on the Permissions Tab. |
Data Source Connectors, Data Target Connectors, Subgraphs, Graphs, Jobflows, Rest Jobs, Metadata sections |
Lists the public library resources. |
Documentation Tab
To add additional information that might be important to other users, or to keep track of changes in libraries, library documentation can be optionally added before exporting a project into a library. See exporting to library for more information on how a documentation page can be added.
If a documentation file is present in a library, a Documentation tab will be displayed when displaying the library in a library repository and when reviewing the installed library detail in the Libraries section.
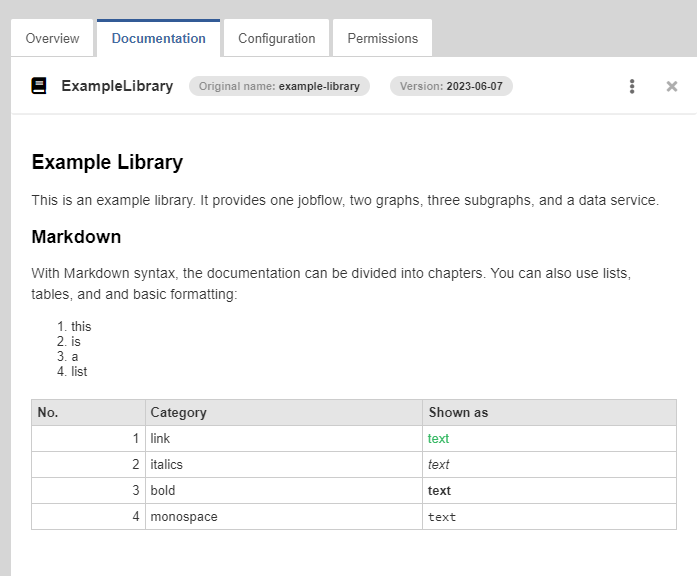
Figure 127. Library Documentation tab
Configuration Tab
The Configuration tab is visible only to users assigned to a user group that has one of the following permissions combinations:
-
Libraries administration + Edit sandbox + the WRITE library-level permission for the given library on the Permissions Tab OR the user is the library owner
Depending on the library design, additional configuration steps might need to be performed after a library installation. Library configuration is performed in the Configuration tab. When reviewing the list of installed libraries, the following indicators related to library configuration or its health might appear in a library record:
| Icon | Description |
|---|---|
Library Health Check job is running. |
|
Library Health Check job has failed. |
|
Initialization Job
If a library has an initialization job (see Initialization job usage), it is indicated by a bullseye icon.

Figure 128. Library has an initialization job
A library initialization job (a graph or jobflow) can be used after installation to CloverDX Server by server administrators. Users with the Libraries administration permission can run the initialization even when the library is disabled.
The initialization job will come up in the Library Initialization section. You can run the job by clicking on the Initialize library button, even when the library is disabled. Note that you can use any other method for executing the initialization job (REST API, Simple HTTP API, etc.).
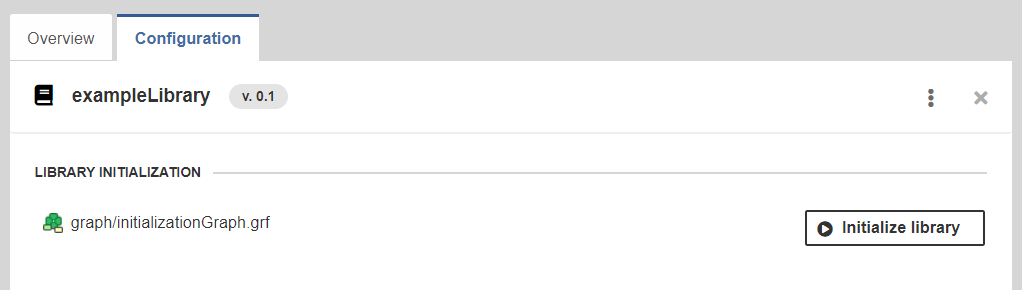
Figure 129. Library initialization
Health Check Job
If your library includes a Health Check job, which was enabled during library installation, a schedule is automatically created in the Schedules module. The schedule is set to run every 24 hours and its status defaults to the library status (i.e., the schedule is disabled if the library is installed as disabled). To quickly get to the schedule detail, click on the "Health Check Schedule for <library name>" link. You can adjust its scheduled time or set up alerts and notifications on the Alerts and Notification tab as needed. The schedule can also be added to a monitor to be tracked in the Monitoring module.
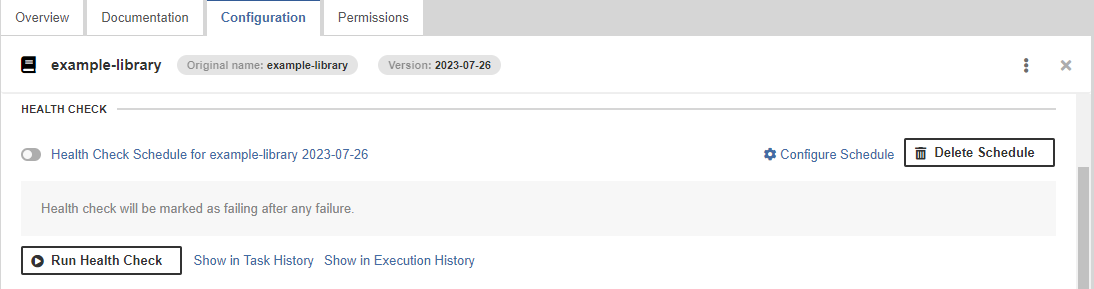
Figure 130. Installed Health Check job
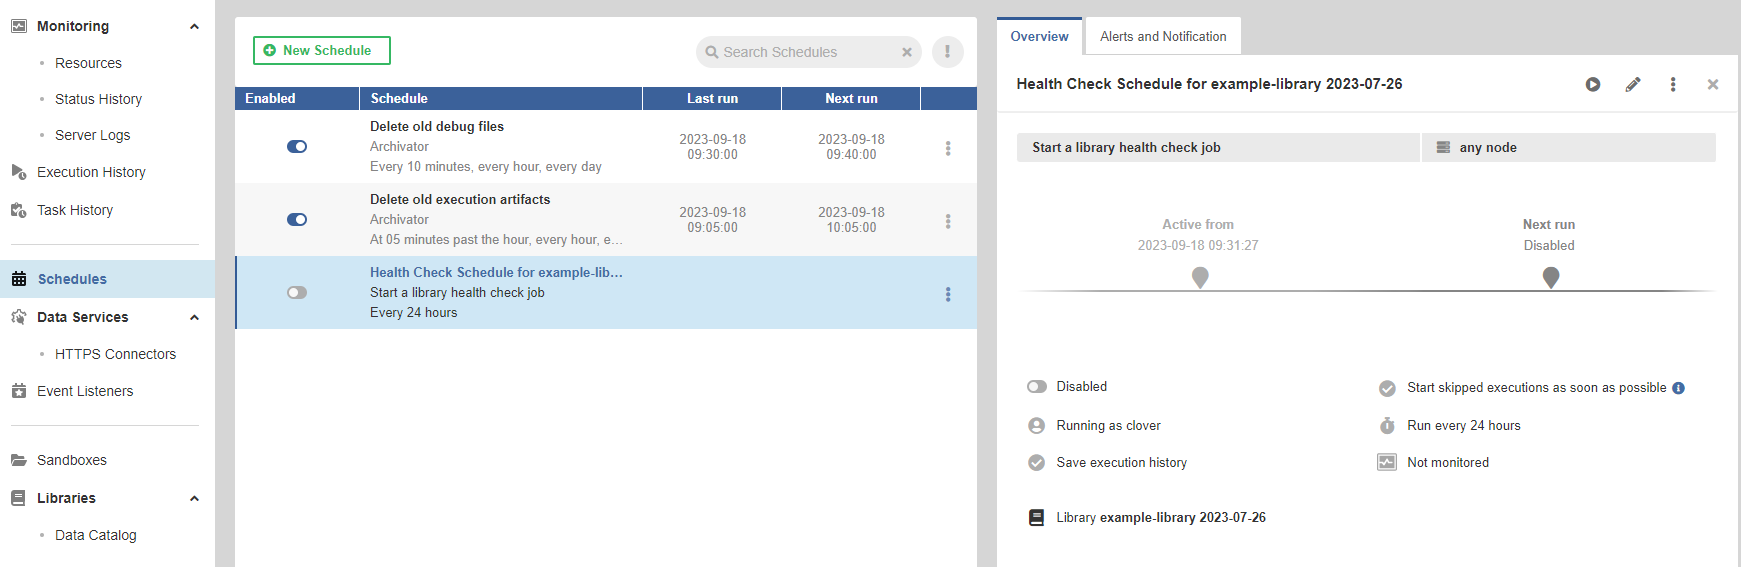
Figure 131. Created Health Check schedule
The schedule is automatically enabled if you enable the library, but you can disable it in the library Configuration tab by using the switch button next to the Health Check schedule. You can also run the Health Check job manually by clicking on Run Health Check.
To quickly display the job task or execution history, click on Show in Task History or Show in Execution History, respectively.
If you did not enable the Health Check job during library installation, you can create the schedule by clicking on Schedule Health Check.

Figure 132. Unscheduled Health Check job
If the Health Check job fails, an exclamation mark appears in the library record, and the library is highlighted in red.

Figure 133. Failed Health Check job
Configurable Parameters
If a library includes configurable parameters (see exporting a library for more information), it is indicated by a wrench icon.

Figure 134. Library has configurable parameters
The supported parameter types are String, Secure String, Boolean, Integer, Decimal, and Enumeration. The parameter’s description is shown as an “i” icon with a tooltip.
All such parameters are displayed in the Library Parameters section, where their values can also be populated.
| Note that to be able to modify values of secure parameters, users need to be assigned to a user group that has the Secure parameters administration permission enabled. |
If there is a parameter with an invalid value, the wrench icon will turn red to indicate that there is an issue and there will be an exclamation mark next to the affected parameter.

Figure 135. Library has some parameters with invalid values
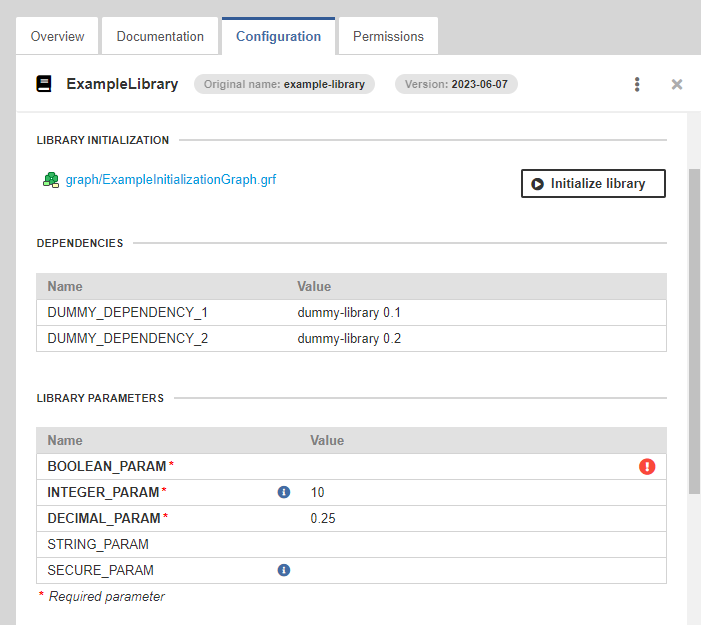
Figure 136. Library parameters
OAuth2 Connections
All implemented OAuth2 connections in a library appear on the Configuration tab, where they can be reviewed, updated, authorized, or re-authorized. Unused OAuth2 connections, i.e., connections present in a library project which are not used in any of the public or internal (sub)graphs, are not displayed.
| When exporting a library project, all OAuth2 connections are always exported as unauthorized even when they were authorized in CloverDX Designer during the development stage. After library installation, all used OAuth2 connections will need to be authorized again in CloverDX Server. |
Each OAUth2 connection appears in a separate section on the Configuration tab, and its title includes the filename of the related .cfg file, and the provider of the OAuth2 connection (e.g., Google, Azure, generic),
All connections that need to be authorized have the Authorize button under them, and a note stating that the connection is not authorized. You can review and modify the connection properties if needed. If any of the connection properties are changed, the Authorize button becomes disabled until the changes are saved.
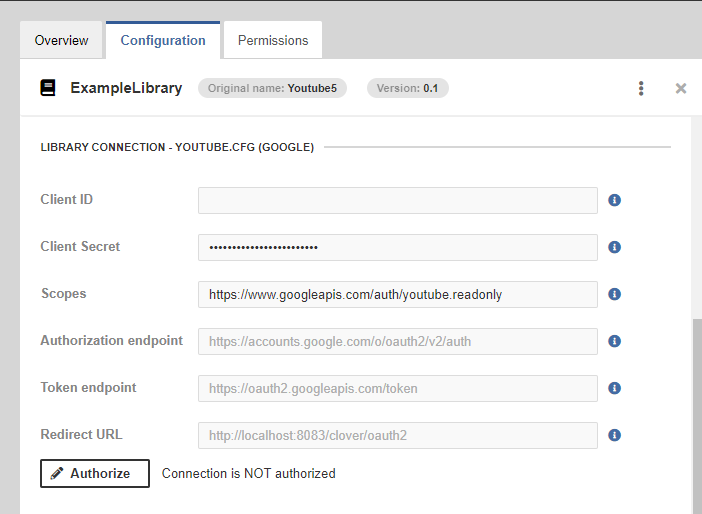
Figure 137. Unauthorized connection
By clicking on the Authorize button, you are redirected to the provider’s website to complete the authorization process. If the authorization process is successful, the button label changes to Re-authorize, and the note changes to indicate that the connection is authorized.
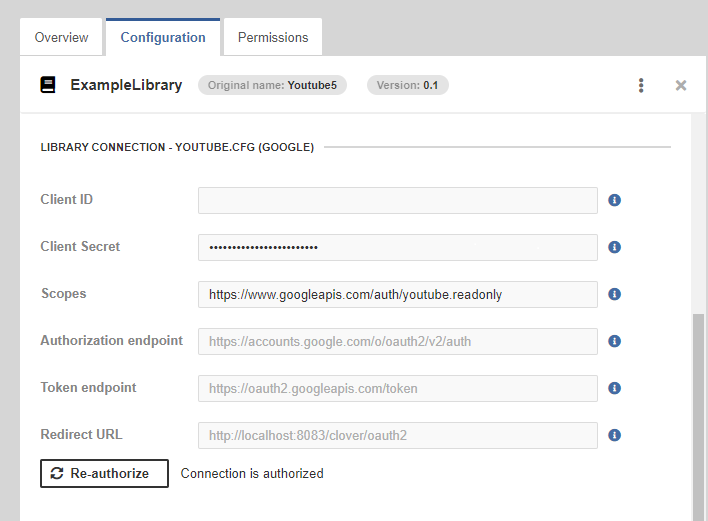
Figure 138. Authorized connection
Dependencies
If there is a dependency on another library, the Configuration tab will show the dependencies in the Dependencies section. If there is a dependent library missing, a red icon is displayed in the library list to indicate that there is an unresolved dependency, a warning is displayed in the Configuration tab, and the missing dependency is highlighted in the Dependency section.
If the referenced library is installed under the same name, it is linked automatically; otherwise, you must resolve the dependency manually.
| After resolving dependencies manually, the dependency warning will automatically disappear but it is not possible to check if the dependency was resolved correctly until the library jobs or data connectors are used. If a dependency is resolved incorrectly, the library jobs or data connectors might fail even when there is no dependency warning. |
| It is important to set the same library permissions on all the dependent libraries to ensure that library jobs or data connectors can run successfully. For more information see permissions. |

Figure 139. Library has unresolved dependencies
Incompatible library
CloverDX libraries may have specific version compatibility requirements. During development process it is possible to specify the minimum and/or maximum CloverDX version with which the library is compatible. If your CloverDX Server version falls outside a library’s supported range, it might not function correctly. This could lead to unexpected behavior or errors. While you can still install the library, it’s highly recommended to use libraries that are compatible with your CloverDX Server version to ensure optimal performance and avoid potential issues. If your installed library is imcompatible with your CloverDX Server version, a warning appears in the Overview tab and a warning icon is displayed in the library list.
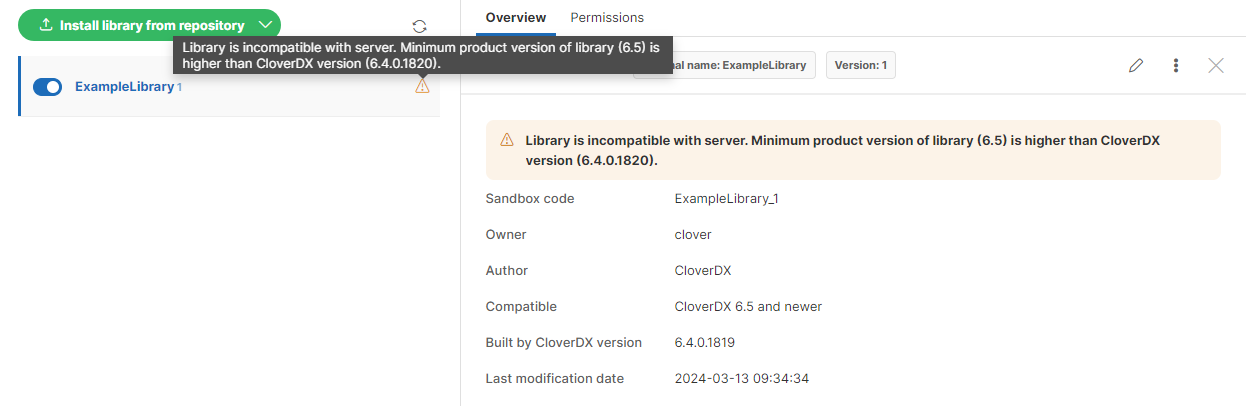
Figure 140. Installed incompatible library
Permissions Tab
On the Permissions tab, library-level permissions for libraries, data source connectors, and data target connectors can be set. In combination with the permissions set at the user group level, it is possible to control library and data connector visibility and allowed operations in CloverDX Server, CloverDX Designer, and CloverDX Wrangler.
Only users assigned to a user group that has one of the following permission combinations are allowed to view the Permissions tab:
-
Libraries administration + Edit sandbox + the WRITE library-level permission for the given library on the Permissions Tab OR the user is the library owner
The tab includes separate sections for library-level permissions that affect the visibility and allowed operations in CloverDX Server and CloverDX Designer, and for data source connectors and data target connectors in the Data Catalog in CloverDX Wrangler if any are present in the given library.
| Any change in library permissions will automatically log out all users assigned to the affected group from all their active sessions and force them to log in again. |
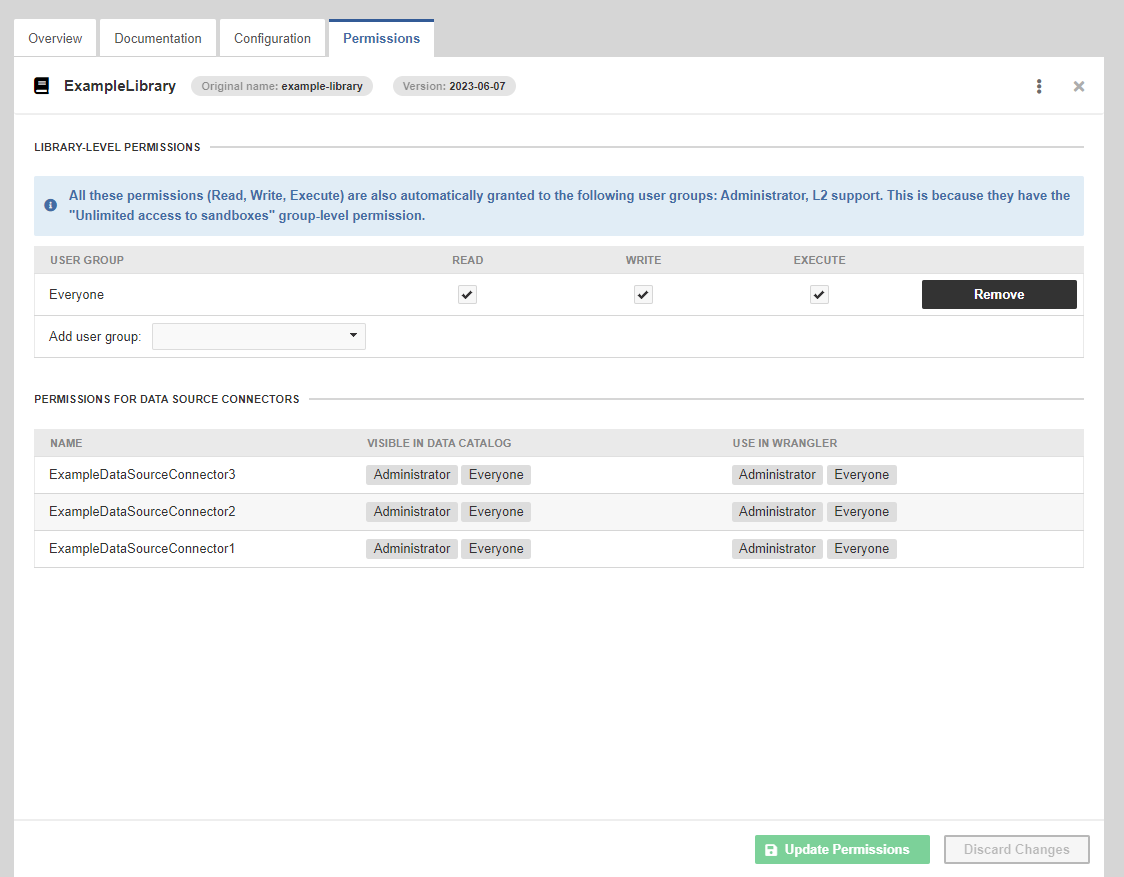
Figure 141. Permissions tab
| Any changes performed in the tab will be saved only after clicking on the Update Permissions button. |
Library-Level Permissions
The library-level permissions allow the following permissions to be set:
-
READ: controls if a user group can see the library in the list of libraries, and other places in CloverDX Server and CloverDX Designer.
-
WRITE: in combination with the Edit sandbox permission, controls if a user group can see the library Configuration and Permissions tabs, and edit information on these tabs.
-
EXECUTE: controls if a user group can execute graphs, subgraphs, jobflows, or data services from the public interface of the library.
| When there are library dependencies, it is important to set the same library permissions on all the dependent libraries to ensure that library jobs or data connectors can run successfully. |
Data Connectors Permissions
Data source and data target connector permissions are set individually for each data connector by linking a user group to permission. To add a user group to a permission, click in the column to activate the edit mode, and select the desired user group from the list. To remove a group, click on the X button on the right side of the group.

Figure 142. Adding or removing user groups
The data connector permissions allow the following permissions to be set:
-
VISIBLE IN DATA CATALOG: controls if a user group can see the data connector in the Data Catalog in CloverDX Wrangler. Users with only the READ permission will not be able to see data preview or add the connector to their sources.
-
USE IN WRANGLER: controls if a user group can add the data connector to their sources and use it Wrangler jobs.
Data Connector Permissions Logic
Users assigned to a user group that has the Unlimited access to sandboxes permission are automatically granted all the library-level and data connector permissions. For other user groups, it is important to set both the library-level permissions and data source or data target connector permissions in the same way. This is because data connectors run on CloverDX Server to generate and display data on the Wrangler side. Having the same permissions for the libraries in which they are installed, and for the data connectors themselves, will ensure that the data connectors will be able to generate and display data successfully.
To make the configuration easier, there is a check in place, which will display a warning if there is a discrepancy between the library-level and data connector permissions. The warning will state which permissions and for which user groups will be ignored, and a warning icon will be displayed next to the group. The configuration can still be saved even when warnings are present; however, it is strongly recommended to correct the permission setup and remove all such warnings to ensure that the data connector can run without an issue.
| When a library that includes data connectors is dependent on other libraries, it is important to set the same library-level permissions on all the dependent libraries as well to ensure that the data connectors can run successfully. |
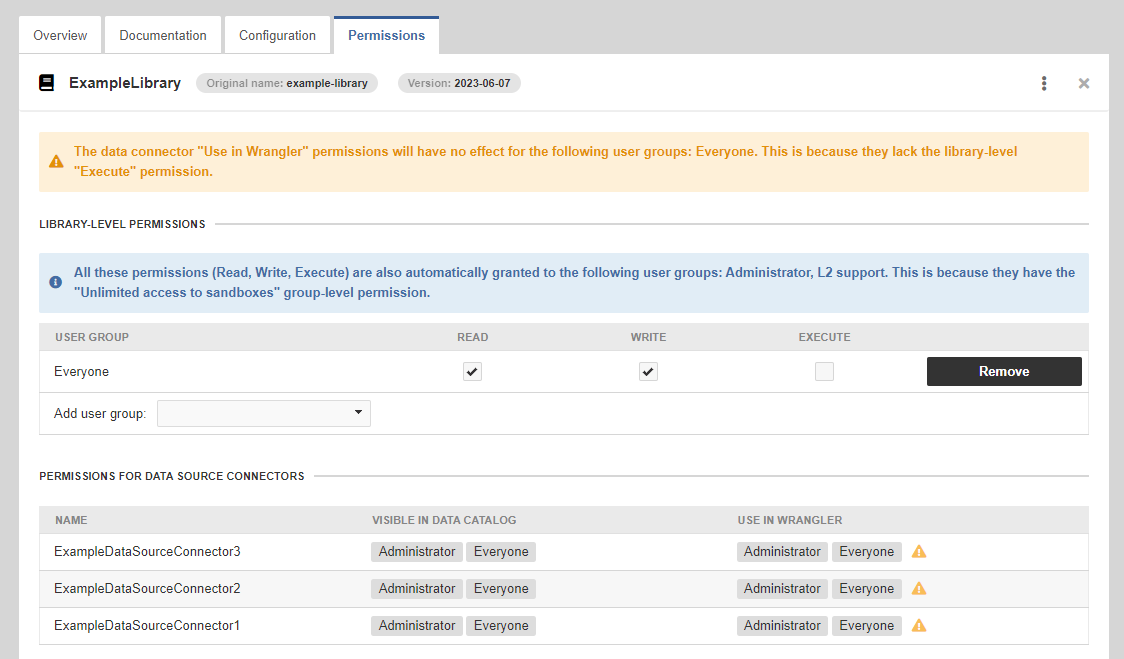
Figure 143. Data source connector permissions warning
Library Editing
Click on the Edit button in the upper right corner of the Overview tab to access the Edit mode, which allows you to modify the Label (Library name) or Description of a library.
Only users assigned to a user group that has one of the following permissions combinations are allowed to edit libraries:
-
Libraries administration AND Edit sandbox AND the WRITE library-level permission for the given library on the Permissions Tab (OR the user is the library owner)
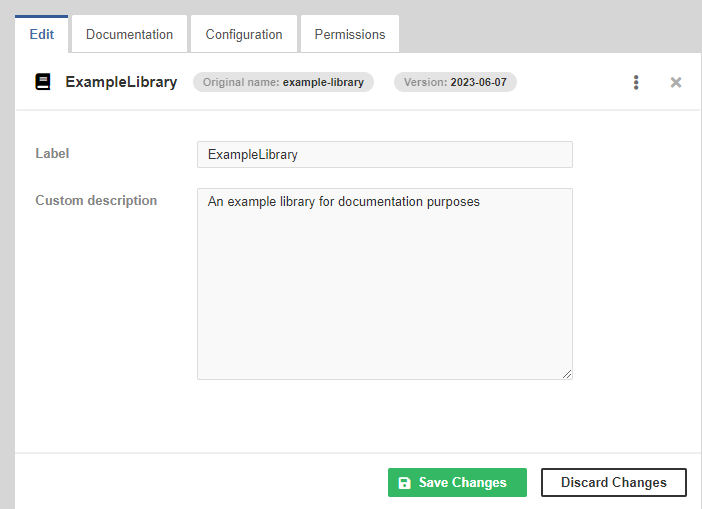
Figure 144. Library editing
Library Deleting
To delete an installed library click on the library that should be removed and use the ⋮ menu on any of the tabs to display the Delete library option.
Only users assigned to a user group that has one of the following permissions combinations are allowed to delete libraries:
-
Libraries administration AND Delete Sandbox AND the WRITE library-level permission for the given library on the Permissions Tab (OR the user is the library owner)
Library and Library Repository Configuration Exports
Installed Library and Library Repository information can be easily exported in the CloverDX Server console under Configuration > Export.
Library and Library Repository Configuration Import
When you import Library or Library Repository configuration in the CloverDX Server console under Configuration > Import, CloverDX Server tries to find imported libraries in the list of installed libraries. If they are found they will be updated, otherwise, they will be installed from available repositories. Libraries are matched according to their original name, version, and library ID.
Library Management through REST API
Libraries can be installed and managed programmatically using our REST API. The REST API can be used to perform the following:
-
Retrieve information about available libraries.
-
Upload and install new libraries.
-
Update, disable, enable, and delete existing libraries.
-
Initialize libraries and schedule/run health checks to ensure their proper functioning.
Refer to the REST API Catalog within the CloverDX Console for instructions and code samples.