Using Data Services
Deploying Data Service
To deploy Data Service from the Server,
go to Data Services tab,
click Publish Data Service job
and choose a sandbox and .rjob file.
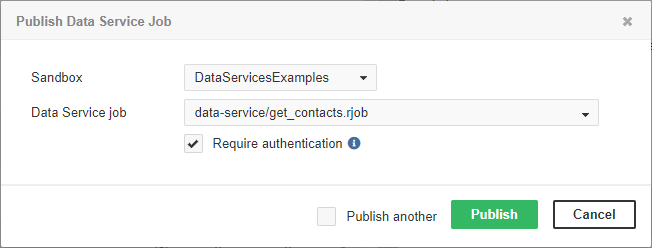
Figure 40.19. Publishing Data Service job
You can choose between Data Service with or without required authentication. In the latter case, the Data Service will run under the specified account.
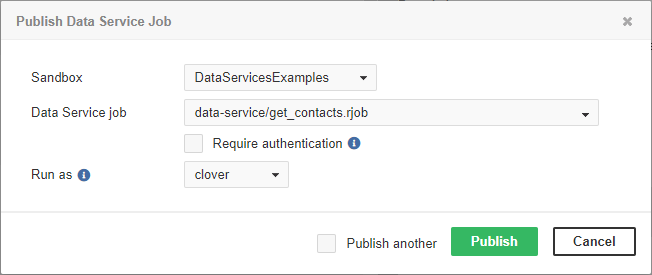
Figure 40.20. Publishing Data Service job that does not require authentication
Publishing Multiple Jobs
To deploy multiple jobs, tick the Publish another checkbox. After deploying one job, the dialog for publishing Data Service is displayed again to let you enter the next one.
Publishing and Unpublishing Data Service from Sandbox
You can deploy Data Service directly from a sandbox. To do so, you need the read access to the sandbox and List Data Services and Manage Data Services privileges.
In the Sandboxes section of the Server GUI, select a data service to be published/unpublished. In the top right corner of the overview, there are options for publishing or unpublishing the data service, as well as editing, showing data service in Execution History, downloading/downloading as ZIP and deleting the data service.
Publishing Data Service Examples
CloverDX Server contains a built-in set of Data Service examples. These examples are not deployed by default.
The Data Service examples can be deployed directly from the Data Services tab. If you do not have any Data Service deployed, click the Publish Data service Examples link.

Figure 40.21. Publishing Data Service examples
If there is an existing Data Service, the button to publish examples is in the menu accessible under the three-dot-button.
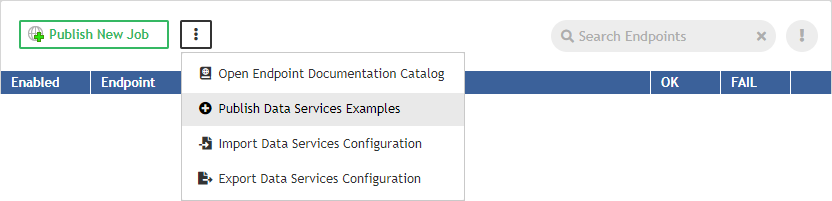
Figure 40.22. Publishing Data Service examples - II
Changing Data Service to Anonymous
By default, the Data Service requires a client to send the credentials. To create the Data Service that does not require authentication, switch to the Configuration tab in the Data Service Detail pane and change Authentication method to Do not require authentication. The Data service runs with privileges of an existing user; therefore, you should set the Run as field to the suitable user. This user should have permissions necessary to run the Data Service.
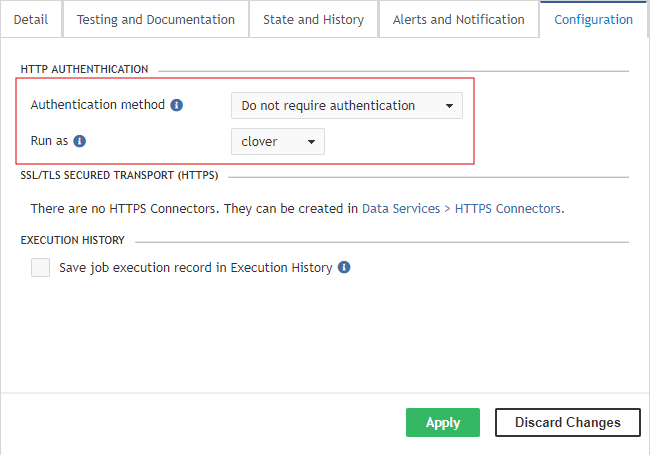
Figure 40.23. Configuring Anonymous Data Service
In the list of Data Services, the Data Service that does not require credentials is indicated by unlocked padlock icon.

Figure 40.24. Data Service without authentication
Running Data Service on HTTPS
By default, the Data Service runs on HTTP and you can configure it to run on HTTPS.
To run Data Service on HTTPS, create a new HTTPS Connector.

Figure 40.25. Creating a new Data Service Connector
Enter a name, port, keystore path, and keystore and key passwords.
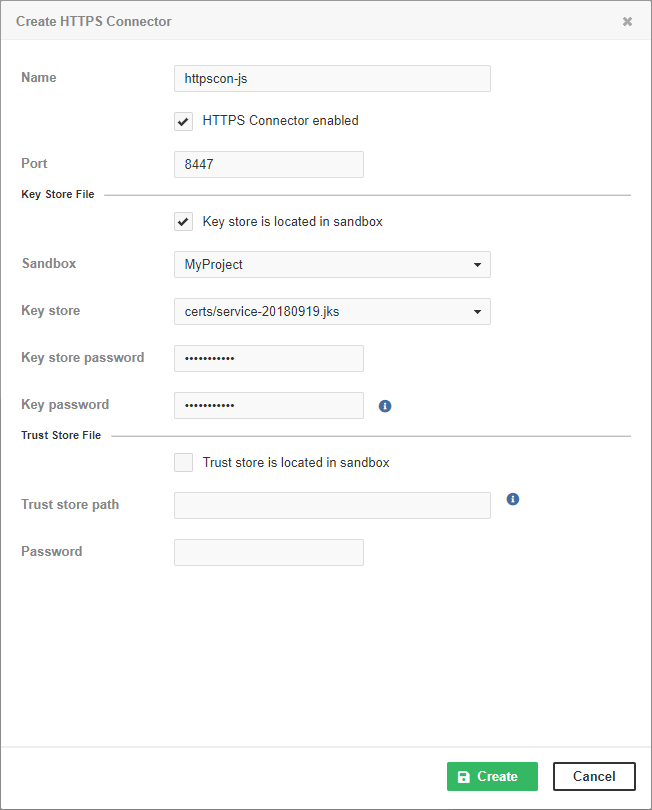
Figure 40.26. Creating a new Data Service Connector II
In → , select the Data Service to be running on HTTPS and switch to the Configuration tab.
Select the HTTPS connector from the combo box and click the button. Now, the Data Service runs on HTTPS.
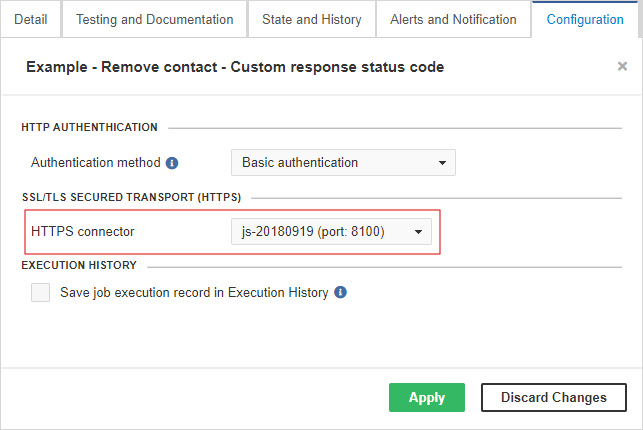
Figure 40.27. Using the HTTPS Connector in Data Service endpoint
You can have more independent HTTPS contexts running on one Server. There can be multiple Data Services running on the same HTTPS context.
Running Data Service on HTTPS on Cluster
This case extends the case of Running Data Service on HTTPS. Different Cluster nodes have different domain names, but the Java KeyStore has to have one certificate. There are two way to solve the problem with certificates.
Use a wildcard certificate. The keystore file should be placed on the shared file system.
Use different certificates for each Cluster node. The keystores with the certificates must be on the same path on all Cluster nodes.
Monitoring Data Service
To see the activity of Data Service, use the list of Data Services. There you can see the main overview of data services.
The state of a particular Data Service is on the State and History tab.
Testing Data Service
To test the Data Service, select the Data Service in the list, switch to the Testing and Documentation tab and click the button. Results appears in the Responses part of the tab.
Performance Tuning
To improve performance, do not save job execution records in Execution History. To do so, do not tick Save job execution records in Execution History on Configuration tab.
Exporting Data Service Configuration
You can export the Data Service configuration from → tab. Click the three-dot-button and select Export Data Services Configuration from context menu.
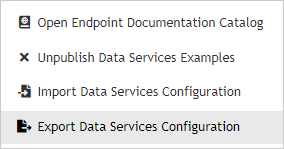
Figure 40.28. Data Services - Export
The Data Services configuration will be exported.
You can also export Data Service configuration in → See Server Configuration Export.
Importing Data Service Configuration
You can import the Data Service configuration from → . Click the three-dot-button and select Import Data Services Configuration from the context menu.
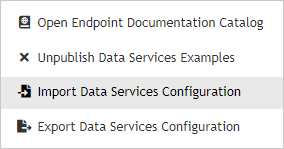
Figure 40.29. Data Services - Import
You can also import the Data Service configuration directly in → See Server Configuration Import.
Avoiding Premature Marking of Data Service as Failing
Data Service might prematurely switch to a failing state if the failure indication is set up to switch to a failing state after a given percentage of executions fails in a given time window. E.g. First execution fails.
To avoid this, you can set the minimum number of events necessary to be taken into account when calculating the change of Data Service state.
It can be set with the dataservice.failure.ratio.min.record.count configuration property.
The default value is 10 executions.
It can be set in → → . Add a line containing
dataservice.failure.ratio.min.record.count=10
to the configuration file.
You can set it to any reasonable positive integer. This configuration is valid for all Data Services available on the Server.
Looking up Particular Data Service
If you have multiple Data Services available, you can search for a specific Data Service:
If you know the endpoint name, you can look it up. Enter the text into the Search endpoints field and click the button. The Data Services will be filtered.
The entered text will be searched in the title of the Data Service, in the name of the request method,
in the name of .rjob file and in the path that the Data Service uses.
If you would like to see invalid endpoints only, click the failing and invalid only icon. The both filters can be combined.
To switch off the filters, click the button.
Resetting State of Failing Data Service Endpoint
If the Data Service endpoint is in the failing state and the problem has been fixed, you can reset the endpoint state manually.
To reset the state, open the details of the endpoint, switch to the Alerts and Notification tab and click the button.
If the endpoint has an email address set, a notification email will be sent to this address.