keytool -genkeypair -alias cloverdxserver -keyalg RSA -storetype jks -keystore ./serverKS.jks \
        -keypass p4ssw0rd -storepass p4ssw0rd -validity 365 -keysize 3072 \
        -dname "cn=localhost, ou=Support team, o=CloverDX, c=CZ"
        -ext san=dns:test.example.com,ip:127.0.0.1
Version
Securing Server with HTTPS
This guide explains how to set up HTTPS for your CloverDX Server at the application server level. HTTPS encrypts communication between your server and clients, ensuring data security and user trust.
Before proceeding, consider which certificate approach you want to go with. There are two main approaches to securing your CloverDX Server with HTTPS:
-
Self-signed certificate: This is a simpler option, but the certificate won’t be trusted by default by web browsers. It’s suitable for testing environments or internal deployments.
-
Signed certificate from a certificate authority (CA): This offers the highest level of trust because the certificate is validated by a trusted authority (internal or external commercial CA). It’s recommended for production environments where you want to avoid browser warnings.
Our guide describes two options for certificate and keystore creation and management:
-
Using the keytool command (CLI): This method requires familiarity with command-line tools. This method offers granular control over the certificate creation process, empowering you to tailor it to your needs.
-
Using KeyStore Explorer (GUI): This intuitive graphical interface simplifies the complexities of certificate management, allowing you to quickly and easily generate keystores and key pairs.
|
Configuration overview
Here’s a summary of the steps to enable HTTPS for your CloverDX Server:
-
If you need a CA-signed certificate:
-
Generate a certificate signing request (CSR) and have it signed by a CA.
-
Import the signed certificate into your keystore.
-
-
Configure your application server to use the keystore.
Creating a keystore and key pair
Keytool command
The commands below will generate a JKS keystore and keypair with example defaults. See Keytool commands breakdown for the command options explanation.
Linux
Windows
keytool -genkeypair -alias cloverdxserver -keyalg RSA -storetype jks -keystore ./serverKS.jks ^
        -keypass p4ssw0rd -storepass p4ssw0rd -validity 365 -keysize 3072 ^
        -dname "cn=localhost, ou=Support team, o=CloverDX, c=CZ" ^
        -ext san=dns:test.example.com,ip:127.0.0.1
Keytool commands breakdown
-
Alias: specifies an alias for the key.
-
Keyalg: sets the key algorithm. Only RSA is supported.
-
Storetype: Specifies the storetype (jks).
-
Keystore: sets the keystore file name to store the certificate.
-
Storepass: password for the keystore.
-
Keypass: password for the private key.
-
Validity: validity in days.
-
Keysize: key bit size. For production deployments, at least
3072is recommended. For non-production deployments,2048should suffice. However, always consult your organization’s internal security policies and standards for specific key size requirements. -
Dname: sets the Distinguished Name (DN) fields. These fields are especially important when asking a certificate authority (CA) to sign your request. It should uniquely identify your entity. Refer to your CA requirements to see which DN fields they require (e.g. DigiCert). In our example below we use 4 values:
-
Common name (cn): We use
localhostas our default hostname. Change it to your desired hostname. -
Organizational unit (ou)
-
Organization (o)
-
Country (c)
-
-
Subject alternative name extension (
-ext san): allows multiple domain names or IP addresses to be associated with a single certificate.
|
|
KeyStore Explorer
Creating a keystore
Open the KeyStore Explorer and click on the New button or use the Ctrl+N shortcut. You will be prompted to select the keystore type. Select the JKS (Java Key Store) type.
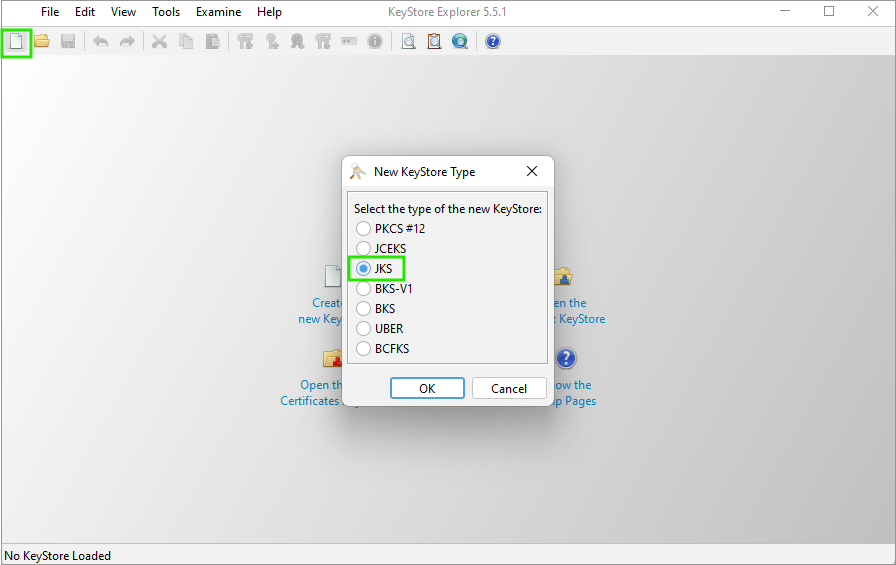
Figure 86. Create new keystore
Generating a key pair
Click on Generate Key Pair or use the Ctrl+G shortcut to generate a key pair. For production deployments, at least 3072 is recommended. For non-production deployments, 2048 should suffice. However, always consult your organization’s internal security policies and standards for specific key size requirements.

Figure 87. Algorithm selection
A new window opens where you can change the Validity Period. Then click the Edit name button.
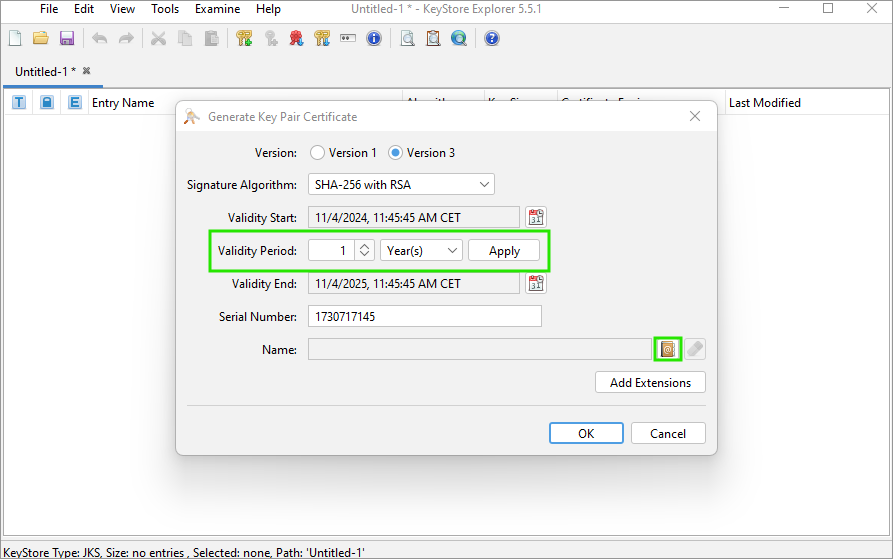
Figure 88. Validity period and Edit name option
Fill in the needed Distinguished name fields. For more information, see the Keytool commands breakdown above.
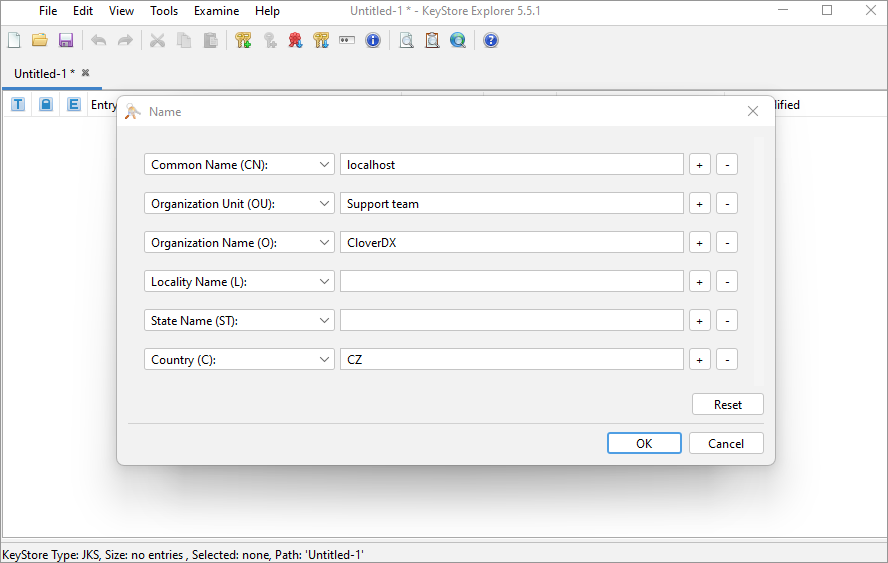
Figure 89. Distinguished Name options
Click OK to get to the previous window and click on Add Extensions.
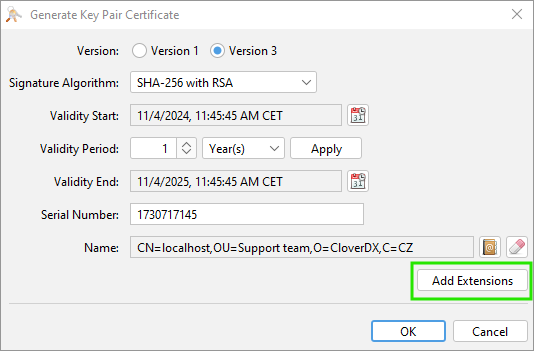
Figure 90. Add Extensions
You can display the list of available extensions by clicking on the + button. Add all the extensions required by your certificate authority or by your internal rules. For example, to add the Subject Alternative Name extension, select it from the list, and then add all the alternative IP addresses or DNS names that you need.
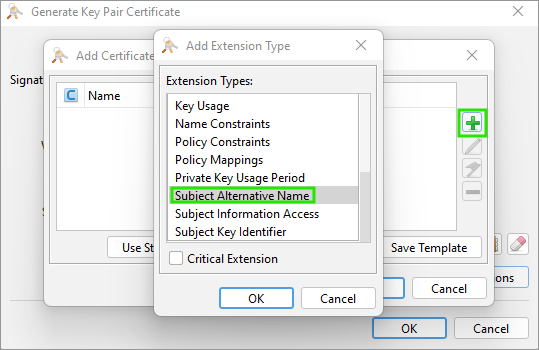
Figure 91. List of extensions
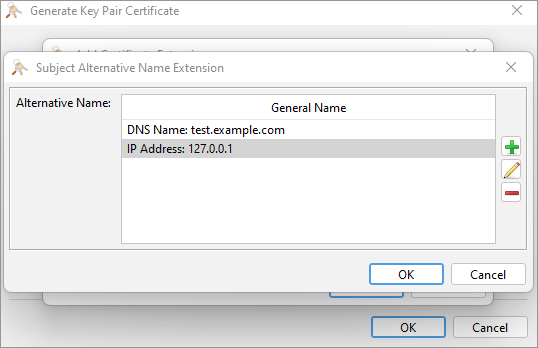
Figure 92. Subject Alternative Name
After you fill in all the information that you need and click on the OK button, you will be prompted to enter an Alias for your certificate. We will call it “cloverdxserver” in our example. The Alias can always be changed by right-clicking on the key pair and selecting the Rename option.
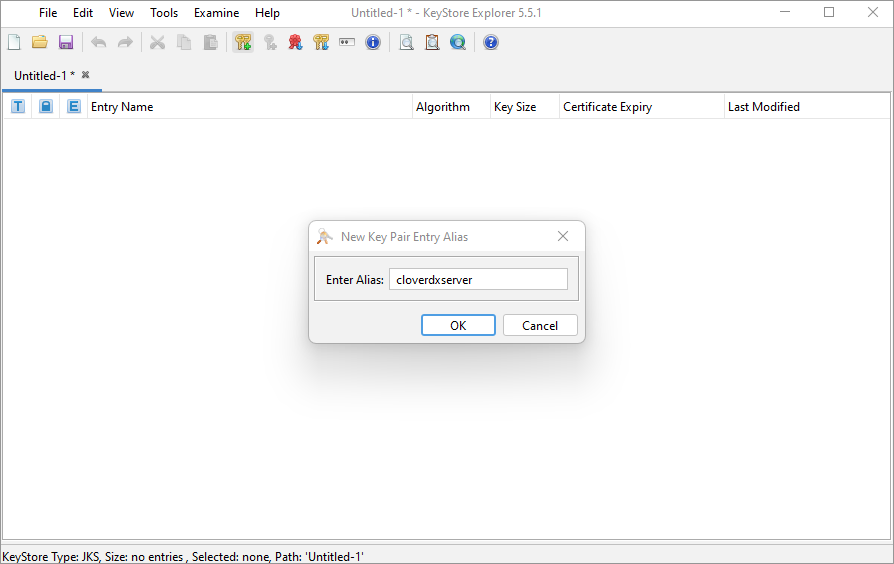
Figure 93. Enter an Alias name for the key pair
Enter a password for the key pair.
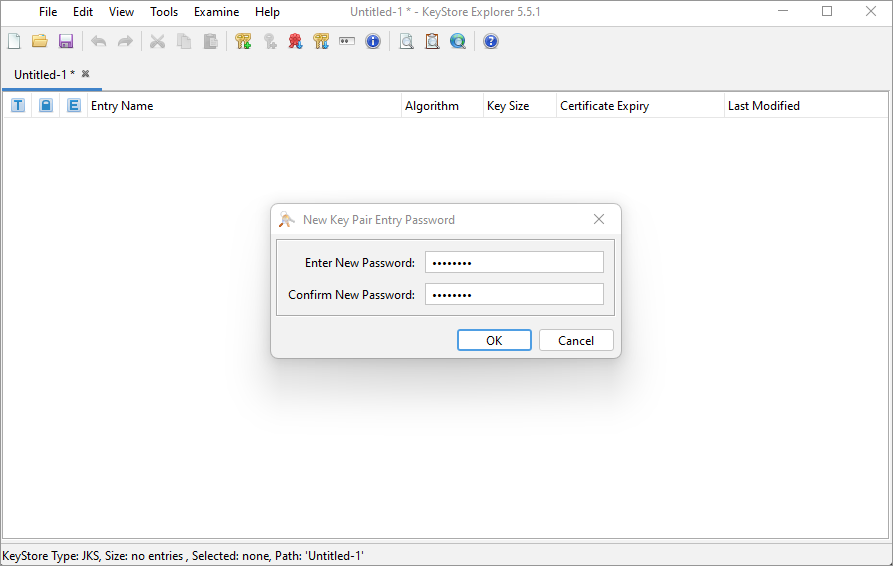
Figure 94. Password prompt
You should now see the generated key pair record.

Figure 95. Successfully generated key pair
Saving the keystore
Now save the keystore (click on Save or press Ctrl+S). You will be prompted to enter and confirm a password - it is recommended to use the same password as used for the key pair.
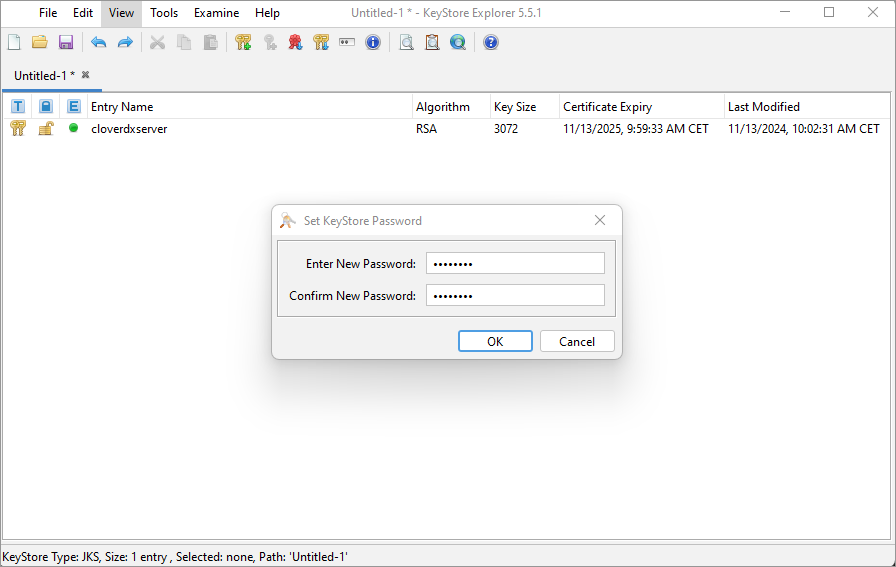
Figure 96. Creating keystore password
Save the keystore as a keystore file.
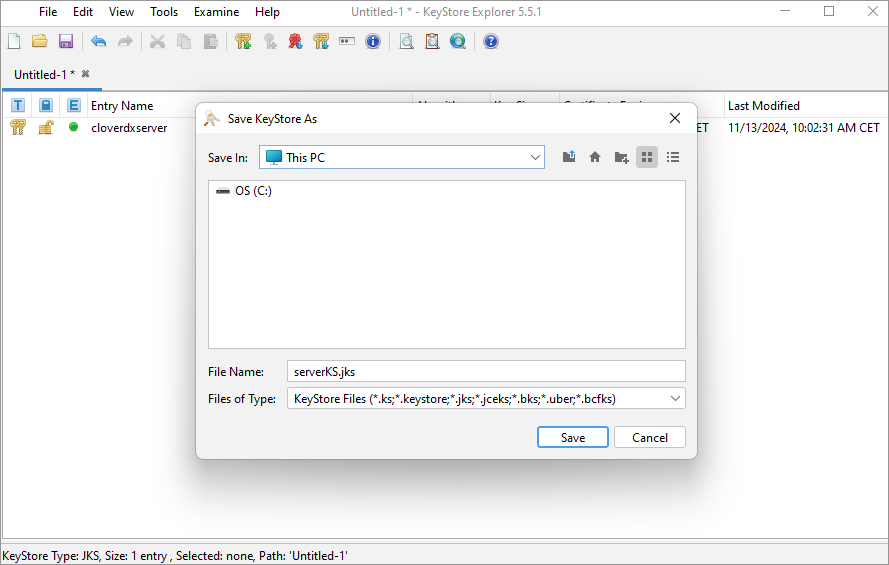
Figure 97. Saving the .jks file
|
|
Generating a certificate signing request (CSR)
To obtain a signed certificate from a certificate authority (CA), you’ll need to generate a certificate signing request (CSR). After generating the CSR, submit it to your chosen certificate authority (CA) for signing. This could be an internal CA within your organization or an external commercial CA. The CA will verify your request and issue a signed certificate.
Keytool command
Linux
keytool -keystore serverKS.jks -certreq -alias cloverdxserver -keyalg rsa \
        -validity 365 \
        -ext san=dns:test.example.com,ip:127.0.0.1 \
        -file server.csr
Windows
keytool -keystore serverKS.jks -certreq -alias cloverdxserver -keyalg rsa ^
        -validity 365 ^
        -ext san=dns:test.example.com,ip:127.0.0.1 ^
        -file server.csr
You will be prompted to enter the keystore password.
Keytool Explorer
Right-click on your key pair and select Generate CSR.
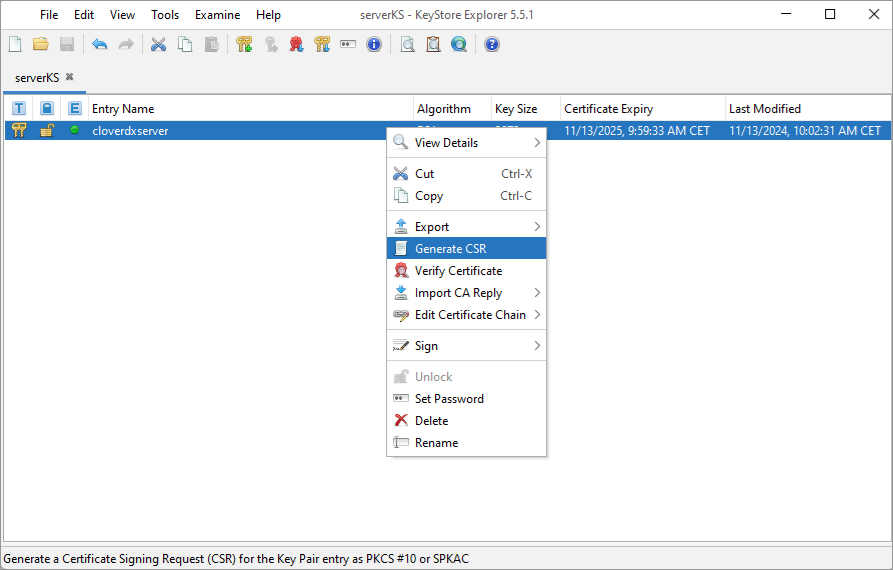
Figure 98. Generate CSR
Don’t change any of the defaults, just select the output path and name in the CSR file field.
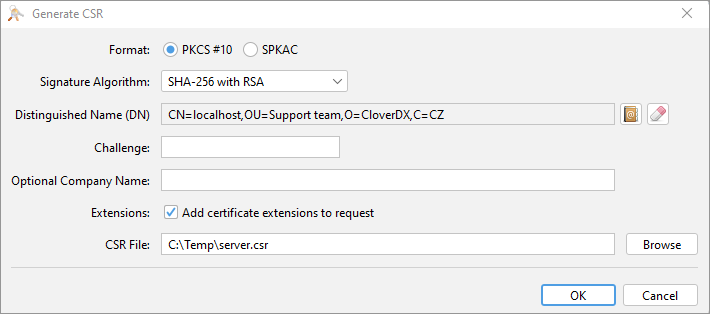
Figure 99. Export CSR to a file
Importing signed certificate
Once signed, import the signed certificate into your keystore.
Import the signed certificate into your keystore.
Keytool command
Run the following command to import the signed certificate:
keytool -importcert -alias cloverdxserver -file careplyfilename.cer -keystore serverKS.jks -trustcacerts
KeyStore Explorer
Right-click on your key pair, navigate to the Import CA Reply option, and select the .p7r or .cer signature reply file provided by your certificate authority.
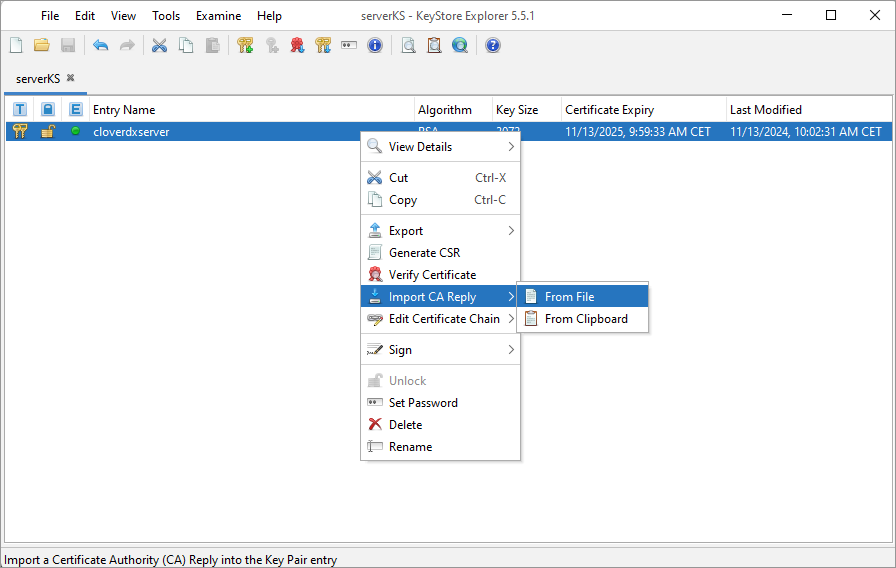
Figure 100. Import CA reply
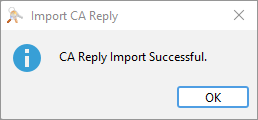
Figure 101. CA reply was successfully imported
Make sure to save the keystore changes after importing.
Server configuration
To configure your application server to use the keystore and enable HTTPS, follow the steps below. Here’s an example for Tomcat:
-
Move the generated
.jksfile to the<TOMCAT_INSTALL_DIR>/Confdirectory. -
Edit the
server.xmlfile and add the following configuration:
<!-- Define an SSL Coyote HTTP/1.1 Connector on port 8443 -->
<Connector
           protocol="org.apache.coyote.http11.Http11NioProtocol"
           port="8443" maxThreads="200"
           maxParameterCount="1000"
           scheme="https" secure="true" SSLEnabled="true"
           keystoreFile="pathToTomcatDirectory/conf/serverKS.jks"
           keystorePass="p4ssw0rd"
           clientAuth="false" sslProtocol="TLS"/>
Important notes:
-
keystoreFile: Use forward slashes (/) in the
keystoreFilepath, both on Linux and Windows. -
keystorePass: Replace
p4ssw0rdwith your actual keystore password. -
port number: Ensure that port 8443 is not blocked by your firewall.
After making these changes, restart your CloverDX Server. Once configured, your CloverDX Server will be accessible via HTTPS on port 8443, e.g., https://localhost:8443/clover.