Version
8. Designer configuration
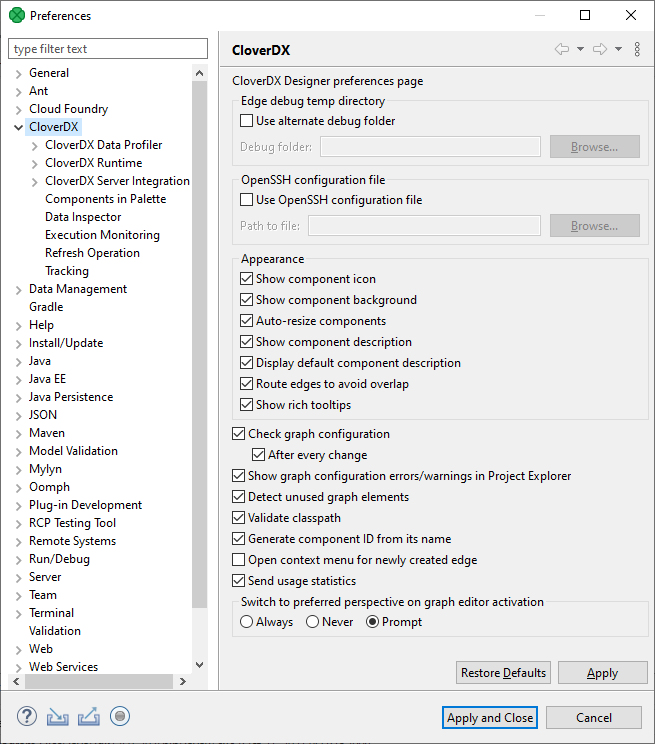
Figure 60. CloverDX Server Integration
| Option | Description | Default Value |
|---|---|---|
Edge debug temp directory |
||
Use alternate debug folder |
Allows the user to specify the path to an alternate folder containing edge debug files ( |
disabled |
OpenSSH configuration file |
||
Use OpenSSH configuration file |
Specifies the location of the OpenSSH configuration file which allows you to define SSH access outside of CloverDX Designer.
The path to the file is |
disabled |
Appearance |
||
Show component icon |
Switches component icons on or off. |
enabled |
Show component background |
Enables or disables the background color of components. |
enabled |
Auto-resize components |
Automatically adjusts components' size to fit their name. |
enabled |
Show component description |
Displays or hides components' description in a graph. If Display default component description is disabled, only user-defined description is visible. |
enabled |
Display default component description |
When Show component description is enabled, it shows the components' default description (e.g. path to the file in Readers or Writers). |
enabled |
Route edges to avoid overlap |
Enables or disables different edge-routing algorithm. |
enabled |
Show rich tooltips |
Enables or disables detailed tooltips on edges. |
enabled |
Check graph configuration |
Enables or disables graph configuration check. Without checking, errors on components are not displayed. |
enabled |
Show graph configuration errors/warnings in Project Explorer |
Allows to suppress detected configuration errors and warnings in Project Explorer and Problems views. |
enabled |
Detect unused graph elements |
Enables or disables updates and reporting of used/unused graph elements. Disabling can solve some specific performance issues. |
enabled |
Validate classpath |
Checks whether the content of the classpath file is valid for both Designer and Server. Can be disabled in case it significantly slows down the working process (opening new projects, etc.) or indicates false positives. |
enabled |
Generate component ID from its name |
Generates component identifier based on its name. |
enabled |
Open context menu for newly created edge |
Opens the context menu after creating an edge between two components. In the menu, you can select metadata for the edge. |
disabled |
Runtime Configuration
CloverDX Runtime is one of architectural layers of CloverDX Designer. It takes care of running graphs and subgraphs.
Current state of CloverDX Runtime can be seen in the right bottom corner of the perspective.
CloverDX Runtime is configured in the Preferences dialog: open and choose .
The CloverDX Runtime Configuration serves to set up:
Temporary Disk Space Settings
The temporary disk space is necessary for debug files. You can store temporary files either into a temporary directory within the workspace directory or into a user-defined directory.
Engine configuration
Change max record size, etc. See Engine configuration.
Amount of Memory for Java Heap Size
It is important to define some memory size, because Java Virtual Machine requires memory to run graphs.
Additional Virtual Machine Parameters
Additional libraries can be added to the classpath.

Figure 61. CloverDX Runtime
To take effect of the changes in runtime configuration, restart of CloverDX Runtime is needed. The runtime menu is accessible in the right bottom corner of CloverDX window.

Figure 62. Accessing CloverDX Runtime menu
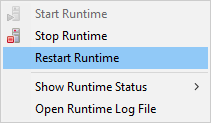
Figure 63. Restarting CloverDX Runtime
Example 3. Adding an External Library to Classpath
To add an external library to the CloverDX runtime's classpath, the -Djava.library.path=path/to/library option should be used.
To add libraries located in C:/path/to/lib, type -Djava.library.path=C:\path\to\lib into the VM parameters field.

Figure 64. Adding library to classpath using VM parameters
Additional VM Parameter
Server mode (-server)
There are two flavors of JVM: client and server. The client system (default) is optimal for applications which need fast start-up times or small footprints. Switching to server mode is advantageous to long-running applications for which reaching the maximum program execution speed is generally more important than having the fastest possible start-up time. To run the server system, Java Development Kit (JDK) needs to be downloaded.
Logging
CloverDX Runtime writes its logs into Console tab.
Here you can set up messages of which severity are written down. If you set up a particular level, you can see messages of the specified level and more severe ones. For example, if you set up level to INFO, messages of INFO and WARN levels are logged.
Do not forget to restart the CloverDX Engine to take effect of the change.
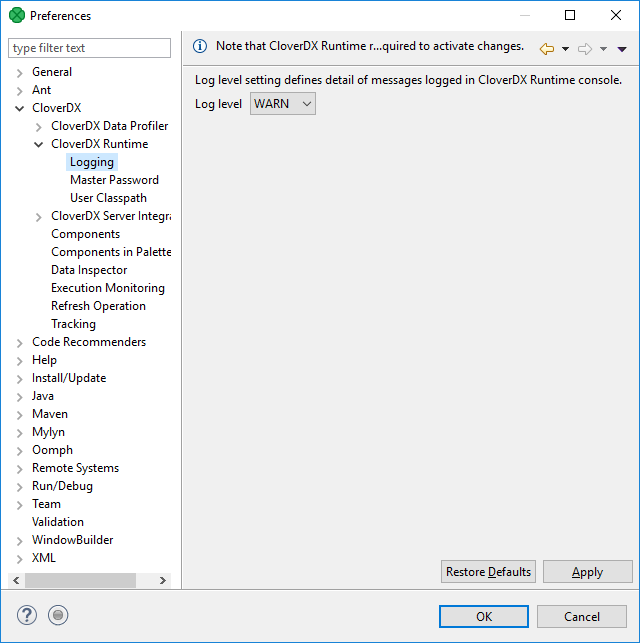
Figure 65. CloverDX Runtime - Logging
Master Password
Master Password serves for encryption and decryption of Secure graph parameters.
You need to set up the Master Password to be able to use the Secure parameters on CloverDX Designer.
The maximum length of the master password is 255 characters; there are no other restrictions or complexity requirements.

Figure 66. Setting the Master password
If you use the Clear Master Password button, restart of CloverDX Runtime is required.
User Classpath
You can add your own libraries to the CloverDX Runtime classpath.
User Entries
Add your libraries under User Entries.

Figure 67. CloverDX Runtime - User Classpath
Add Projects
Add Project adds the source code of a project and all libraries of the project which are marked as exported to the classpath.
Note: Libraries can be marked as exported using in context menu of corresponding project.
Add JARs
Adds .jar file(s). The files have to be within the workspace.
Add External JARs
Adds .jar file(s). The files do not have to be within the workspace, they may be placed within an arbitrary directory on the file system.
Advanced
The Advanced button opens an additional dialog to choose not frequently used options.

Figure 68. User Classpath - Advanced Options
Add Folder
Adds a folder with .class files within the workspace.
Add External Folder
Adds a folder with .class files.
The folder can be on arbitrary place within the system, it does not have to be in the workspace.
Add Classpath Variables
Adds a variable name pointing to a .jar file, folder with .class files.
It may be within the workspace or out of the workspace.
Add Library
Adds a library (.jar file or set of .class files with a predefined name).
Opens a wizard for adding a library. You can use it, for example, to add CloverDX Engine libraries.
Add Variable String
Adds an environment variable. The value of the variable will be added to the classpath.
CloverDX Server integration
Preferences of CloverDX Server Integration allow you to tweak communication between Designer and Server.
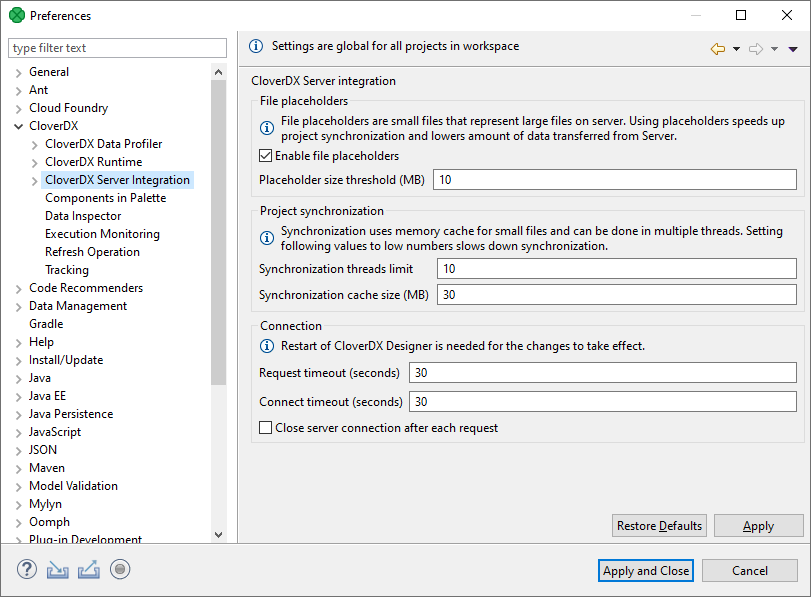
Figure 69. CloverDX Server Integration
| Option | Description | Default Value |
|---|---|---|
Enable File Placeholders |
Enables usage of placeholder files. The placeholder file serves to save your disk space and to speed up synchronization in server projects. The files with a size above the specified limit are replaced with placeholder files (in Designer). Usually, you do not need to see the content of these files and you do not commit them into repository. See CloverDX Server project. |
enabled |
Placeholder Size Threshold |
Files above this threshold are replaced with placeholder files. The size is in MB. |
10 |
Synchronization Threads Limit |
The maximum number of threads used for synchronization between CloverDX Designer and CloverDX Server. Using more threads can speed up synchronization in networks with high latency. |
10 |
Synchronization Cache Size |
While downloading files from CloverDX Server during synchronization, the content of files is cached in memory to improve the performance. This parameter sets the cache size. |
30 |
Request Timeout |
A request timeout of connection to CloverDX Server. The request timeout is in seconds. |
30 |
Connect Timeout |
Timeout of the connection to CloverDX Server. The timeout is in seconds. |
30 |
Close server connection after each request |
Enables closing the connection to the server after each request. Used for performance tuning. |
false |
Restart CloverDX Designer to use new timeout values.
Ignored files
The Ignored files setting allows you to avoid synchronization of particular files.
You should not synchronize metadata of version control systems. By default, we exclude metadata files and directories of the most common ones: Bazaar, CVS, Git, Mercurial, Subversion. If you use any other version control system, add its metadata files to the list.
The configuration has the same syntax as the .gitignore file.
This is a global (workspace-scope) configuration template. When a new project is created, this content is copied into the new project configuration. Therefore, any change of this configuration does not change configuration of any existing project.
See also Ignored files in project configuration.
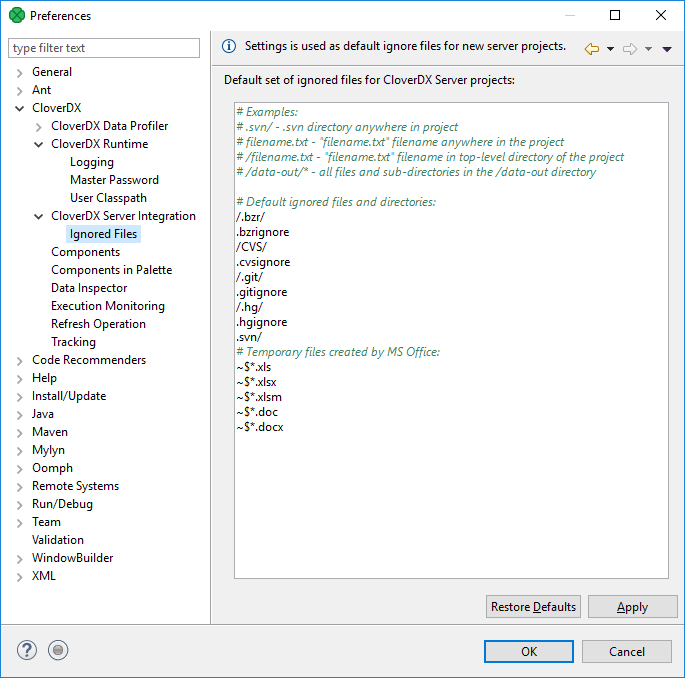
Figure 70. CloverDX Server Integration
Execution monitoring
Execution Monitoring lets you set up status and log update intervals.
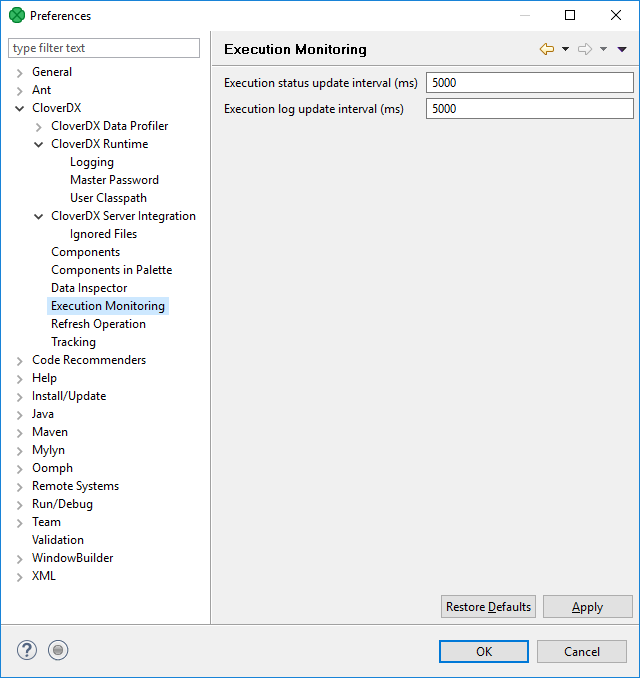
Figure 71. Execution Monitoring
Refreshing the data-out folder is described in Refresh operation.
Java configuration
The JDK installed during CloverDX Designer installation is also used to compile and run your Java and CTL code in local projects. By default, the Designer is installed with the recommended Eclipse Temurin JDK version 17.
When running your jobs in a CloverDX Server environment, the jobs are run with the Java version configured in the Server environment. If your CloverDX Server runs on Eclipse Temurin JDK 17, there is no need to add a different JDK. If your Server environment runs on a different JDK (refer to our Compatibility Matrix here), the default Eclipse Temurin JDK version should in most cases work without an issue as well. However, if you want to ensure that you are developing your code with the same Java version as is configured on the server, you can add the desired JDK and globally change the Java used during runtime.
| Make sure to add a JDK (Java Development Kit) package. JRE (Java Runtime Environment) packages are not supported. |
If you want to switch to a different JDK, perform the steps below:
-
Go to Window > Preferences.
-
Navigate to Java > Installed JREs. By default, you will see the Java version selected during the Designer installation.
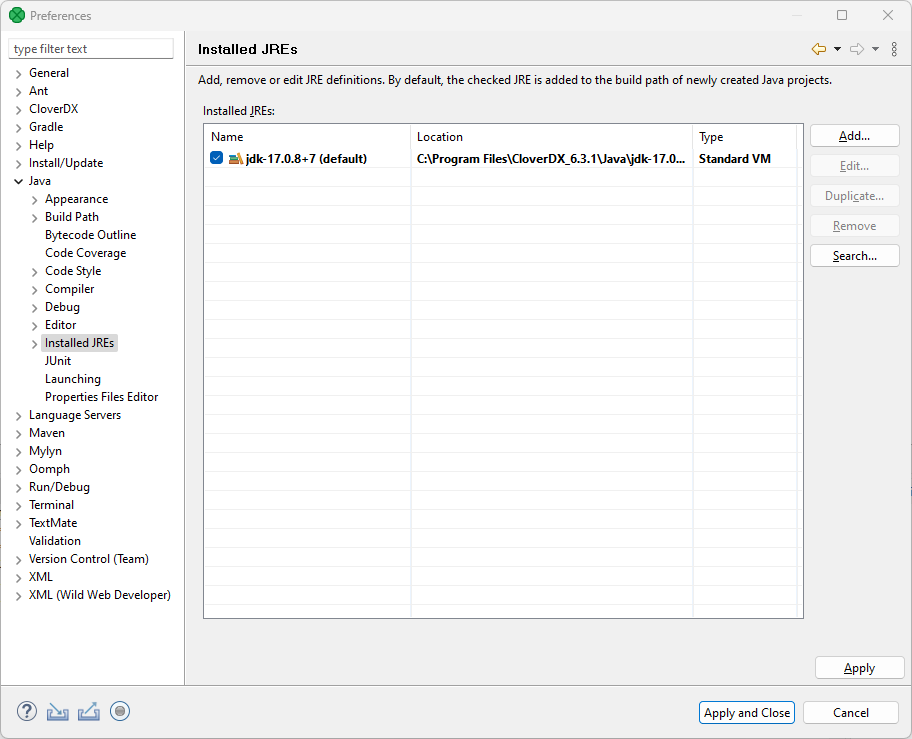
Figure 72. Installed JREs Wizard
-
To add a new Java installation click on Add, select Standard VM, and hit Next.
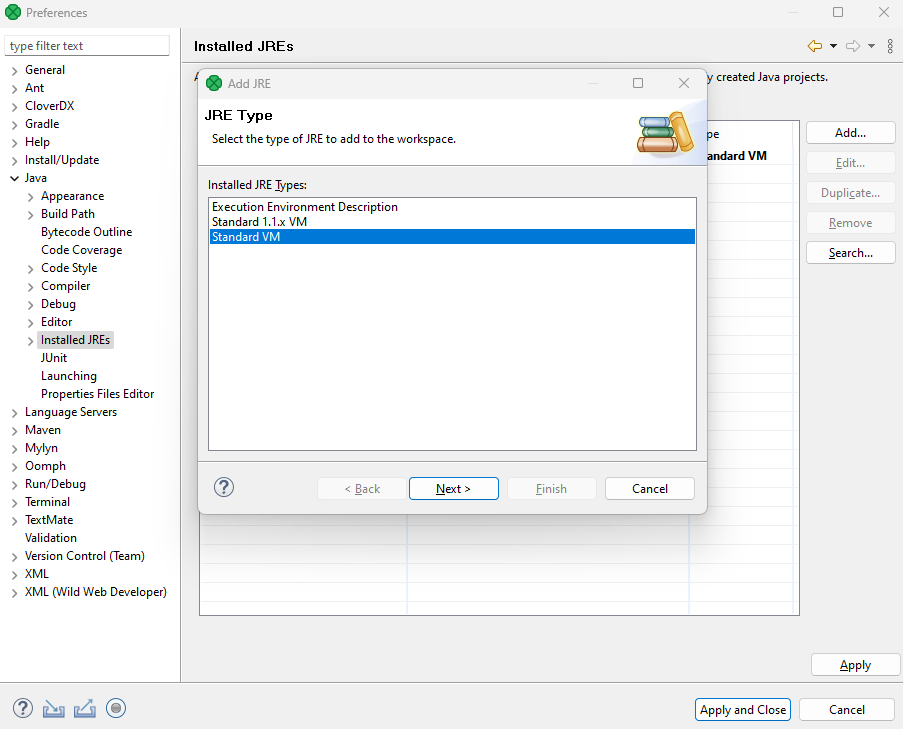
Figure 73. Adding new JRE
-
Select the directory of the desired JDK and click on Finish.
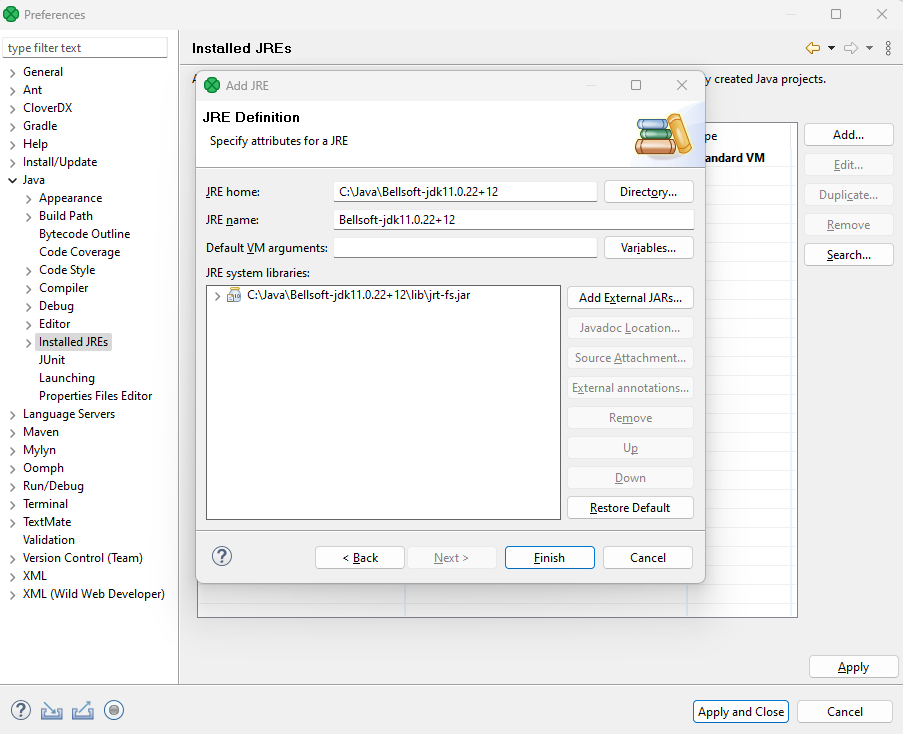
-
To start using the JDK, select the checkbox next to it. After saving this change, the JDK is automatically added to the build path of your projects.
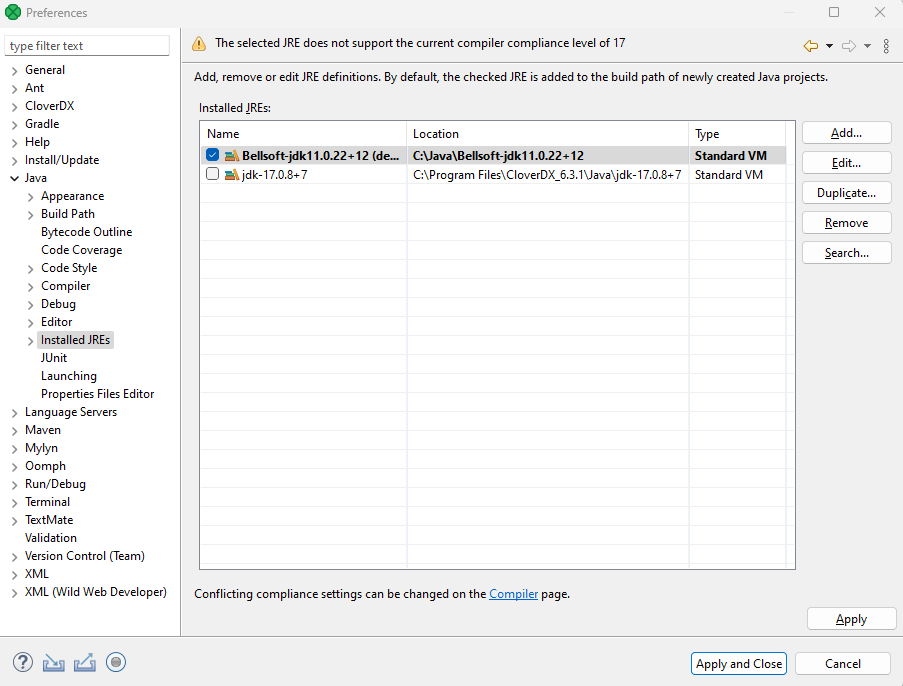
Figure 74. New default JDK and compliance warning
-
If you are switching to a different Java version than version 17, a compliance warning appears. To change the compliance level, click on the link at the bottom to be redirected to the Compiler section. Select the appropriate level here and save your changes.
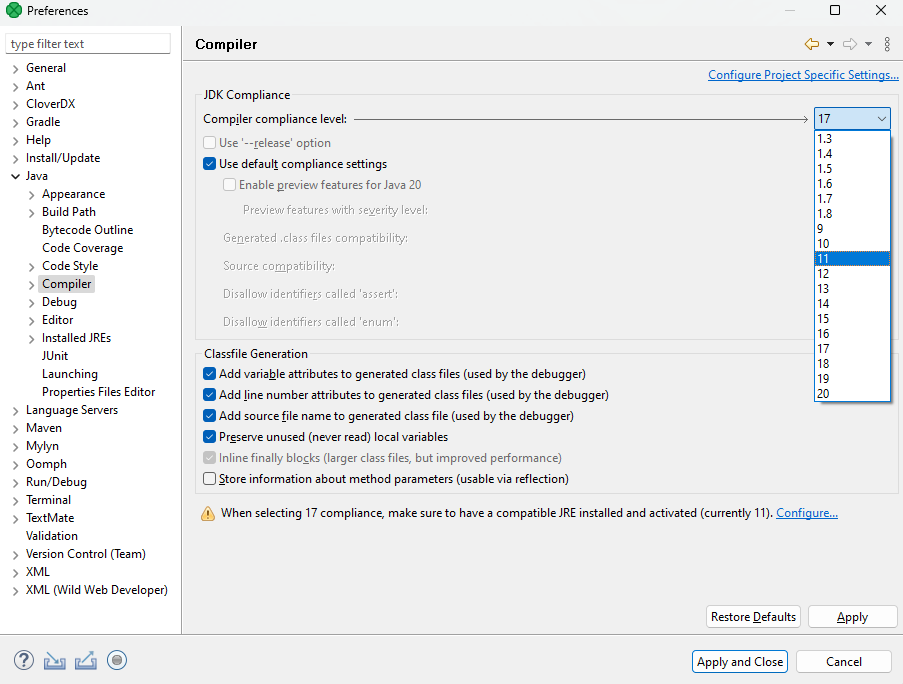
Figure 75. Compiler compliance level
Engine configuration
CloverDX internal settings (defaults) are stored in the defaultProperties file located in the CloverDX engine.
This source file contains various parameters that are loaded at run-time and used during transformation execution.
We do not recommend changing values in this file.
In Designer, the path to the file is plugins/com.cloveretl.gui/lib/lib/cloveretl.engine.jar.
In Server Core, the path to the file is WEB-INF/lib/cloveretl.engine.jar.
If you need to change the default setting, create a local file with only those properties you need to override and place the file in the project directory. To instruct CloverDX to retrieve the properties from this local file, go to and either define the path to the file in the CloverDX Engine Properties field or put the following parameter in the VM parameters field:
-Dclover.engine.config.file=/full/path/to/file.properties
Note: engine properties have to be set for each workspace individually.
Content of defaultProperties file
Here we present some of the properties and their values as they are presented in the defaultProperties file:
-
Record.RECORD_LIMIT_SIZE = 268435456Limits the maximum size of a record. Theoretically, the limit can be set very high, but you should keep it as low as possible for an easier error detection. For more details on memory demands, see Edge memory allocation.
-
Record.RECORD_INITIAL_SIZE = 65536Sets the initial amount of memory allocated to each record. The memory can grow dynamically up to
Record.RECORD_LIMIT_SIZE, depending on how memory-greedy an edge is. See Edge memory allocation. -
Record.FIELD_LIMIT_SIZE = 268435456Limits the maximum size of one field within a record. For more details on memory demands, see Edge memory allocation.
-
Record.FIELD_INITIAL_SIZE = 65536Sets the initial amount of memory allocated to each field within a record. The memory can grow dynamically up to
Record.FIELD_LIMIT_SIZE, depending on how memory-greedy an edge is. See Edge memory allocation. -
Record.DEFAULT_COMPRESSION_LEVEL = 5This sets the compression level for compressed data fields (
cbyte). -
DEFAULT_INTERNAL_IO_BUFFER_SIZE = 32768Determines the internal buffer size the components allocate for I/O operations. Increasing this value affects performance negligibly.
-
USE_DIRECT_MEMORY = falseThe CloverDX engine can use direct memory for data records manipulation. For example, underlying memory of CloverBuffer (container for serialized data records) uses direct memory (if the usage is enabled). This attribute is by default
false.Using direct memory can slightly improve performance in some cases. However, direct memory is out of control of a Java Virtual Machine, as the direct memory is allocated outside of the Java heap space in direct memory. If
OutOfMemoryexception occurs and usage of direct memory is enabled, try to turn it off.In CloverDX 4.9.0-M2, the default value was changed from
truetofalse. -
DEFAULT_TIME_FORMAT = HH:mm:ss -
DEFAULT_DATETIME_FORMAT = yyyy-MM-dd HH:mm:ss -
DEFAULT_REGEXP_TRUE_STRING = true|T|TRUE|YES|Y|t|1|yes|y -
DEFAULT_REGEXP_FALSE_STRING = false|F|FALSE|NO|N|f|0|no|n -
DataParser.DEFAULT_CHARSET_DECODER = UTF-8 -
DataFormatter.DEFAULT_CHARSET_ENCODER = UTF-8 -
Lookup.LOOKUP_INITIAL_CAPACITY = 512The initial capacity of a lookup table when created without specifying the size.
-
DataFieldMetadata.DECIMAL_LENGTH = 12Determines the default maximum precision of decimal data field metadata. Precision is the number of digits in a number, e.g. the number 123.45 has a precision of 5.
-
DataFieldMetadata.DECIMAL_SCALE = 2Determines the default scale of decimal data field metadata. Scale is the number of digits to the right of the decimal point in a number, e.g. the number 123.45 has a scale of 2.
-
Record.MAX_RECORD_SIZE = 33554432This is a deprecated property. Nowadays, you should use
Record.RECORD_LIMIT_SIZE.Limits the maximum size of a record. Theoretically, the limit is tens of MBs, but you should keep it as low as possible for easier error detection.
|
You can define locale that should be used as the default one. The setting is the following:
By default, system locale is used by CloverDX.
If you uncomment this row you can set the Similarly, the default time zone can be overridden by uncommenting the following entry:
For more information about time zones, see the Time zone section. |
Properties specific for Wrangler
-
CSVAnalyzer.LINES_TO_ANALYZE = 1000Maximum number of lines read during metadata analysis of a CSV data file. This sets the data sample size Wrangler uses to detect columns and their data types for CSV sources.
-
CSVAnalyzer.BYTES_TO_ANALYZE = 524288Maximum number of bytes read during metadata analysis of a CSV data file. This sets the data sample size Wrangler uses to detect columns and their data types for CSV sources.
-
CSVAnalyzer.MAJORITY_TYPE_GUESS_THRESHOLD = 90The confidence needed for CSV data type detection of a column, in percent. With default setting, 90% or more values in a column must contain integer number for Wrangler to detect the column as integer. If only 89% of values are integers Wrangler will attempt to generalize the data type to a larger data type such as decimal or string.
-
XLSAnalyzer.LINES_TO_ANALYZE = 1000Maximum number of lines read during metadata analysis of an Excel file. This sets the data sample size Wrangler uses to detect columns and their data types for Excel sources.
-
Wrangler.MAX_NUMBER_OF_COLUMNS = 1000Maximum number of columns allowed in Wrangler data set. Data sets with more columns are rejected and cannot be worked with.
-
Wrangler.DEFAULT_SORT_LOCALE = en.USLocale used for sorting wrangler data sets. If not specified DEFAULT_LOCALE is used.
|
Compatibility
In 4.4.0-M2, the default encoding was changed from ISO-8859-1 to UTF-8.
Therefore, Since 6.0.0, added Wrangler properties. |
Refresh operation
Refresh Operation lets you configure which resources should be refreshed after graph run on a per project basis.
The refresh operation configuration is accessible from the main menu under . Choose in Preferences window.
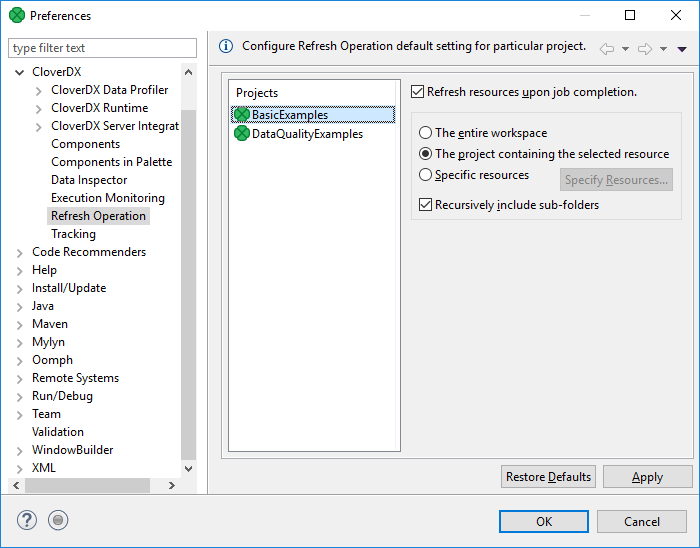
Figure 76. Refresh Operation
Choose the project in the middle part of the dialog and specify which resources should be updated.
The Refresh resources upon job completion checkbox enables or disables refreshing of resources.
Radio buttons on the right hand side let you choose between refreshing the entire workspace, the project containing the selected resource or specific resource.
The refreshing can be performed in the selected directories or recursively using the Recursively include sub-folders option.
Refreshing after graph run can be configured per particular graph, too. See Run configuration.