Version
2. Data sources and targets
Introduction
Wrangler employs the concept of data sources and data targets to specify the origin and destination of the data in the transformation process. You can find the menus for the data source and data target management in the left-side panel. Before you can start working on your data transformations, it is essential to incorporate your data sources into My Sources. Detailed instructions on how to do this and what the supported source types are can be found in the Data sources section below.
When you create a new Wrangler job, a CSV data target is automatically generated. However, you can always create or add your own data target in My Targets and then update your job to utilize it. Additional information about data targets can be found in the Data targets section below.
Data sources
In CloverDX Wrangler, you can extract data from specific locations known as data sources. These sources can either be file-based, like an uploaded CSV or Excel file, or custom, which are provided by data source connectors accessible from the Data Catalog. Data source connectors retrieve data directly from their configured sources, such as a database or a third-party interface (e.g., Salesforce, HubSpot, or Xero). Data source connectors can be created in CloverDX Designer and are managed by your IT team.
Data sources that you used in your jobs are all visible in the My Sources screen. Typically, you’ll create the data sources when you start working on a new job, but you can work with sources independently and manage them via the My Sources page.
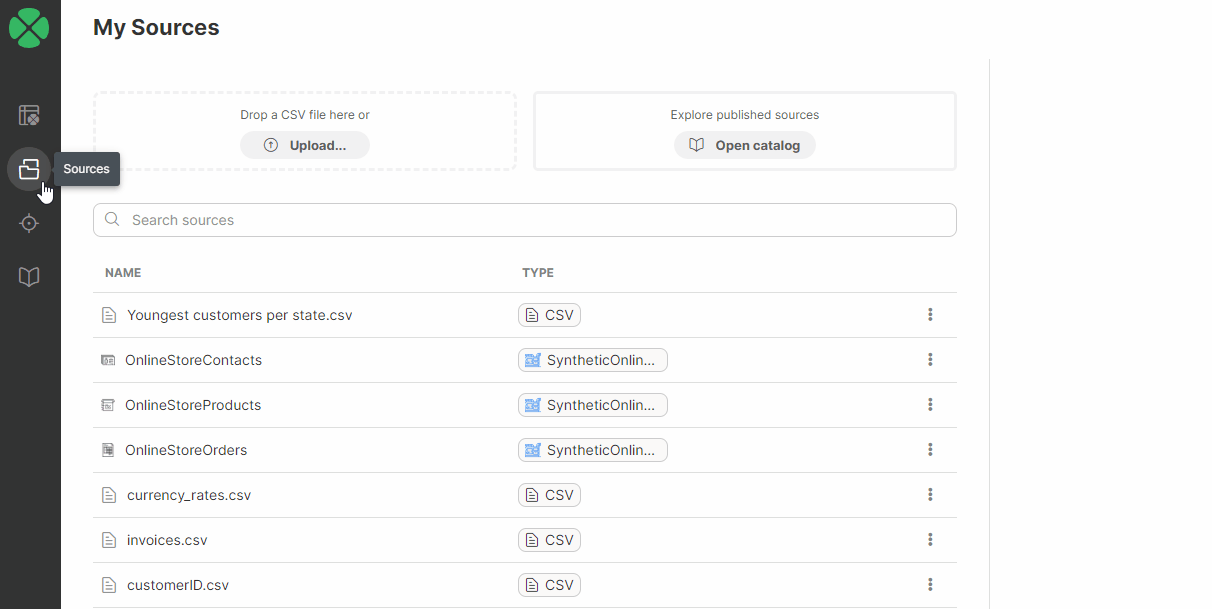
My Sources
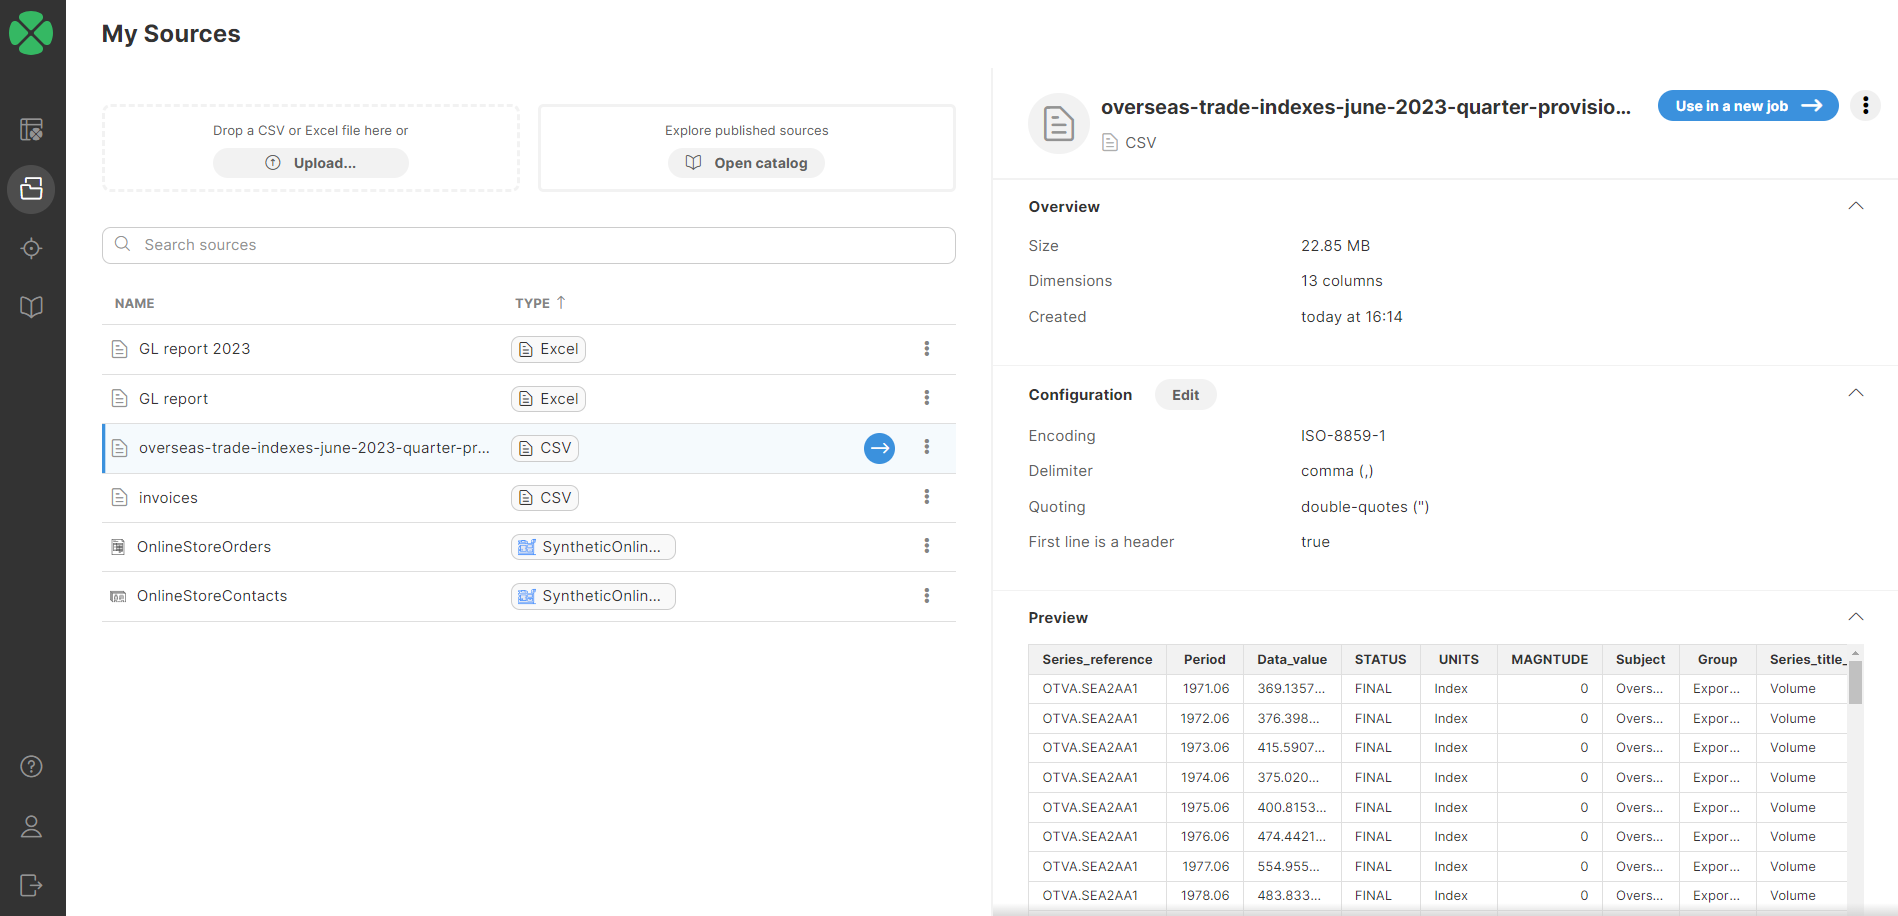
My Sources page allows you to view and manage all data sources that you’ve used in your Wrangler workspace. It will show you all your sources - whether they are files you uploaded to Wrangler or data sources created from the Data Catalog.
My Sources page is accessible directly from Wrangler’s main menu.

Figure 6. A preview of a data source alongside a list of configured sources
My Sources screen is split into two halves - the left half provides an overview of all the sources you’ve already created while the right half allows you to view details and manage the source you select.
The table showing all sources provides basic information for each source:
-
Name is the name of your source.
-
Type to help you determine the type of source. A source can be file-based (created from files uploaded to your workspace) or connector-based (created from connectors in your Data Catalog).
Additional actions are available when you hover over each item in the table or by clicking on the three-dot menu for each item.
-
Use source (white arrow in blue circle shown on hover) to create a new job from given source,
-
Delete (in the three dots menu) to delete the source. Note that deleting the source will invalidate the jobs that are using that source.
-
View in Data Catalog (in the three dots menu for non-file sources) to open a Data Catalog page with details for the given source.
When you select a source in the table, the right half of the screen will show you additional details about that source including data preview. It will also allow you to edit its configuration.
To edit the configuration, click on the Edit button in the Configuration section. This will open a dialog that will allow you to change the parameters of your data source.
The exact layout of this dialog will depend on the source type: you will either get the CSV data source settings dialog or the dialog to configure the data source connector provided by a library similar to one in Add to My Sources wizard.
Adding data sources to My Sources
There are several ways to add data sources to My Sources:
-
CSV files can be uploaded:
-
Directly in My Sources by uploading a CSV or Excel file via the drop area at the top
-
Uploading a CSV or Excel file via the drop area when creating a new job via Create a new job action on the My Jobs page
-
-
Data source connectors can be added from the Data Catalog:
-
Click the Add to My Sources or Use in a new job buttons
-
Click the Add to My sources or Use in a new job buttons when exploring connector details
-
When adding data source connectors, the Add to My sources wizard opens to allow you to configure settings for your data source. The dialog will look different for each data source since it shows the parameters for that specific data source. If a data source settings is updated, a warning will be displayed to remind you to reload preview data to reflect the changes in the data preview.
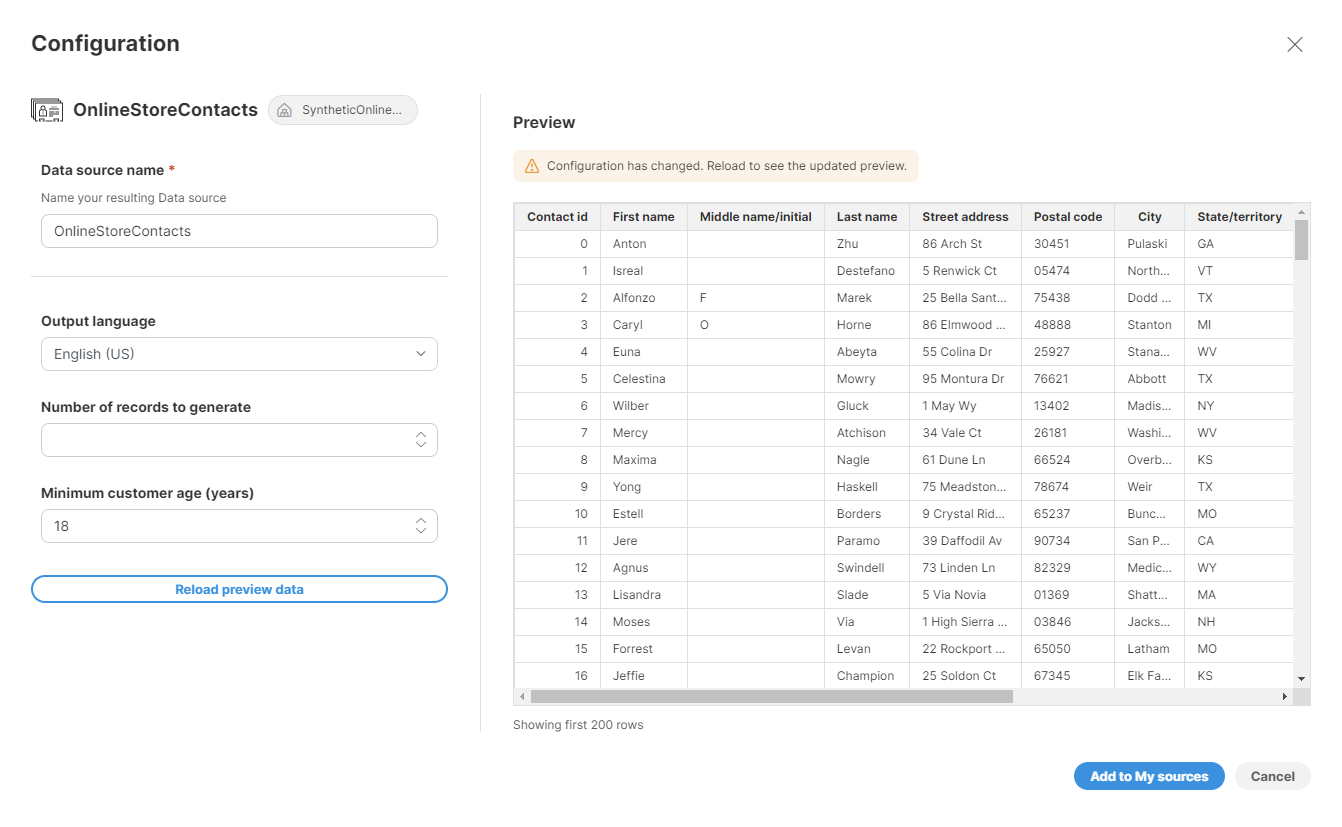
Figure 7. Connector configuration dialog in the Add to My sources wizard
Updating data source in an existing job
To update the data source in an existing job, click on the Source button in the overview diagram of your job at the top of the transformation editor screen or click on the ![]() icon which appears when you hover over the Source step.
icon which appears when you hover over the Source step.
You will be redirected to a page listing all your sources added to your My Sources page. Select a new source by performing one of the following:
-
Double-click on the new data source.
-
Select a new source in the list, or hover over it and click on the blue button.
-
Select a new source in the list and click on the Transform button.
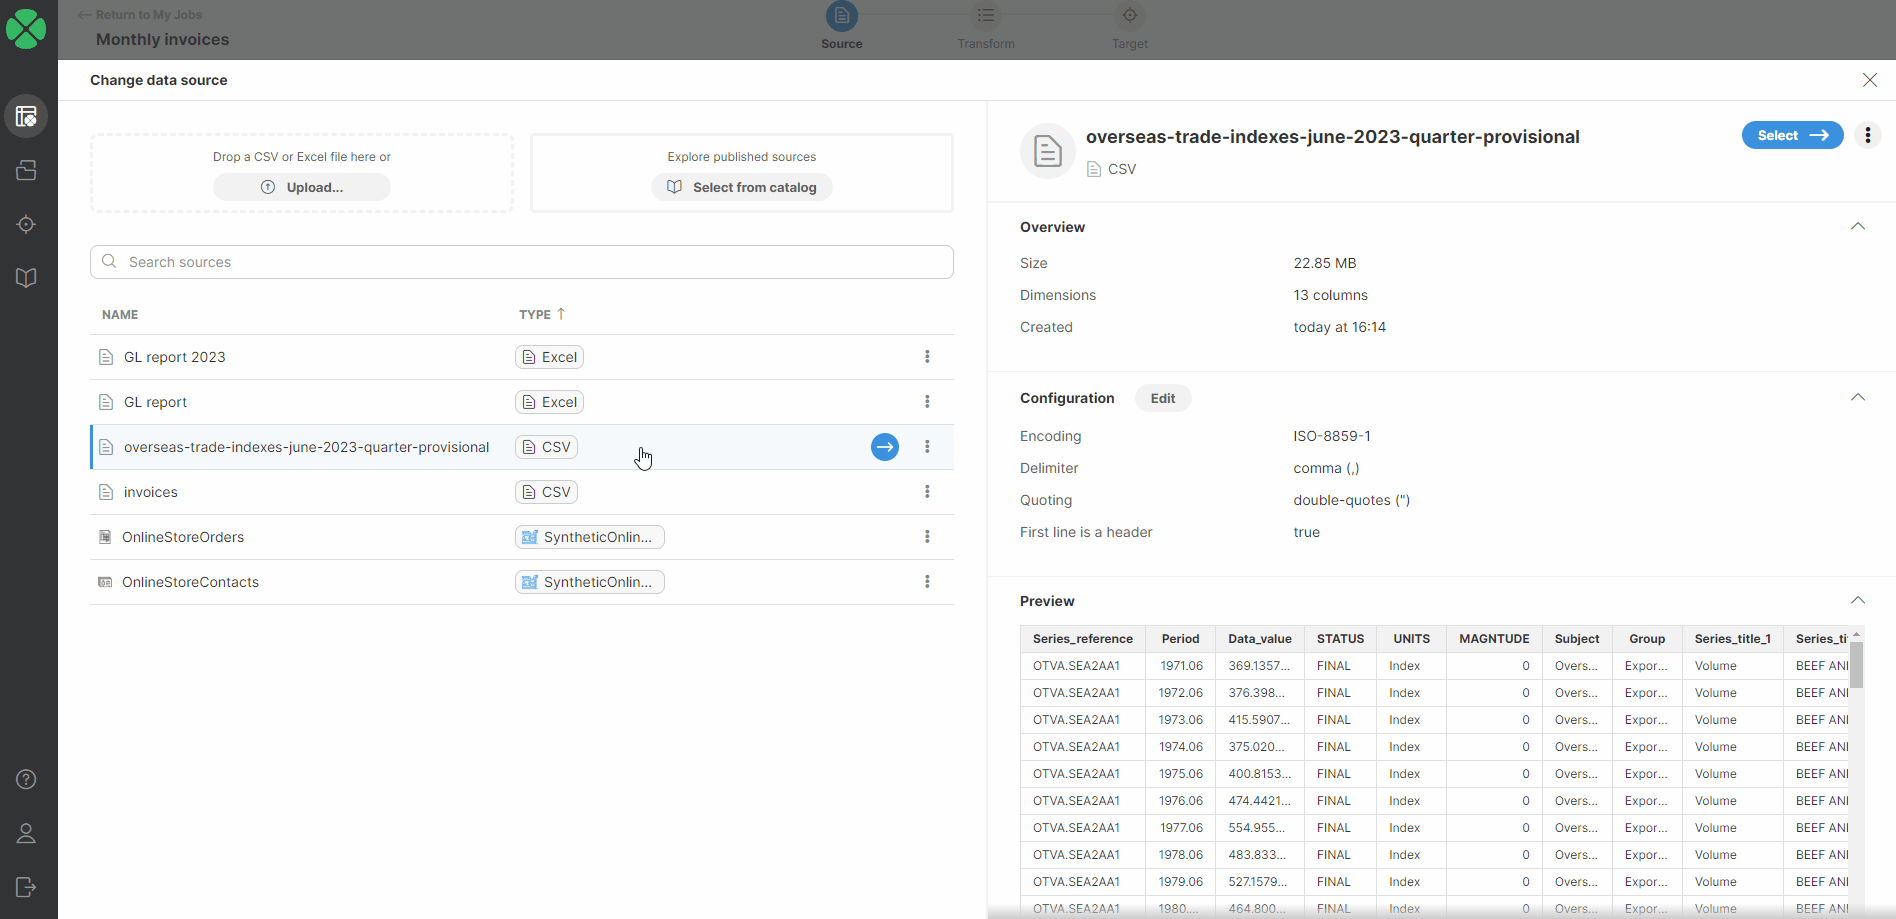
After performing one of these steps, you will be asked to confirm the data source change.
| When you change the data source of a job, the data source which was previously used by the job is not changed or deleted. To remove it, you have to manually select this source and delete it via the three dots menu. |
Data source connectors
Wrangler allows you to use custom data source connectors that are created, managed and maintained by your CloverDX Server administrators and IT. These connectors can read data from any data source such as a database or a third-party interface.
Adding new connectors
For steps on how to add an existing data source connector to My Sources, refer here.
When adding data source connectors the Add to My sources wizard will open, where you can configure settings for your data source. The dialog will look different for each data source since it will show the parameters for that specific data source. If a data source setting is updated, a warning will be displayed to remind you to Reload preview data to reflect the changes in the data preview.
Figure 8. Connector configuration dialog in the Add to My sources wizard
| If you cannot find the source connector you need, you will have to contact your CloverDX administrator. They will be able to review permissions to provide you with the access to the connector via the Data Catalag if the connector is already installed. If the connector is not yet installed, they will be able to install it from variety of different sources - either manually or from CloverDX Marketplace which contains many pre-built and ready to use connectors. Administrators can consult our Server documentation for more information on how to install and configure new connectors. |
Using data source connectors
To learn more about how to use data source connectors, please read the Data Catalog section in this documentation.
CSV data sources
The CSV data source allows you to read data from CSV files uploaded to your Wrangler workspace.
When you want to create a new CSV data source, you can do so either from My Sources or directly from the Create a new job screen. In both cases, you can simply upload a file by dragging & dropping it or by selecting the file on your computer.
Once a file is uploaded, the CSV connector will scan your data and automatically determine the data structure. The algorithm looks at a sample of data at the beginning of the file to determine the columns and their data types.
You will be able to see the preview of your data to verify that the automatically determined file structure matches your expectations. You can read more about data types available in Wrangler in the Data types section.
Configuring CSV data source
If the automatically determined structure of the uploaded file does not match your expectations, you can configure the connector parameters via the Edit action:

The following options are available in the configuration dialog:
-
Encoding: pick data encoding for your file. Encoding determines how characters are stored in text files and picking incorrect encoding can result in incorrectly read data (for example, some accented letters may show incorrectly). The most common encodings are UTF-8 (universal encoding that can handle any characters), windows-1252 (US English encoding commonly used for files created on Windows) or ISO-8859-1 (US ASCII encoding).
-
Delimiter: allows you to select column delimiter. Column delimiter is a single character that serves as a separator between columns in the file. Most common delimiters are comma (",") and tab. You can also type your own delimiter if none of the default delimiters work for you. Setting correct delimiter ensures that all columns are read from the file as expected.
-
Quoting: determines whether values in your source file are enclosed in quotes or not. You can select from three options - double quotes, single quotes or N/A (no quotes).
-
First line is a header: tell the CSV connector that it should interpret first line of the data as header and read names of columns from it. If this is unchecked, columns in your data set will have sequentially generated names like
field1,field2, and so on.
Where are my CSV files?
The files you upload to Wrangler are stored in your workspace. Only you (and your IT administrator) have access to those files. Other Wrangler users cannot see or manipulate the files in your workspace.
If you have access to CloverDX Server Console, you can find these files via Sandboxes module by browsing to your Wrangler workspace and then into the data-in folder.
Limitations of the CSV data source
CSV data source can handle most common data layouts but it does have some limitations. It can handle following:
-
Files of any size. There is no limit to the total number of rows in your file. Note that by default only the first 1000 rows are shown in the preview. To ensure the whole file is processed, run the job once you are finished building the transformation.
-
Files with any number of columns. While there is no technical limitation to how many columns can your files have, Wrangler implements a soft limit set to 1000 columns by default to help you prevent cases where your browser may not be able to handle display of too large of a sample. You can change this limit by contacting your CloverDX Server administrators and asking them to increase the value of
Wrangler.MAX_NUMBER_OF_COLUMNSproperty. -
Files with varying number of columns on different rows. Your files do not have to have the same number of columns on each rows. However, this feature works correctly only when the header or one of the sample rows is the longest row in the file. For example, the connector will work fine if your header contains 20 columns but some of the rows in your file contain fewer than 20 columns. By default, connector will read the first 512 kB of your data or first 1000 rows whichever comes first to determine how many columns does your data have. You can work with your CloverDX Server administrators to increase these limits by setting
CSVAnalyzer.BYTES_TO_ANALYZEandCSVAnalyzer.LINES_TO_ANALYZEsettings (see more here).
The connector does not support:
-
Files in which the longest row (a row with the largest number of columns) does not appear within the analyzed sample. For example, if you have a file that has a header with 20 columns and much later in the file (after first 1000 rows) you have a record with more than 20 columns. See above for more details about increasing sampling limits.
-
It does not support files with multiple different types of column delimiters. If you have such a file, you will need to pick one of the delimiters and then split the columns using the other delimiter in your Wrangler job using Calculate formula step.
Excel data sources
The Excel data source allows you to read data from Excel .xlsx or .xls files uploaded to your Wrangler workspace.
When you want to create a new Excel data source, you can do so either from My Sources or directly from the Create a new job screen. In both cases, you can simply upload a file by dragging & dropping it or by selecting the file on your computer.
Once a file is uploaded, the Excel connector will scan data from the first sheet and automatically determine the data structure. The algorithm looks at a sample of data at the beginning of the file to determine the columns and their data types. You can read more about data types available in Wrangler in the Data types section.
|
It is possible to read data from one sheet only. If you want to read data from a different sheet than the first sheet, see the configuration section below for more information. |
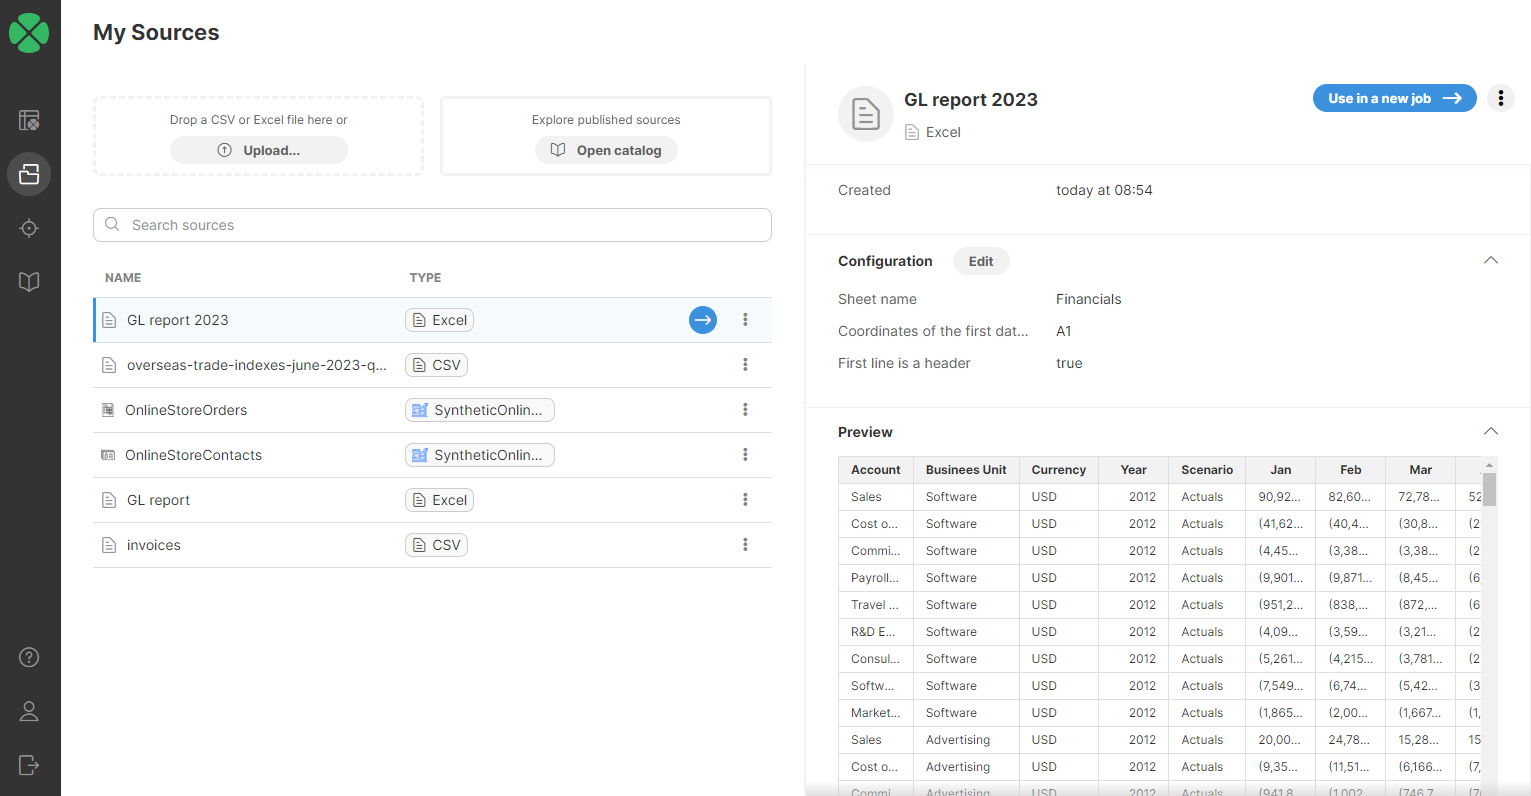
Configuring Excel data source
If you want to read data from a different sheet or want to change the data start point, click on the Edit button in the Configuration section to edit the data source configuration.

Figure 9. Configuring Excel data source
The following options are available in the Configuration dialog:
-
Sheet name: defaults to the first sheet name found in the loaded Excel file. If you want to read data from a different sheet, type in the desired sheet name. You can also use sheet numbers - note that the numbering starts with 0 (i.e., the first sheet number is 0, the second sheet number is 1, etc.).
-
Coordinates of the first data cell: defaults to A1; i.e., the typical first position in Excel files. To change it, type in the desired start cell (e.g., C1).
-
First line is a header: selected by default. When selected, the data in the first row are used as column names. When unchecked, the header names default to column positions (ColumnA, ColumnB, etc.).
Where are my Excel files?
The files you upload to Wrangler are stored in your workspace. Only you (and your IT administrator) have access to those files. Other Wrangler users cannot see or manipulate the files in your workspace.
If you have access to CloverDX Server Console, you can find these files via Sandboxes module by browsing to your Wrangler workspace and then into the data-in folder.
Limitations of the Excel data source
-
Files of any size. There is no limit to the total number of rows in your file. Note that by default only the first 1000 rows are shown in the preview. To ensure the whole file is processed, run the job once you are finished building the transformation.
-
Files with any number of columns. While there is no technical limitation to how many columns can your files have, Wrangler implements a soft limit set to 1000 columns by default to help you prevent cases where your browser may not be able to handle display of too large of a sample. You can change this limit by contacting your CloverDX Server administrators and asking them to increase the value of
Wrangler.MAX_NUMBER_OF_COLUMNSproperty. -
Files with varying number of columns on different rows. Your files do not have to have the same number of columns on each rows. However, this feature works correctly only when the header or one of the sample rows is the longest row in the file. For example, the connector will work fine if your header contains 20 columns but some of the rows in your file contain fewer than 20 columns. By default, connector will read the first 1000 rows to determine how many columns does your data have. You can work with your CloverDX Server administrators to increase these limits by setting
CSVAnalyzer.BYTES_TO_ANALYZEandCSVAnalyzer.LINES_TO_ANALYZEsettings (see more here).
Data targets
A data target in Wrangler is the destination where your resulting data will be written. A data target can be either a file (CSV or Excel) or you can use data target connectors from your Data Catalog to directly write the data to any external system such as Salesforce, Snowflake, database or any API. Data target connectors are designed, managed, and maintained by your CloverDX Server administrators and IT team.
When a new job is created, Wrangler automatically generates a CSV target file and assigns it a name based on the job name. However, you can always change the target to a different one (different file or even a completely different target type). To use a different target, you first need to add the data target to My Targets.
My Targets
My Targets page allows you to view and manage all data targets that you’ve used in your Wrangler workspace. It will show you all your targets - whether they are files or data targets created from the Data Catalog.
My Targets page is accessible directly from Wrangler’s main menu.
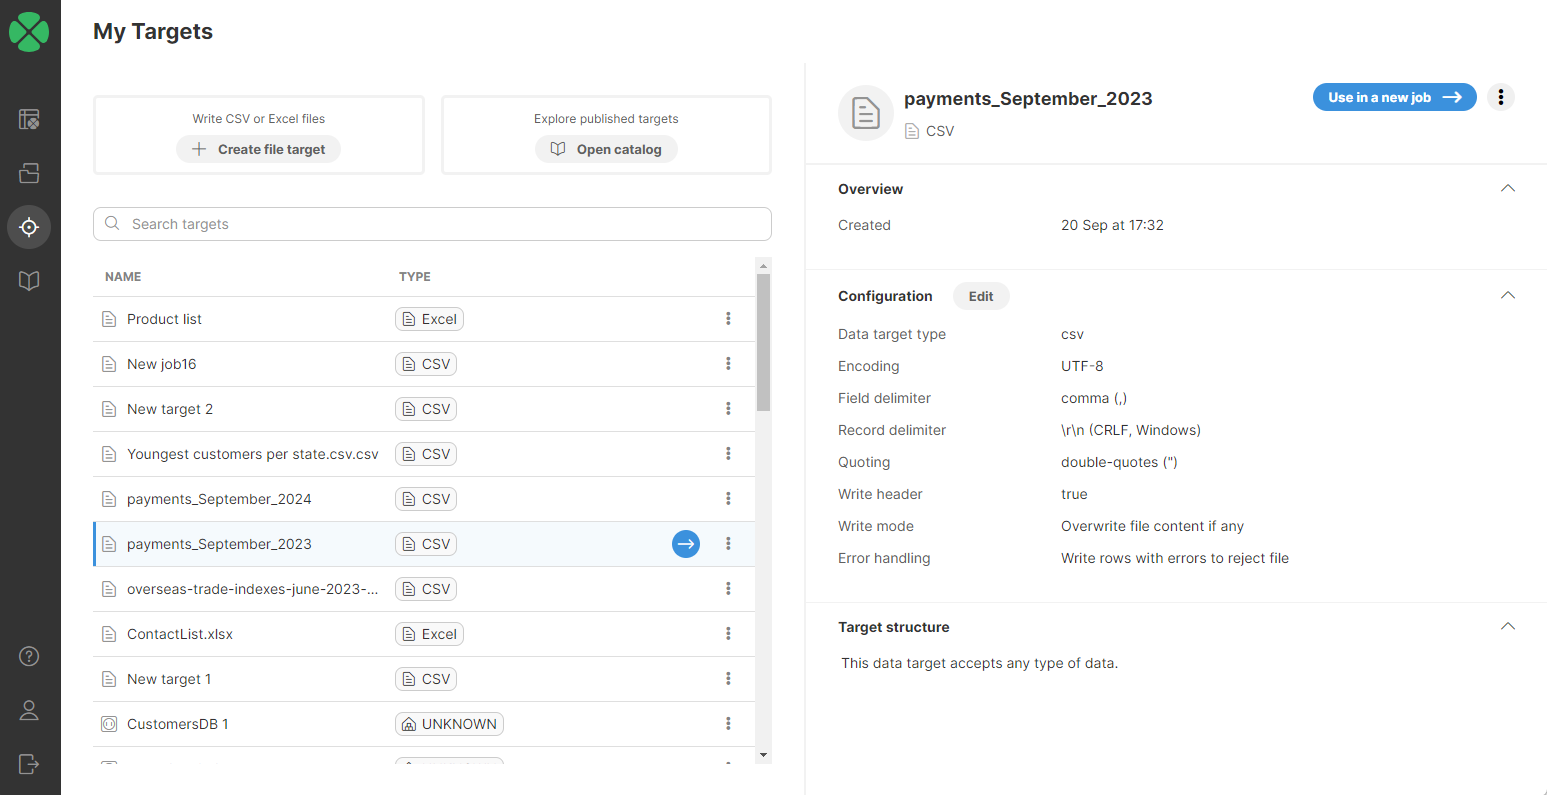
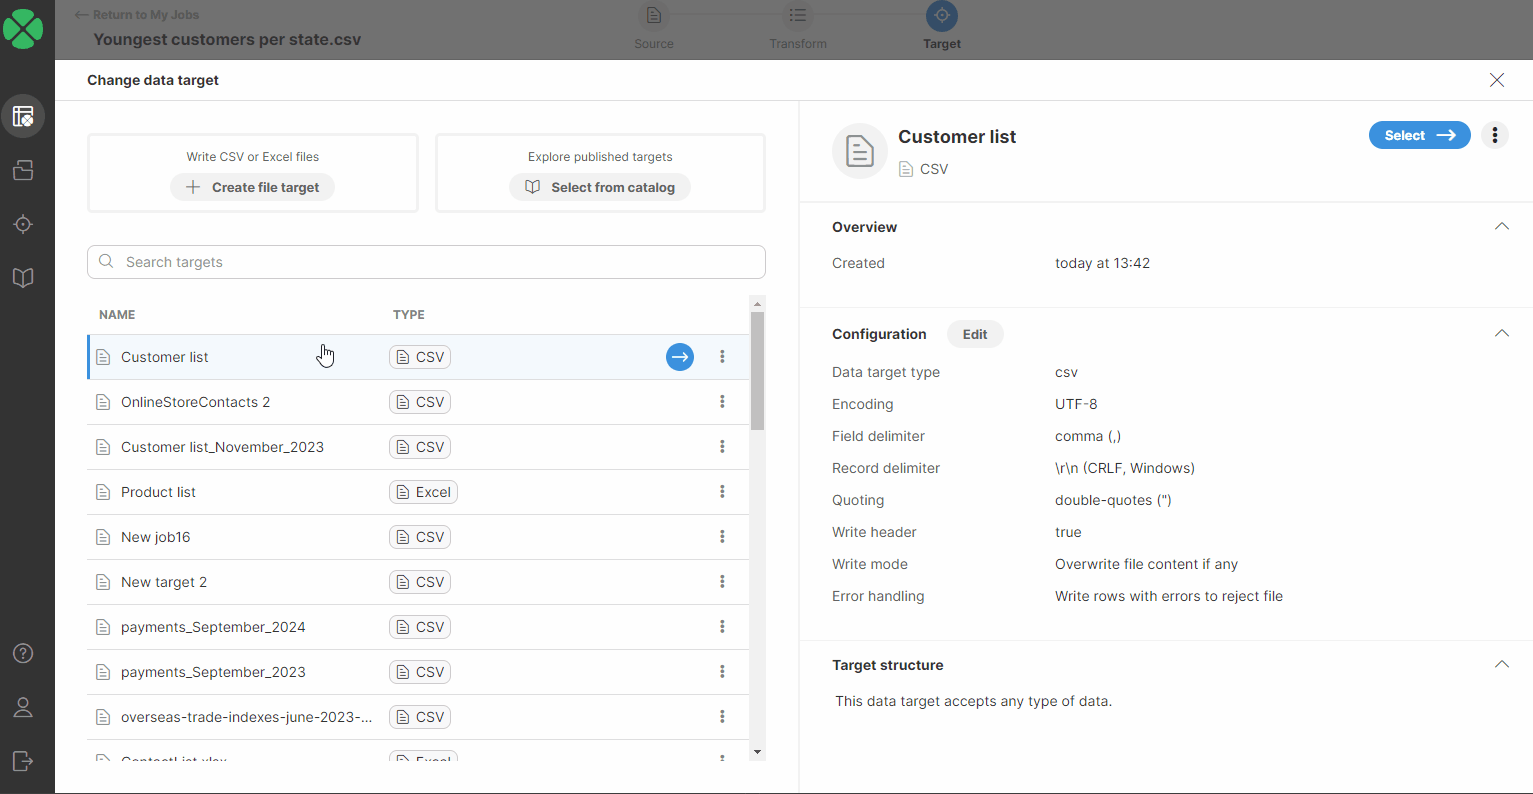
Figure 10. A preview of a data target alongside a list of configured targets
The table showing all targets provides basic information for each target:
-
Name is the name of your target.
-
Type to help you determine the type of target. target can be file-based (CSV or Excel) or connector-based (created from data target connectors in the Data Catalog).
-
Actions directly in the table or in three dots menu shown on hover for each item:
-
Use target (white arrow in blue circle) to create a new job from given target,
-
Delete (in the three dots menu) to delete the target. Note that deleting the target will invalidate the jobs that are using that target.
-
View in Data Catalog (in the three dots menu for non-file targets) to open a Data Catalog page with details for the given target.
-
When you select a target in the table, the right half of the screen will show you additional details about that target, as well as allow you to edit its configuration.
To edit the configuration, click on the Edit button in the Configuration section. This will open a dialog that will allow you to change the parameters of your data target. The exact layout of this dialog will depend on the target type:
-
For CSV files, see CSV data target settings
-
For Excel files, see Excel data target settings
-
For data target connectors, the configuration will depend on the design of each individual connector.
Adding data targets to My Targets
There are several ways to add data targets to My Targets:
-
CSV files or Excel files can be uploaded:
-
Directly in My Targets by uploading a CSV or Excel file after clicking on Create file target
-
When a new job is created, a CSV file target is automatically generated
-
-
Data target connectors can be added from the Data Catalog:
-
Click the Add to My Targets or Use in a new job buttons
-
Click the Add to My Targets or Use in a new job buttons when exploring connector details
-
Updating data target in existing job
To update the data target in an existing job, click on the Target button in the overview diagram of your job at the top of the transformation editor screen or click on the ![]() icon which appears when you hover over the Target step.
icon which appears when you hover over the Target step.

Figure 11. Job diagram showing main parts of your Wrangler job
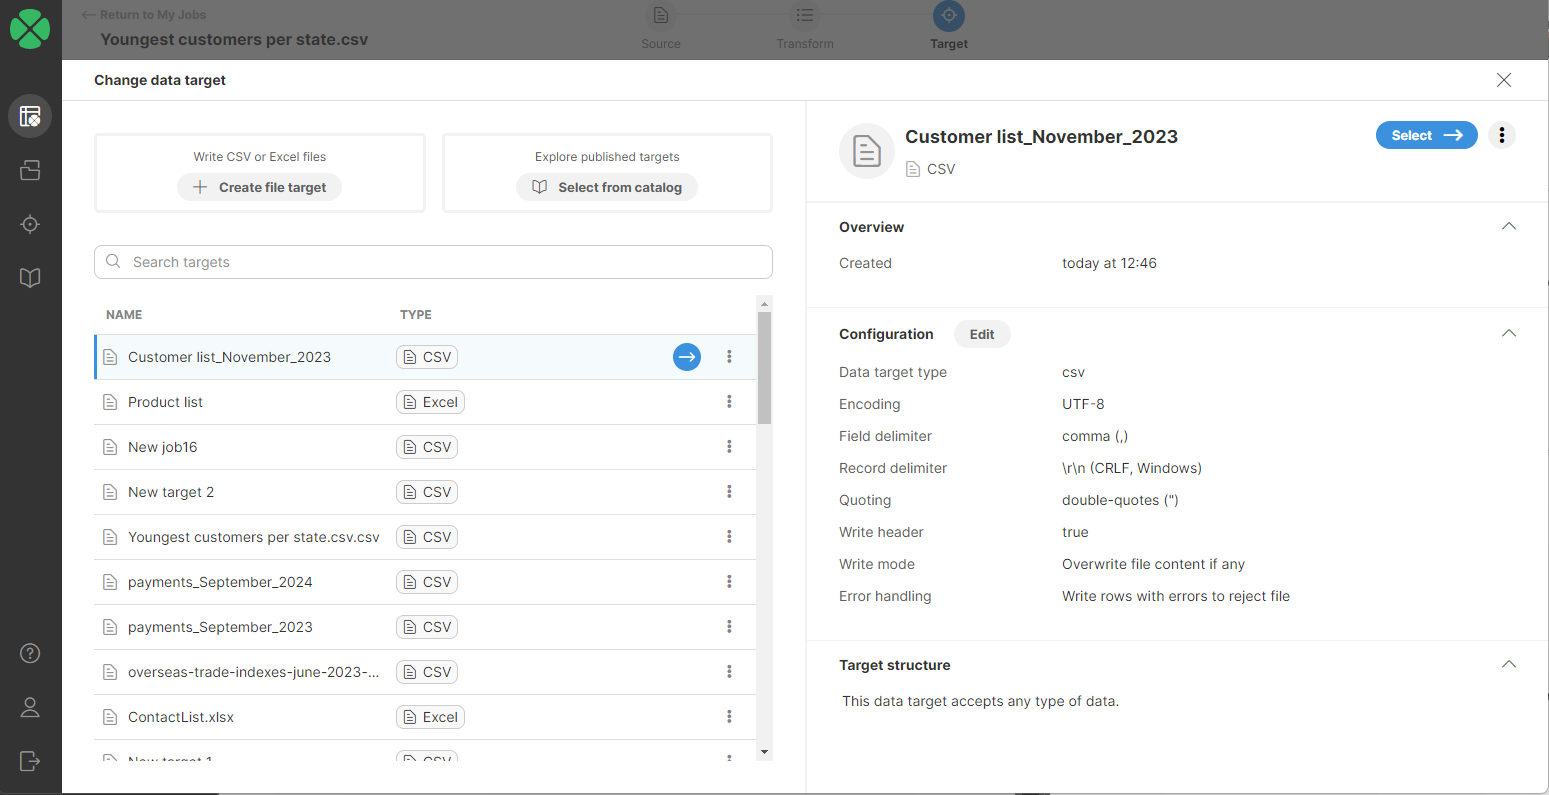
You will be redirected to a page listing all your targets added to your My Targets page. Select a new target by performing one of the following:
-
Double-click on the new data target.
-
Select a new target in the list, or hover over it and click on the blue button.
-
Select a new target in the list and click on the Select ⟶ button.
After performing one of these steps, you will be asked to confirm the data target change.
Target mapping
Some data target connectors may require data in certain format - they may have required columns and their data types. This is most often used to ensure that all required data gets to the target system. For example, when writing to a CRM like Salesforce, you most likely will see that the person’s name is required.
Such data targets will require mapping - a transformation from your data layout to the data layout required by the target. Mapping is always done at the end of the job and is clearly shown in the step list.
If your selected data target requires mapping, a Mapping step will appear above the Target step. The Mapping step allows you to assign which columns from your data at the end of the job get assigned to which columns in the target. The Mapping step will display the number of currently mapped vs. mappable fields, including a note about how many fields are required.
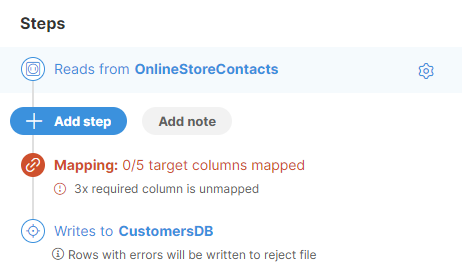
Figure 12. Data target with mapping that requires at least 3 columns to be mapped.
To edit the mapping, click on the Mapping step (or on the little pencil next to the step). The view will switch to Mapping mode which will display preview of your data as well as Mapping editor.
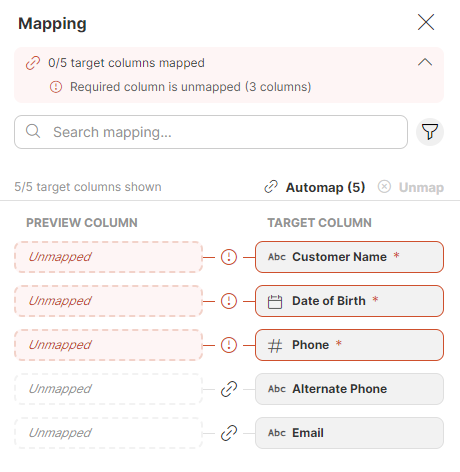
Figure 13. Mapping editor
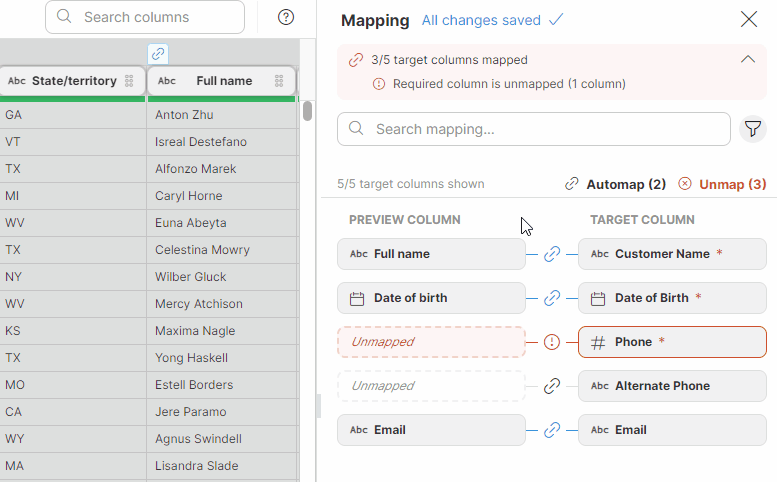
In the Mapping editor you can link your dataset preview columns to specific data target connector columns. The target columns are listed on the right side, and the mapping is performed on the left side in the Preview column section. You can easily tell which columns are required: required columns are highlighted to distinguish them from optional columns.
There are multiple ways to map columns:
-
Drag and drop a column header from the data preview onto the left Preview column placeholder in the mapping editor. Note that it is possible to map one column from the data preview to multiple target columns.
-
You can use the Automap feature. This feature will attempt to automatically map columns based on their names. It will try to match columns from your data preview with target columns and the ones which have the same (or at least similar) names will be mapped together.
Note that automapping is applied to visible columns only. If you used the Search option above the data preview or if you filtered columns in the Mapping editor, only the columns visible in both parts of the screen will be considered during automapping.
You can freely combine automapping with drag & drop mapping for maximum effectivity.
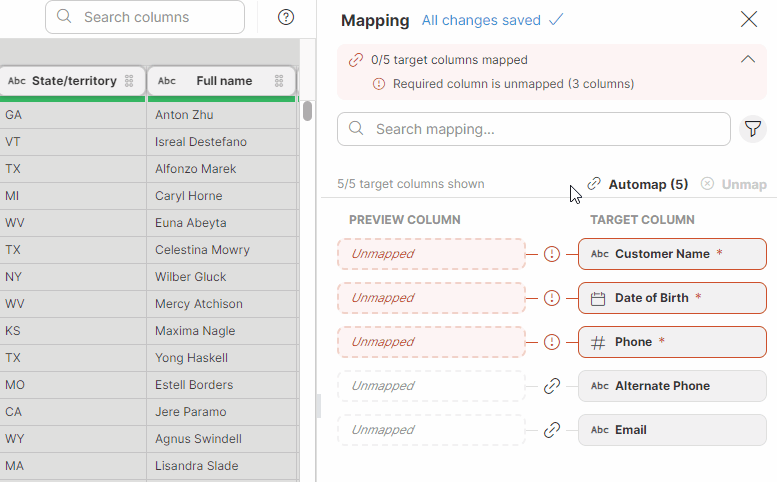
Figure 14. Mapping target columns
Your mapping changes are saved automatically - you’ll see a little status notification about this at the top of the mapping editor.
You can use the Search mapping in the mapping editor to display just the columns that contain your search term in their name. The search returns results from both the Preview and Target columns.
You can also use advanced search by clicking on the funnel icon on the right side to filter based on the mapping status (Required, Optional, Unmapped, Mapped, With error). The text under the Search mapping field will keep you informed about how many columns out of the total number of columns are currently displayed.
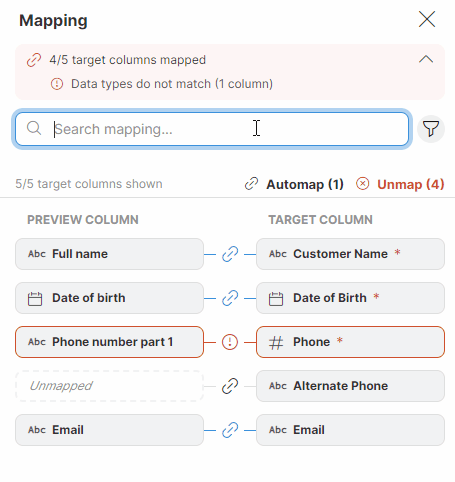
Figure 15. Searching in the Mapping editor.
Note that the mapped columns need to have the same data type as the target column - mapping will not perform any type conversions for you. The target column data type is indicated by an icon next to the column name, and you can also see it in the tooltip which appears when you hover over it. If the data types do not match, the mapping is considered invalid. If your job includes invalid mapping, the job run will fail.
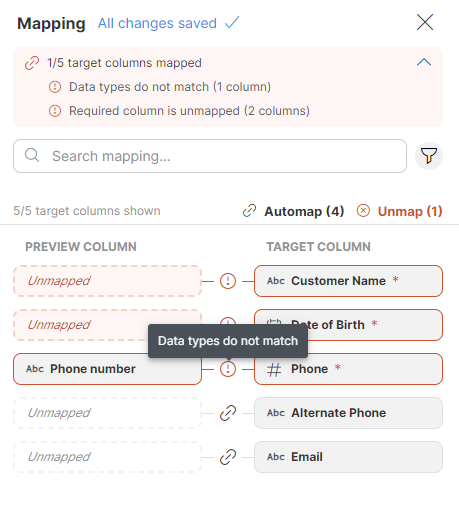
Figure 16. Example of mapping with mismatched data types: Phone number is invalid because the target column is an integer while the mapped column is a string.
When a column is mapped, an icon appears above its column name in the transformations editor to indicate that the column is linked to a target column. If the mapping is successful, you will see a blue "link" icon ![]() . If the mapping of this column is invalid (e.g., the data types do not match), you will see an error icon
. If the mapping of this column is invalid (e.g., the data types do not match), you will see an error icon ![]() .
.
When you click on any of these icons, the Mapping editor opens.

Figure 17. Mapped columns: the Date of birth and Email are ok while the Phone number mapping is invalid as indicated by the red error icon above the header.
To unmap a column, hover over the desired column in the Preview column section, and click on the X button, or, to quickly unmap all columns, use the Unmap button in the Mapping editor.
The Mapping editor keeps track of all the mapped, unmapped, required, and optional fields, as well as the number of errors. It also automatically adjusts the numbers when you make a change. The Mapping step displays the overview as well.
Figure 18. Mapping editor showing mapping status with one error - type mismatch between preview column Phone number (a string) and target column Phone (an integer).
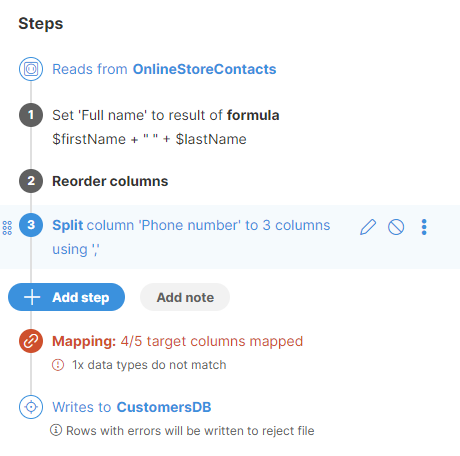
Figure 19. Step with mapping details showing a mapping with a single "type mismatch" error.
Downloading and viewing output files
When files are written by Wrangler, they are stored in your workspace. You can download your files from Wrangler user interface from the My Jobs screen by clicking on the Download result button:
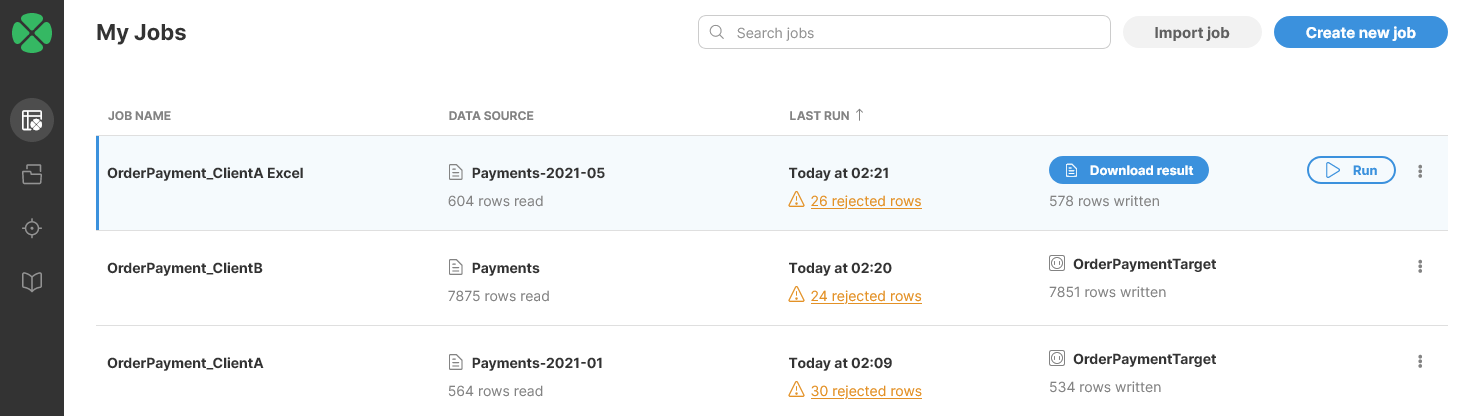
Figure 20. My Jobs screen showing information about three job runs.
Reject file format
Wrangler offers an option to produce a reject file: a file which stores information about rows which contained errors. Reject files can be written in two different formats - a CSV file (for CSV data target) or XLSX file (for Excel data target). In both cases, the information in the file is the same and the only difference is the file format itself. The file provides information about why each row was rejected, including the data in the rejected row at the end of the transformation. For more information see Errors and output.
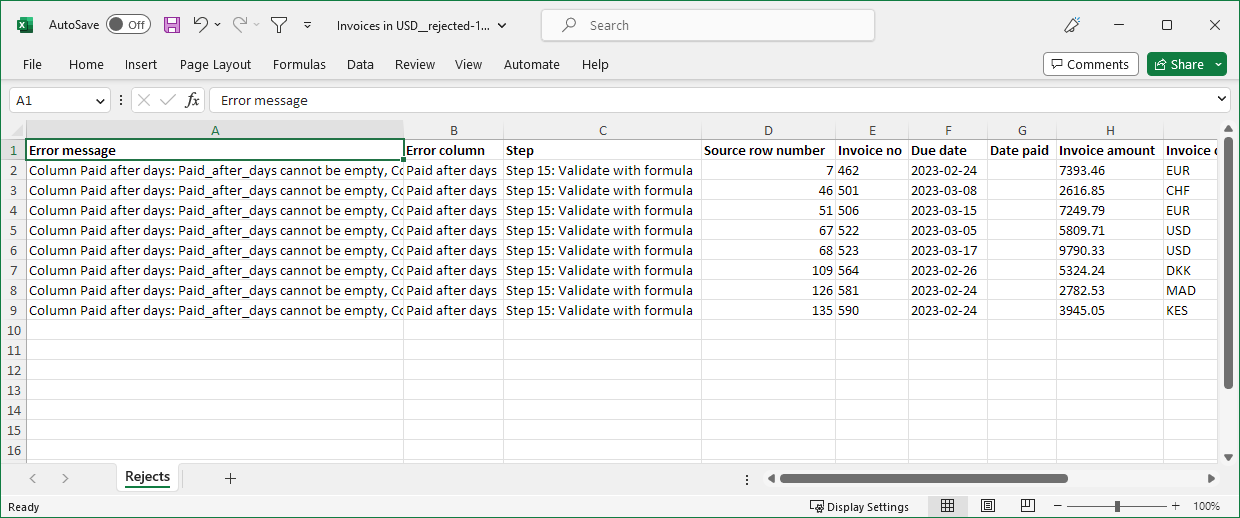
Figure 21. Example reject file in Microsoft Excel format
The reject file contains one row for each rejected row. Since there can be multiple errors in each row, all errors for given row are collected in the single reject file row.
Besides the error details, the reject file also contains the data that was rejected. The data is all stored as string columns to ensure that invalid values can be written to the reject file as well.
The reject file contains the following columns:
-
Error message (column A in Excel): full error message describing the errors in current row. If more than one error is present in a row, error messages are concatenated together. This means that the value can be quite long for rows with many errors.
-
Error column (column B): name of the column in which an error occurred. If there are multiple errors in current row, multiple column names are provided as semicolon-separated list.
-
Step (column C): description of a step in which an error that caused the row to be rejected occurred. If multiple errors are present in current row, multiple steps are listed here as semicolon-separated list. Each step is written as
Step N: step typewhereNis the number of the step in the step list (first step is 1) andstep typeis the "generic" name of the step. Example:Step 15: Validate with formulais 15th step in the job and it is a Validate with formula step. -
Source row number (column D): row number as it was read from the data source (regardless of the source type). The rows are numbered sequentially starting with 1 when they arrive from the data source. Sorting, filtering or removing rows does not change the Source row number value. This means that at the end of the transformation, the sequence of row numbers may be out of order or have gaps in it depending on transformation steps. The Source row number is useful to tie the data to what came from the source system and can help identify the rows in the source if data fix is required.
-
Data columns (columns starting with E): all columns after Source row number are data columns. Data is in the same layout as in the last step of the transformation. The only difference is that all columns are converted to string before they are written to the reject file. This is to ensure that even invalid values (e.g. with wrong format) can be output to the reject file.
Data target connectors
Wrangler allows you to use data target connectors that are created, managed, and maintained by your CloverDX Server administrators. These connectors can be found in the Data Catalog, from where you can choose to add them to My Targets and use them in your jobs.
For steps on how to add an existing data target connector from the Data catalog to My Targets, refer here.
These target connectors do not generate an output file; instead, they write data directly to a configured external target within the connector, such as a database or a third-party interface. Depending on the connector’s design, certain target connectors may require mapping your transformed data into the target structure. For further details, refer to the target mapping section.
| If you cannot find the source connector you need, you will have to contact your CloverDX administrator. They will be able to review permissions to provide you with the access to the connector via the Data Catalag if the connector is already installed. If the connector is not yet installed, they will be able to install it from variety of different sources - either manually or from CloverDX Marketplace which contains many pre-built and ready to use connectors. Administrators can consult our Server documentation for more information on how to install and configure new connectors. |
CSV data targets
CSV data target allows you to write your data into CSV files that are stored in your Wrangler workspace. To change your data target settings, click on the Target button in the overview diagram of your job at the top of the transformation editor screen or click on the ![]() icon which appears when you hover over the Target step.
icon which appears when you hover over the Target step.
Figure 22. Job diagram showing main parts of your Wrangler job

Figure 23. Target step
A page listing all the targets added to your My Targets will appear. Your currently used target will be automatically selected and its details displayed on the right side. To change the configuration of your CSV file, click on the Edit button next to Configuration.
To select a different target, select the desired target from the list, click on the Select ⟶ button, and confirm your changes.
CSV data target configuration
The following settings are available for CSV data targets:
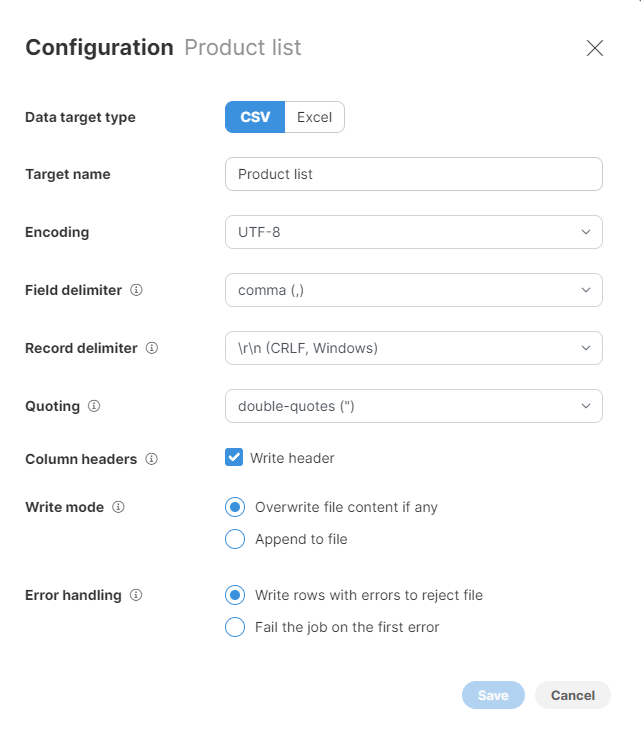
Figure 24. CSV data target configuration dialog
-
Target name: name of the output file. Default value is the name of your Wrangler job.
-
Encoding: encoding for the output file. The default (recommended) value is UTF-8, which is a universal encoding that will allow you to save data in any language while making it readable in many other apps. Other common encodings include windows-1252 (US English encoding commonly used for files created on Windows) or ISO-8859-1 (US ASCII encoding). Selecting the wrong encoding here can produce a file in which some characters are not stored correctly.
-
Field delimiter: a single character to use as a separator between columns in the output file. You can either select one of the provided options or type your own character. The most common delimiter is either a comma or a tab.
-
Record delimiter: configures character(s) that are used to separate rows in the output file. The default value is a "Windows new line" which means that each row appears on a separate line in the output file. Select the option based on your target platform - if you are targeting Windows users, use the Windows CRLF option, for Linux or Mac users pick the Linux LF option. You can also type your own delimiter if needed.
-
Quoting: allows you to configure whether values in your file are surrounded by quotes or not. If you enable quotes, the data may look like this (assuming two columns:
NameandAge):"Name","Age" "Alice","22" "Bob","23"Quoting is needed when your data can contain your delimiter character - e.g., if your delimiter is a comma and your data can contain commas as well. When configuring quoting you can pick which character to use - whether double quotes or single quotes. Double quotes (the default value) are more common and recommended if quoting is needed.
-
Column headers: allows you to configure whether to write a file header or not. If enabled, the file header will be written as the first row of the output and will contain labels of all columns in your data. We recommend enabling the header as that will allow data recipients to know what is in the data.
-
Write mode: determines how your data should be output.
-
Overwrite file content if any: any existing file content is deleted and replaced by the output from the latest job run.
-
Append to file: any existing file content is kept and data from the latest job run is added to the end of the file.
-
The append function is disabled if the number of columns or column data types change and no longer match the existing layout or data types in the target file. In such a case, you will either need to change the target settings and switch to the Overwrite option, or change the target file to a new empty file.
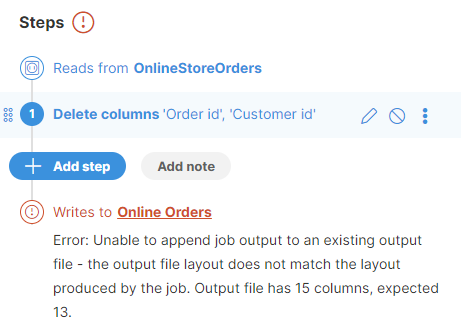 Figure 25. Error when job data layout does not match data layout in target file
-
-
-
Error handling: determines what to do with rows that contain errors in any of their cells. Two options are provided:
-
Write rows with errors to reject file (default value): if selected, all rows that contain errors are written to a reject file. The reject file allows you to see the rejected rows as well as information about errors that caused those rows to be rejected (read more here). You can then see the number of rows that were rejected on My Jobs page when job execution ends:

-
Fail the job on the first error: when an error is encountered when writing the file, the job is stopped and the error will be reported on My Jobs page:

-
CSV data target limitations
CSV target will allow you to work with any size of data - unlimited number of rows or columns.
Excel data targets
Excel data target allows you to write your data into Microsoft Excel files in the XLSX format. The target produces a file with one sheet and a header. Formatting of data in the output file will follow the formatting configured for columns in your Wrangler job.
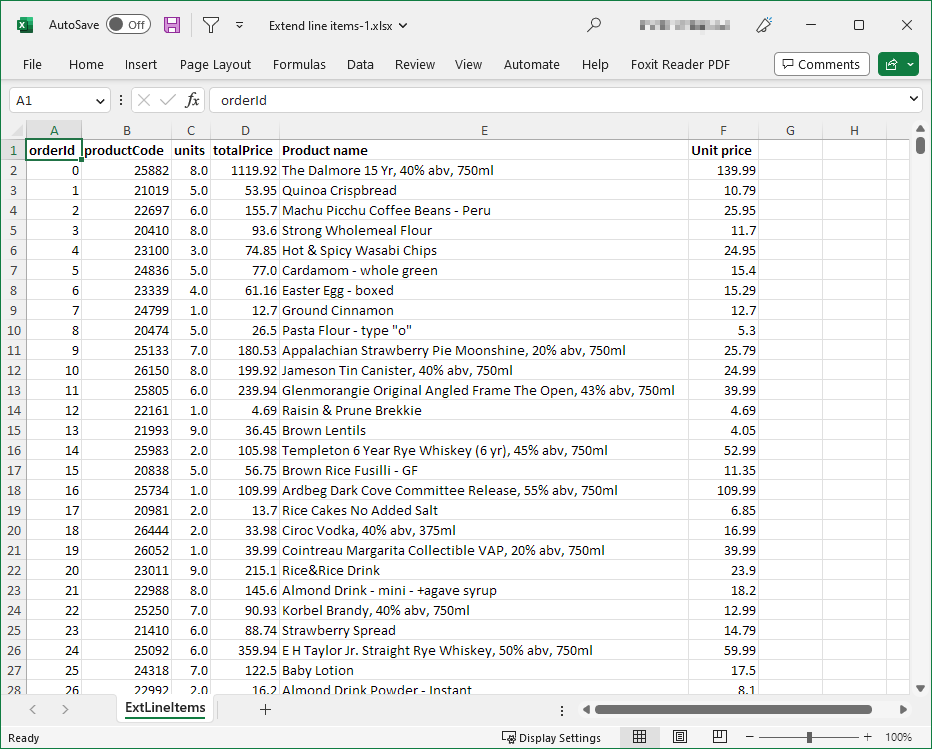
Figure 26. Sample Excel file create with CloverDX Wrangler
Excel data target configuration
Following settings are available for the Excel target:
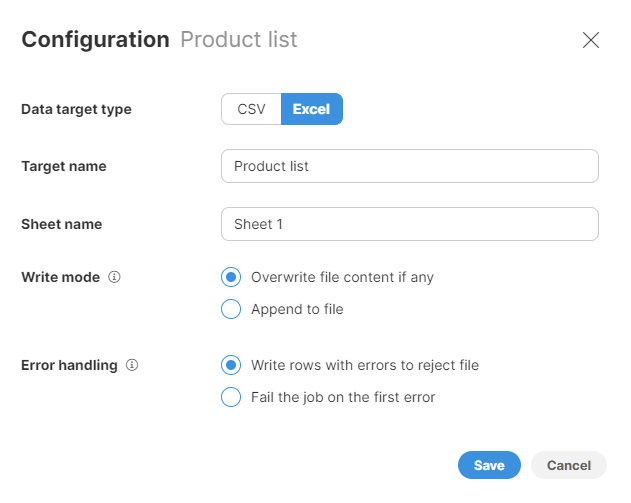
Figure 27. Excel data target configuration dialog
-
Target name: name of the output file. The default value is the name of your Wrangler job.
-
Sheet name: name of the sheet to create in the output file. Note that Excel limits the length of the sheet name to 31 characters.
-
Write mode: determines how your data should be output.
-
Overwrite file content if any: any existing file content is deleted and replaced by the output from the latest job run.
-
Append to file: any existing file content is kept and data from the latest job run is added to the end of the file.
-
The append function is disabled if the number of columns or column data types change and no longer match the existing layout or data types in the target file. In such a case, you will either need to change the target settings and switch to the Overwrite option, or change the target file to a new empty file.
Figure 28. Error when job data layout does not match data layout in target file
-
-
-
Error handling: determines what to do with rows that contain errors in any of their cells. Two options are provided:
-
Write rows with errors to reject file (default value): if selected, all rows that contain errors are written to a reject file. Reject file allows you to see the rejected rows as well as information about errors that caused those rows to be rejected (read more here). You can then see number of rows that were rejected on My Jobs page when job execution ends:
-
Fail the job on the first error: when an error is encountered when writing the file, the job is stopped and the error will be reported on My Jobs page:
-
Formatting of Excel files
The formatting of data in Excel output files depends on the formats configured on columns in your data set. Wrangler will set the corresponding Excel format depending on the display format for each column.
When saving to an Excel file, Wrangler will save the complete value even if the formatting restricts the display of data. This is especially important for numbers which may be stored with higher precision than what is displayed in Wrangler preview.
For example, consider a value like 3.1415926535 written in Wrangler with decimal format set to #.### (i.e. three decimal places):

The column $formatted_constant was created as a duplicate of $constant_value column and then configured to show just three decimal places. The same is then replicated in Excel output in which complete value is stored and the formatting only applies during data display:
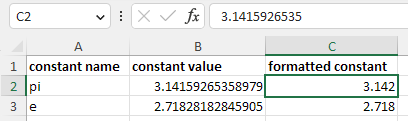
Note that the formats may not always be the same since Excel formatting and Wrangler formatting have slightly different capabilities.
Excel data target limitations
Note that some restrictions apply when working with Excel files. Some of the restrictions below are limitations of the Excel file format itself while others are technical limitations of the Excel data target in Wrangler.
-
You cannot write more than 1048576 rows into an Excel file. This is a limitation of the Excel file format. If you need to work with more data, you will need to use CSV data target.
-
You cannot have more than 16384 columns in the output. This is a limitation of Excel file format. Note that this is much higher than the default soft-limit for Wrangler columns - 1000 columns - so you are unlikely to reach this.
-
You can only create a single sheet in the output file using Wrangler.