Chapter 12. Cloud Marketplaces
Overview
The CloverDX Server offerings in cloud marketplaces provide an easy way to create a CloverDX Server instance in the cloud infrastructure. The offerings spin-up a recommended cloud architecture that contains a standalone CloverDX Server with good defaults and recommended environment.
Currently we support AWS Marketplace and Azure Marketplace, see their respective sections for details. This section will describe aspects that are common for all of our cloud offerings - the intent is for the offerings to be as similar as possible.
For details on how to subscribe to and deploy CloverDX Server in cloud marketplaces, see specific sections:
Architecture
The marketplace offerings consist of virtual machine images and templates. The templates orchestrate creation of all cloud resources necessary for the VM to run and be usable - database, virtual private networks, subnets, virtual firewalls etc. The templates also provide a simple to use UI wizards to deploy the whole solution.
The virtual machine is designed to run a standalone CloverDX Server instance:
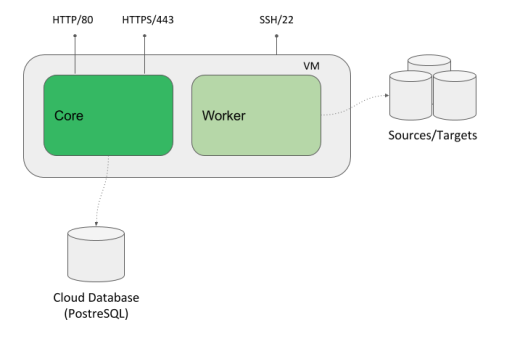
Figure 12.1. Architecture - CloverDX Server in Cloud Marketplaces
It has external dependencies:
- data sources/data targets - the data sources/targets to be processed by jobs are expected to be outside of the VM (temporary files will be inside).
- cloud resources - network resources such as virtual private networks, subnets etc. These are created automatically by the offering’s template.
Environment:
- CentOS-based Linux (depends on specific cloud)
- AdoptOpenJDK 11
- Tomcat 9 - runs under
cloveruser - PostgreSQL 11 based cloud system database
The VM uses 2 disks:
- OS disk - contains operating system, software, installation of Tomcat and CloverDX. Mounted as
/. - Data disk - contains persistent data such as CloverDX configuration, logs, sandboxes etc. Mounted as
/var/clover.
Internal structure of the VM:
/opt/clover- installation of Tomcat and CloverDX, home directory of thecloveruser./var/clover- persistent data of CloverDX (configuration, logs, sandboxes etc). Mount point of the data disk. Contains the following subdirectories:conf/- configuration of the server, e.g. connection to the system databasesandboxes/- sandboxes with jobs, metadata, data, etc.cloverlogs/- server logstomcatlogs/- Tomcat logsclover-lib/- libraries to add to Tomcat, Server Core classpath and Worker classpathtomcat-lib/- libraries to add to Tomcat and Server Core classpathworker-lib/- libraries to add to Worker classpathtemp/- Tomcat's temporary directory, default location of CloverDX tempspace
Default exposed ports:
80- HTTP port of the Server Console and Server API443- HTTPS port of the Server Console and Server API22- SSH port for VM administration
Configuration
Server Configuration
CloverDX Server is configured via configuration properties. See Chapter 17, List of Configuration Properties for available configuration properties.
Server in cloud comes with built-in configuration file /opt/clover/tomcat/conf/default_clover.properties
which contains basic useful configuration for cloud. Do not modify this file, your changes would be lost when updating to newer versions.
The /var/clover/conf/clover.properties file contains user-specified server configuration properties and their values.
Any properties defined here will override default built-in configuration. Changes made here will carry over to new versions when updating.
System Database Configuration
By default, CloverDX Server uses a PostreSQL-based cloud database, see
AWS Marketplace and Azure Marketplace sections
for more details about the databases. The database connection itself uses a JNDI datasource
defined in /var/clover/conf/server_fragment.xml. The JNDI resource defines the database URL, credentials (password is encrypted)
and additional configuration such as connection pool sizes and timeouts. Communication with the database is done over SSL.
The connection to system database over JNDI is defined in /opt/clover/tomcat/conf/default_clover.properties:
datasource.type=JNDI
jdbc.dialect=org.hibernate.dialect.PostgreSQLDialect
datasource.jndiName=java:comp/env/jdbc/clover_server
To use a different system database or change connection configuration:
- Put the JDBC driver to
/var/clover/tomcat-lib. - Modify JNDI resource definition in
/var/clover/conf/server_fragment.xml. - Put database configuration properties into
/var/clover/conf/clover.propertiesconfiguration file. To see which properties are necessary, see Chapter 16, System Database Configuration
Libraries and Classpath
Libraries are added to the classpath of Tomcat (i.e. Server Core) and Worker from directories in the data disk.
Place the JARs to the following directories under /var/clover:
tomcat-lib/- libraries to add to Tomcat and Server Core classpath (e.g. JDBC drivers)worker-lib/- libraries to add to Worker classpath (e.g. libraries used by jobs)
Sandboxes
Sandboxes are stored by default on the data disk under the /var/clover/sandboxes directory.
License
The server can be activated via the Server Console, typically on the login screen on the first start of the Server.
Tomcat Configuration
Tomcat is installed in /opt/clover/tomcat directory. You can modify its configuration in a persistent manner in two ways:
/var/clover/conf/server_fragment.xml- this file is included in Tomcat'sserver.xmlconfiguration file. You can define e.g., JNDI resources here./var/clover/conf/setenv_custom.sh- this bash script is included in Tomcat'ssetenv.shscript. You can add command line parameters for Server Core in this script.
Any changes made in the above two files will carry over when upgrading to new versions of the cloud marketplace offer.
Memory
Important memory settings are Java heap size for Server Core, Java heap size for Worker and sizes of additional Java memory spaces. The memory settings are automatically calculated based on the memory available to the VM instance. If you change the memory size of the VM, the heap memory settings are updated automatically during VM start - for example if you modify the VM to use an instance type with a larger amount of memory, the heap sizes for Server Core and Worker will increase automatically.
For example, if running the VM with 16 GB of RAM, the Server Core will have 4 GB heap, Worker will have 7 GB heap, and the rest is left for additional Java memory spaces and the OS.
The automatic memory settings can be overridden by modifying the /var/clover/memory_allocation_config_override file and setting BOTH properties:
CLOVER_SERVER_HEAP_SIZE- heap size of Server Core (in MB)CLOVER_WORKER_HEAP_SIZE- heap size of Worker (in MB)
CloverDX Services
The CloverDX Server is started automatically as a systemd service
on startup of the VM. To manually stop/start/restart the server, use the following commands:
sudo systemctl stop cloversudo systemctl start cloversudo systemctl restart clover
To see the stdout logs of the clover service, use journalctl -u clover | less.
For working with the service, root permissions are required, use sudo to obtain them.
The system swap size is configured automatically by systemd service swap-autosize.service
on startup of the VM. If you want to configure swap yourself, you can disable the service.
Server logs
Server logs are collected in /var/clover/cloverlogs directory on the virtual machine.
Integration with native cloud logging services is possible, see specific sections:
JMX monitoring
Both Server Core and Worker are configured for JMX monitoring using tools like VisualVM or JConsole.
The JMX is configured to use SSL. It needs 2 open ports per process, so 4 ports in total.
The ports are NOT exposed on the virtual firewall by default. To successfully connect through JMX, you need to
allow inbound connections from your IP to this destination port range: 8686-8689.
In case you want to customize the default JMX configuration, you can modify following files:
/var/clover/conf/jmx-conf-core.properties/var/clover/conf/jmx-conf-worker.properties
To connect through JMX, use port 8686 for Server Core, and port 8688 for Worker.
For further instructions for using JMX with the default self-signed certificate in AWS, see the AWS specific section JMX monitoring in AWS.
Upgrading CloverDX
There are 2 ways to upgrade CloverDX to a new version:
Upgrade of the whole architecture - upgrades the whole cloud architecture defined by CloverDX offerings to a new version. The architecture in newer offering version can be improved by incorporating new cloud services, better defaults etc. This is the recommended way to upgrade the cloud offerings and is described in detail below.
Upgrade of clover.war - simply change the clover.war file to a new version. This doesn’t use improvements to the cloud architecture in new versions and is equivalent to ordinary upgrade of CloverDX. For this upgrade, follow Chapter 28, Upgrading Server to Newer Version. Make sure to use WAR suitable for Tomcat 9 container. The server WAR is located in
/opt/clover/tomcat/webapps. To stop and start the server use the above commands to control its systemd service.
The recommended upgrade process of the whole cloud architecture follows the same basic principles for all cloud offerings. The main idea is that we create the new version instance and its cloud architecture using a copy of the previous versions database, data, configuration, sandboxes etc. The previous version instance is kept running with minimal impact. This way the new version can be run and tested alongside the previous version, while the previous version keeps running and providing its services. The new version does not modify anything of the previous version.
![[Note]](../figures/note.png) | Note |
|---|---|
The upgrade process is supported when upgrading from CloverDX version 5.6.1 or newer. |
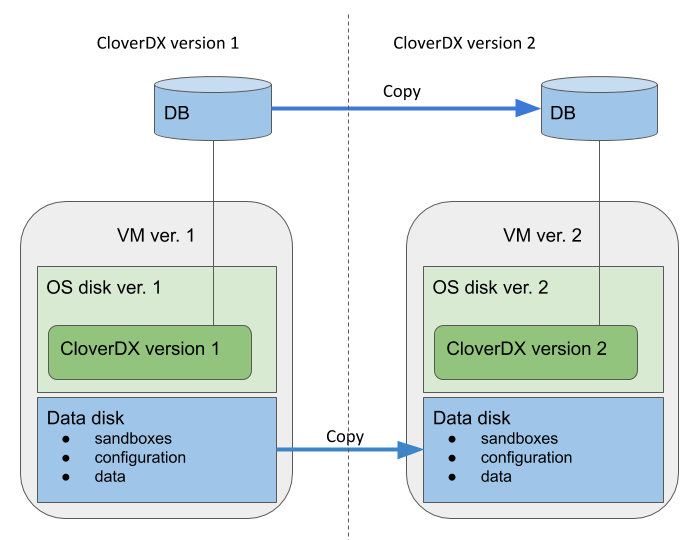
Figure 12.2. Upgrade overview
The data disk and system database of the new version are based on snapshots of the data disk and database of the previous version. Everything else is created as new - OS disk, VM, networking resources and other cloud resources. This way the CloverDX configuration, data, sandboxes used in the previous version are easily used in the new version, while the whole architecture of the offering is upgraded.
Overview of the upgrade process:
Pause processing of jobs in the previous version. This is best done by disabling schedules and event listeners. The reason for this is for the new version to not start processing your data immediately after start. This starts the downtime of the previous version.
Create a snapshot of the system database - contains the state and configuration.
Create a snapshot of the data disk - contains data, sandboxes, configuration, logs etc.
Resume processing of jobs in the previous version - this ends the downtime of the previous version.
Deploy the new version using the above snapshots via a template specific for upgrade. The new version is deployed alongside the previous version, while the previous version is kept running.
Activate the new version - on the login page you will probably be prompted to enter a new license that supports the new version.
Test the new version - perform testing of the new version to verify the upgrade. In the step 1 above you disabled listeners and schedules - you might need to re-activate them correctly if it’s safe (e.g. if they won’t process production data).
When the new version is verified, you might want to re-use the IP address of the previous version - follow cloud-specific steps below. This allows you to continue using the same IP address or hostname with the new version, e.g. for Server projects in CloverDX Designer or other services calling the server API.
Upgrade details specific to cloud providers: