Chapter 11. Cloud Marketplaces
Overview
The CloverDX Server offerings in cloud marketplaces provide an easy way to create a CloverDX Server instance in the cloud infrastructure. The offerings spin-up a recommended cloud architecture that contains a standalone CloverDX Server with good defaults and recommended environment.
Currently we support AWS Marketplace and Azure Marketplace, see their respective sections for details. This section will describe aspects that are common for all of our cloud offerings - the intent is for the offerings to be as similar as possible.
For details on how to subscribe to and deploy CloverDX Server in cloud marketplaces, see specific sections:
Architecture
The marketplace offerings consist of virtual machine images and templates. The templates orchestrate creation of all cloud resources necessary for the VM to run and be usable - virtual private networks, subnets, virtual firewalls etc. The templates also provide a simple to use UI wizards to deploy the whole solution.
The virtual machine is designed to run a standalone CloverDX Server instance:
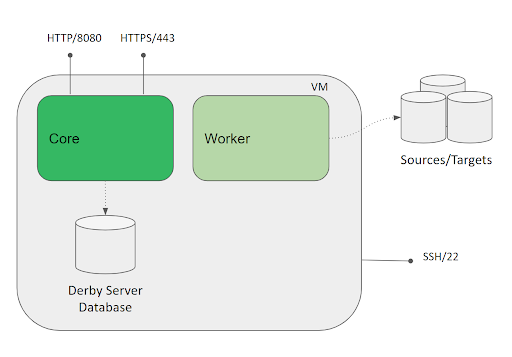
Figure 11.1. Architecture - CloverDX Server in Cloud Marketplaces
It has external dependencies:
- data sources/data targets - the data sources/targets to be processed by jobs are expected to be outside of the VM (temporary files will be inside).
- cloud resources - network resources such as virtual private networks, subnets etc. These are created automatically by the offering’s template.
Environment:
- CentOS-based Linux (depends on specific cloud)
- AdoptOpenJDK 11
- Tomcat 9 - runs under
cloveruser
The VM uses 2 disks:
- OS disk - contains operating system, software, installation of Tomcat and CloverDX. Mounted as
/. - Data disk - contains persistent data such as CloverDX configuration, logs, sandboxes etc. Mounted as
/var/clover.
Internal structure of the VM:
/opt/clover- installation of Tomcat and CloverDX, home directory of the Default exposed ports: user./var/clover- persistent data of CloverDX (configuration, logs, sandboxes etc). Mount point of the data disk. Contains the following subdirectories:conf/- configuration of the server, e.g. connection to the system databasesandboxes/- sandboxes with jobs, metadata, data, etc.cloverlogs/- server logstomcatlogs/- Tomcat logsclover-lib/- libraries to add to Tomcat, Server Core classpath and Worker classpathtomcat-lib/- libraries to add to Tomcat and Server Core classpathworker-lib/- libraries to add to Worker classpath
Default exposed ports:
80- HTTP port of the Server Console and Server API443- HTTPS port of the Server Console and Server API22- SSH port for VM administration
Configuration
Server Configuration
CloverDX Server is configured via configuration properties - e.g. connection information to the system database. See Chapter 16, List of Configuration Properties for available configuration properties.
The /var/clover/conf/clover.properties file contains server configuration properties and their values. For example:
jdbc.driverClassName=com.mysql.jdbc.Driver
jdbc.url=jdbc:mysql://hostname:3306/clover?useUnicode=true&characterEncoding=utf8
jdbc.username=user
jdbc.password=pass
jdbc.dialect=org.hibernate.dialect.MySQLDialect
System Database Configuration
By default, CloverDX Server will use an embedded Derby database. In order to use an external database, the server needs a JDBC driver and a configuration file:
- If necessary, put additional JDBC drivers to
/var/clover/tomcat-lib. We provide some JDBC drivers by default (MS SQL Server, Oracle, MySQL, Postgre). - Put database configuration properties into
/var/clover/conf/clover.propertiesconfiguration file. To see which properties are necessary, see Chapter 15, System Database Configuration
Libraries and Classpath
Libraries are added to the classpath of Tomcat (i.e. Server Core) and Worker from directories in the data disk.
Place the JARs to the following directories under /var/clover:
tomcat-lib/- libraries to add to Tomcat and Server Core classpath (e.g. JDBC drivers)worker-lib/- libraries to add to Worker classpath (e.g. libraries used by jobs)
Sandboxes
Sandboxes are stored by default on the data disk under the /var/clover/sandboxes directory.
License
The server can be activated via the Server Console, typically on the login screen on the first start of the Server.
Tomcat Configuration
Tomcat is installed in /opt/clover/tomcat directory, so all its configuration is done in a standard
way in the bin and conf subdirectories.
Memory
Important memory settings are Java heap size for Server Core, Java heap size for Worker and sizes of additional Java memory spaces. The memory settings are automatically calculated based on the memory available to the VM instance. If you change the memory size of the VM, the heap memory settings are updated automatically during VM start - for example if you modify the VM to use an instance type with a larger amount of memory, the heap sizes for Server Core and Worker will increase automatically.
For example, if running the VM with 16 GB of RAM, the Server Core will have 4 GB heap, Worker will have 8 GB heap, and the rest is left for additional Java memory spaces and the OS.
The automatic memory settings can be overridden by modifying the /var/clover/memory_allocation_config_override file and setting BOTH properties:
CLOVER_SERVER_HEAP_SIZE- heap size of Server Core (in MB)CLOVER_WORKER_HEAP_SIZE- heap size of Worker (in MB)
CloverDX Service
The CloverDX Server is started automatically as a systemd service
on startup of the VM. To manually stop/start/restart the server, use the following command:
systemctl start | stop | status clover.service. To see the stdout logs of the service
use journalctl -u clover | less. For working with the service, root permissions are required,
use sudo to obtain them.
Upgrading CloverDX
To upgrade the CloverDX Server to a newer version, follow Chapter 25, Upgrading Server to Newer Version.
Make sure to use WAR suitable for Tomcat 9 container.
The server WAR is located in /opt/clover/tomcat/webapps. To stop and start the server use the above
commands to control its systemd service.