Chapter 43. Data Apps
Data Apps allow publishing a data integration job and its functionality as an application with a simple web-based user interface.
Each Data App is backed by a Data Service which implements the logic. The user interface is generated based on the input and output of this Data Service job.
Create new Data App
To create a new Data App and make it available for others, a Data Service has to be published on the CloverDX Server. Each published Data Service has a working preview of the Data App embedded into the Server Console UI under the Data App tab of the detail view. In order to make the Data App available for use outside the Server Console, you need to enable the Data App feature for the given Data Service. Data App can be enabled either through the action available in the context menu options or at the header of the Data App tab in the detail view.
The configuration of the Data Service also affects the Data App. Input elements are generated for each parameter based on their type in the order they are defined in the Data Service job. See the table below for more info about what kind of widget is generated for which type of parameter.
Table 43.1. Parameters types
| Parameter type | Widget in Data App | Example screenshot | |
|---|---|---|---|
| String | A simple text box for a string value. |
| |
| Date |
Text box with a calendar widget. Accepts values in YYYY-MM-DD HH:mm:ss format. The time portion is optional. For more information see the Date Input section. Date input widget accepts the following formats:
The date input converts the inserted values to ISO 8601 format in the Time zone of the CloverDX Server. Example: if the server timezone is +03:00 and the user selects the value '2019-05-05 05:05' then the value '2019-05-05T05:05:00.000+03:00' is sent to the Data Service. |
| |
| Binary or Text File |
File widget with browse and drag-and-drop functionality. Note: CloverDX version 5.5 does not distinguish Binary or Text files. Both types should be processed using request:part:[name] URL. Different type name is reserved for upcoming versions. |
|


Using Data Apps
Data Apps catalog
Data Apps catalog contains an alphabetically ordered list of available apps. Each app is backed by a singe Data Service. There is a generated icon with color code based on the first letter of the application name to simplify orientation in the list of available Data Apps.
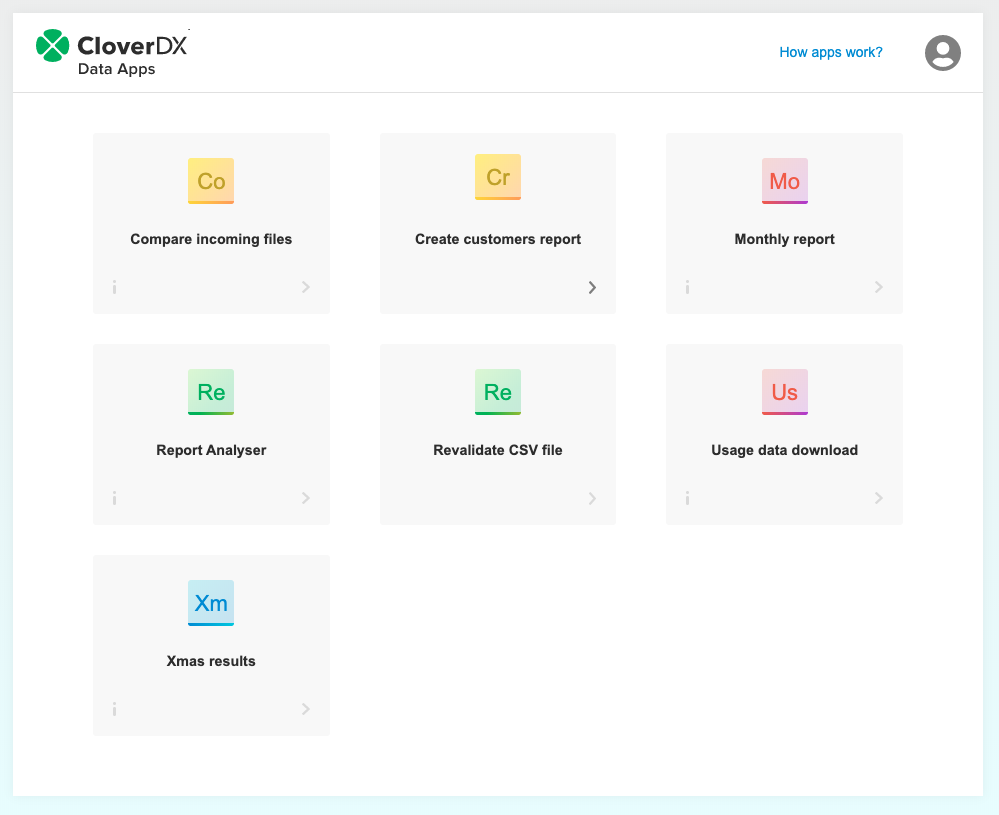 |
Figure 43.1. Data Apps catalog
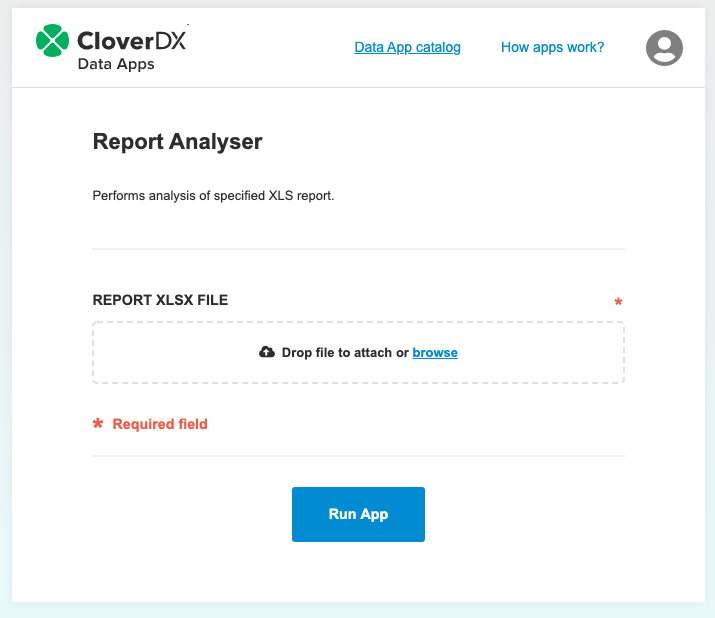
Singe Data App form
The Data App form collects user input and triggers the execution of the job. Form elements are generated based on the input parameters of the backing Data Service. Required parameters are marked with * (asterisk) character. After filling in the form, trigger execution using the Run App button.
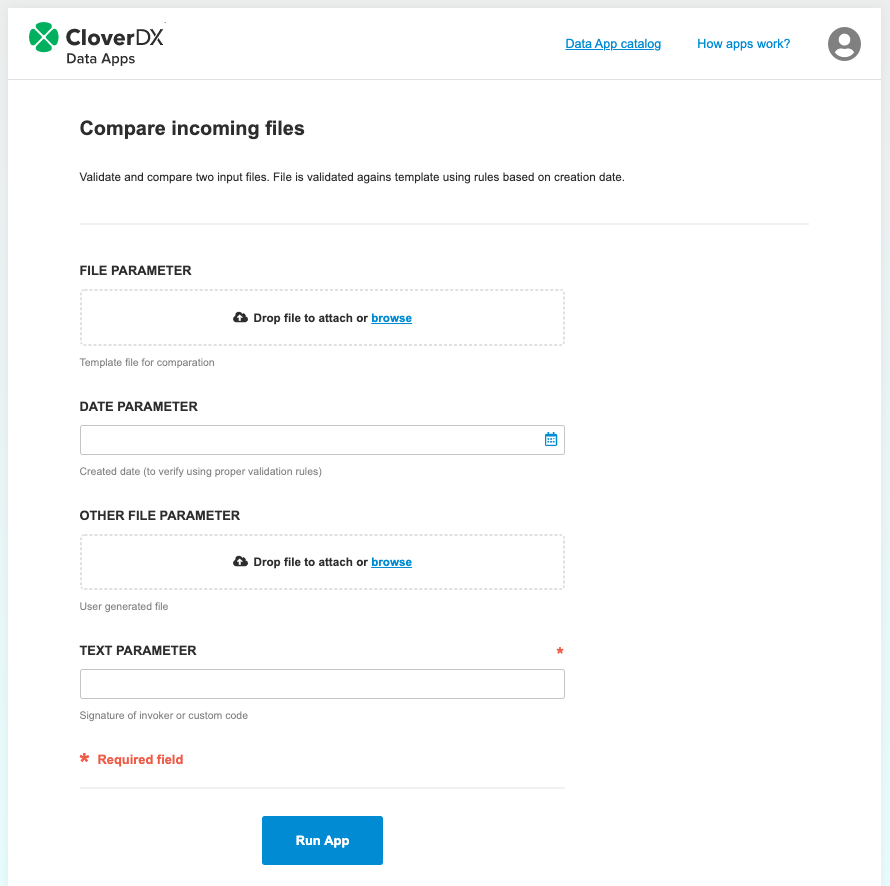 |
Figure 43.2. Data App form
Responses
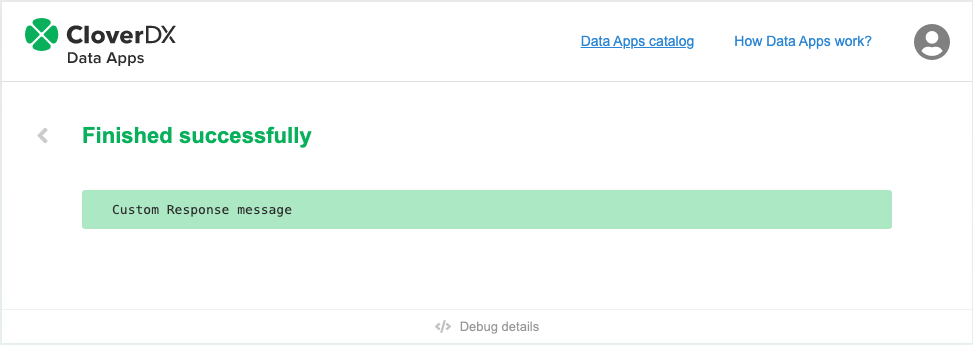
Success or fail response is presented to the user based on response HTTP headers. Most important headers are Content-type and Content-disposition. For response types of JSON, XML, and CSV and any text type other than plain, both a download link and a data preview are shown on the page. When using file response checking the 'Set Content-Disposition as attachment' checkbox will disable the preview and only a file download is offered. When using custom response, it is treated based on content-type text/plain response is treated as a response message and visualizes as such.
Table 43.2. Responses
|
|
|
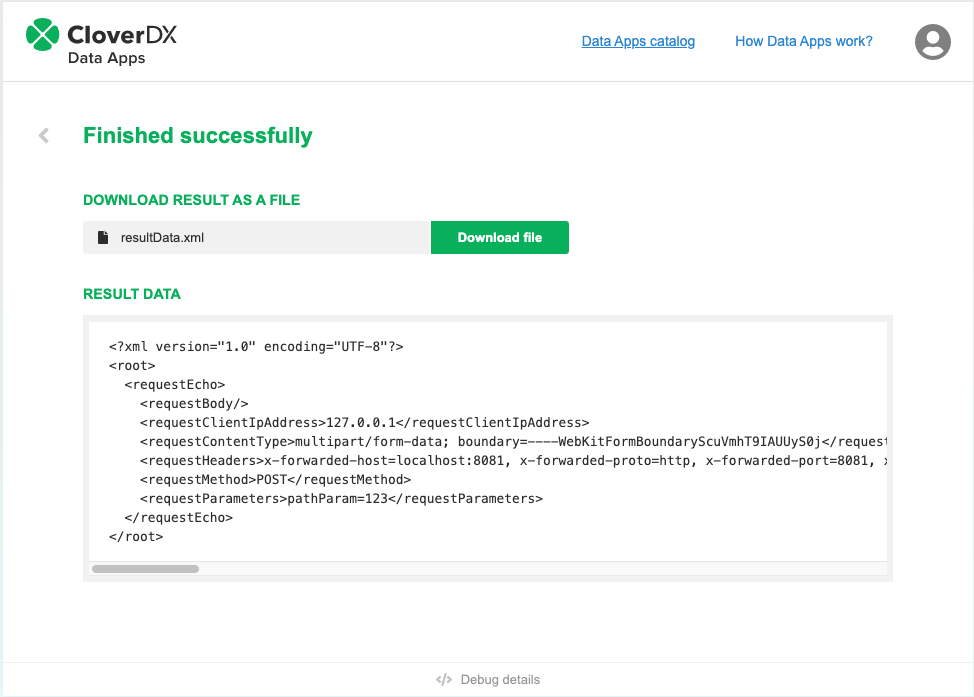
Debugging, Troubleshooting
After receiving a response from the server debug information about the Data App execution is available at the bottom of the Data App UI. The panel is expanded upon clicking the Debug Details footer. It shows additional information about the request and the response that can be useful for troubleshooting errors with the execution, such as the request parameters, request headers and run ID.
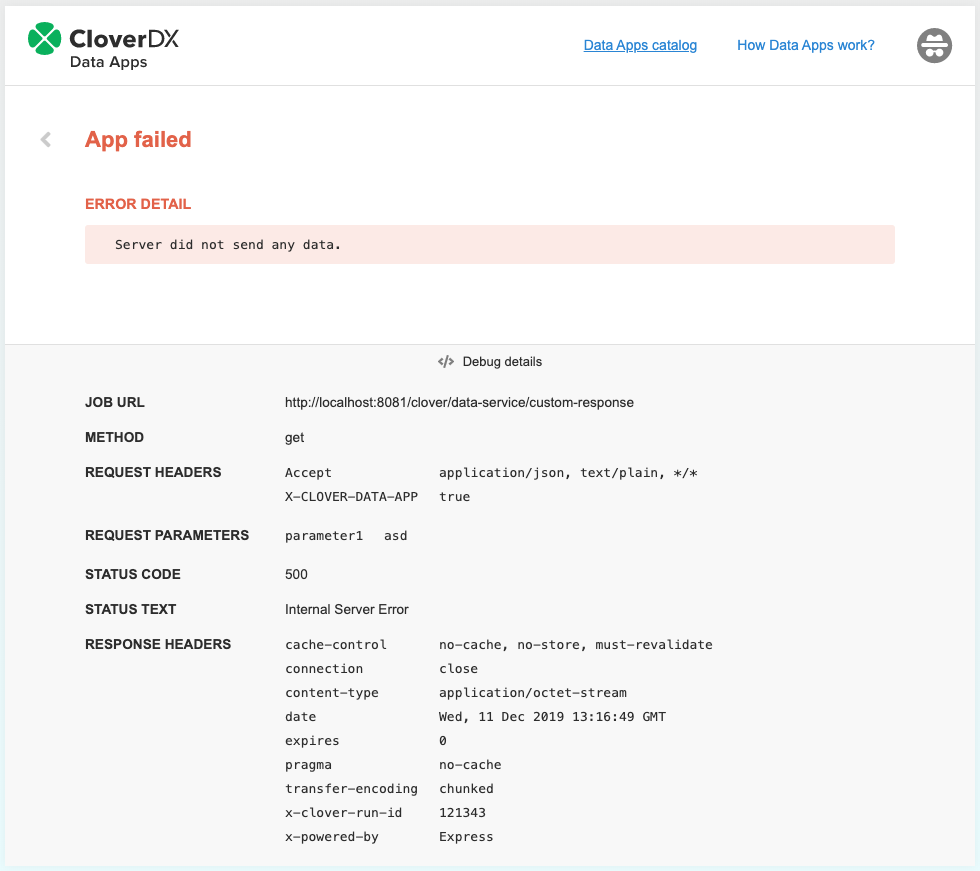 |
Figure 43.3. Data App debugging
Authentication, Anonymous mode
Data Apps uses same authentication mechanism as CloverDX Server console. CloverDX user accounts in clover or LDAP domain can be used for authentication.
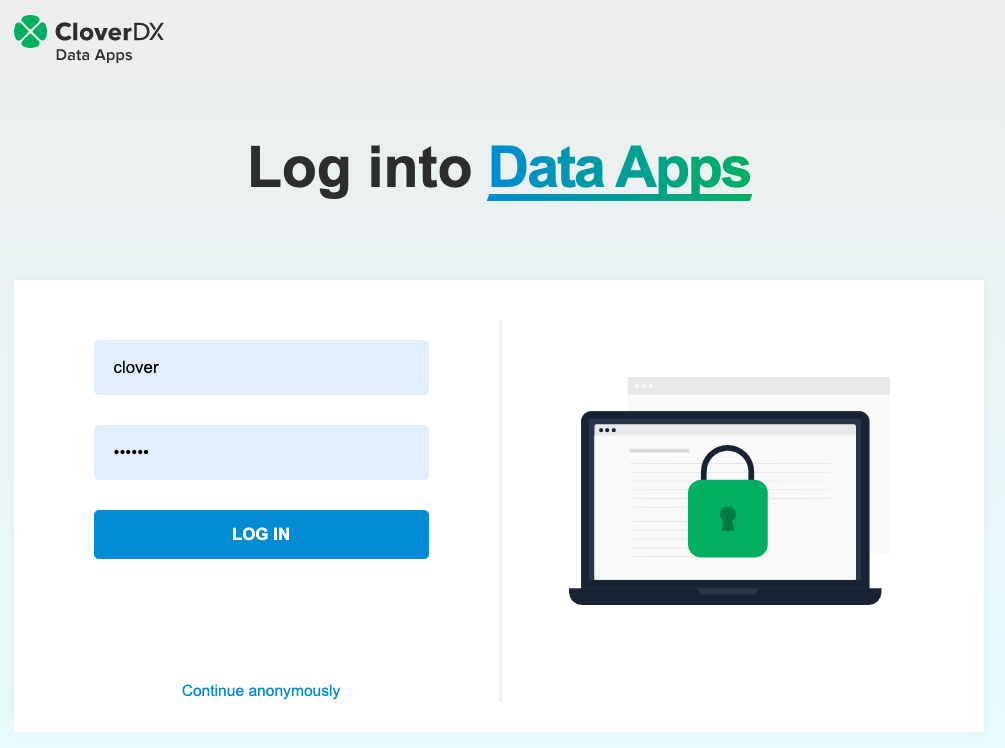 |
Figure 43.4. Data App login
Data Apps can be used in anonymous mode. The user does not have to log in in such a case. The list of available Data Apps only contains apps based on Data Services which do not require authentication.
Permissions
Access to Data App is controlled by the combination of sandboxes and Data Services permissions.
To create a user, who is able to use the Data Apps, but will not have access to CloverDX Server console, follow these steps:
- Create a new group (eg. Business User Group)
- In the permissions tab for this group check Sandboxes and Data service permission
- Create a user and assign him/her to the Business User group
- Go to the Sandboxes module and add read and execute permissions for the sandbox containing the Data Services which are used for Data Apps
Table 43.3. Permissions
|
|
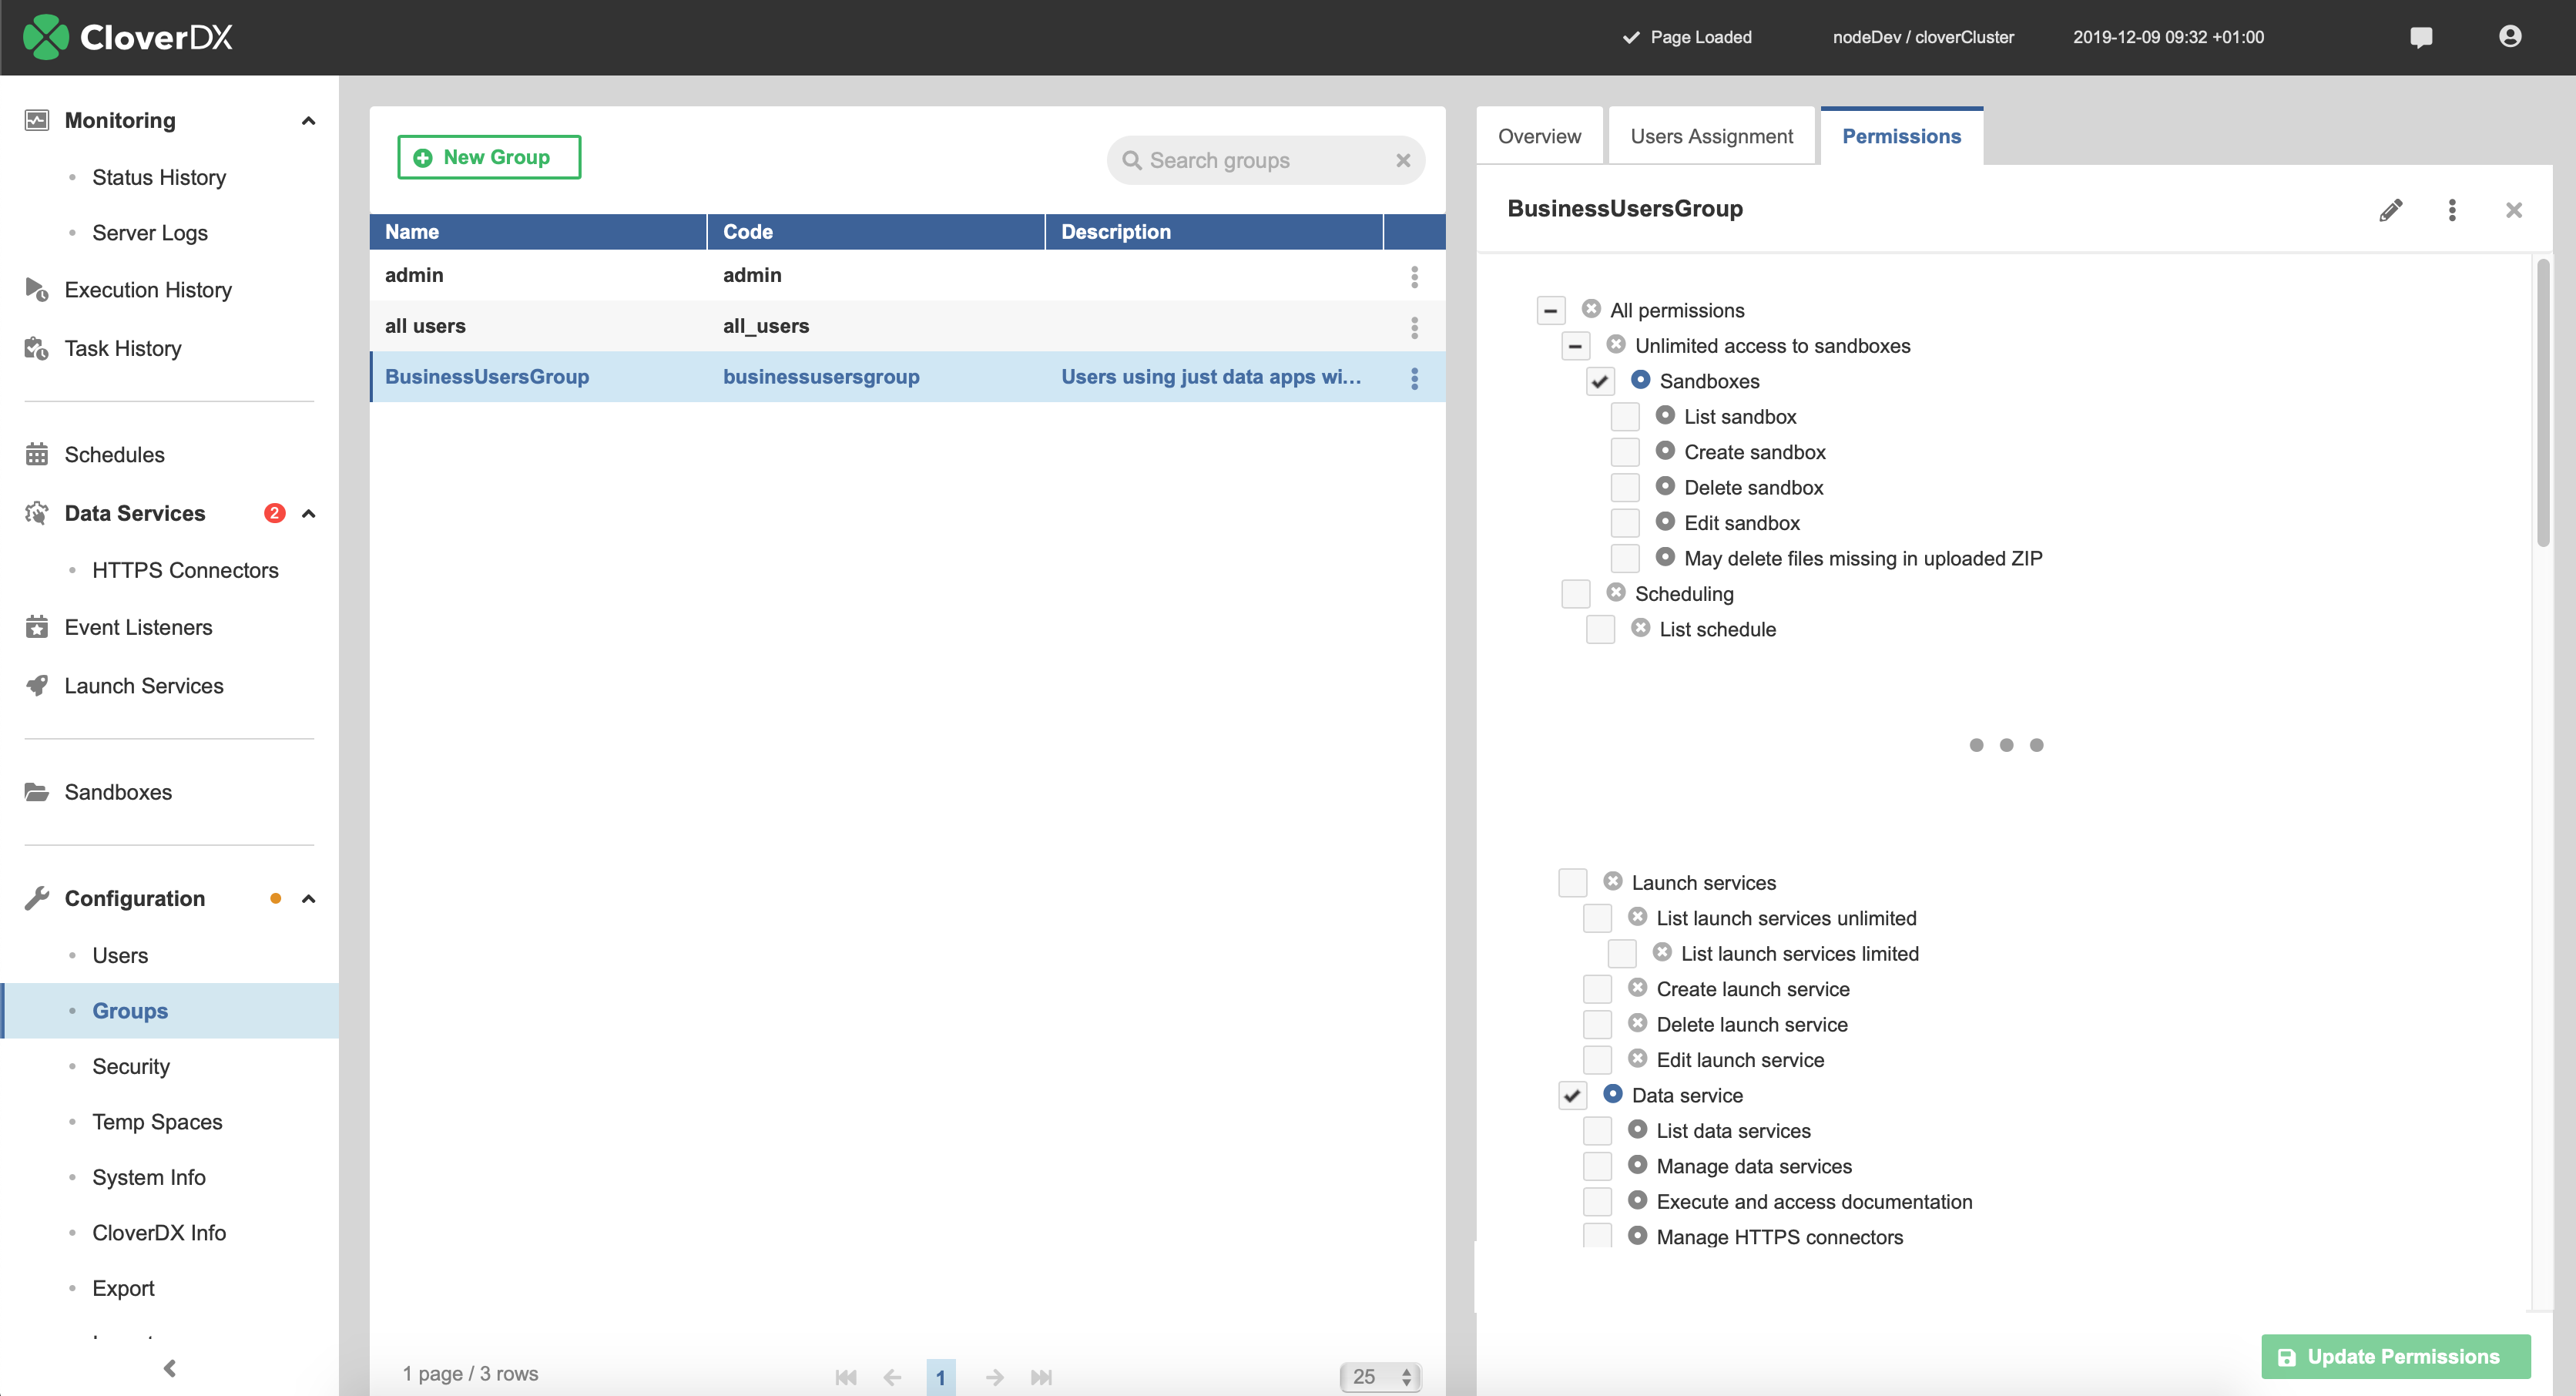
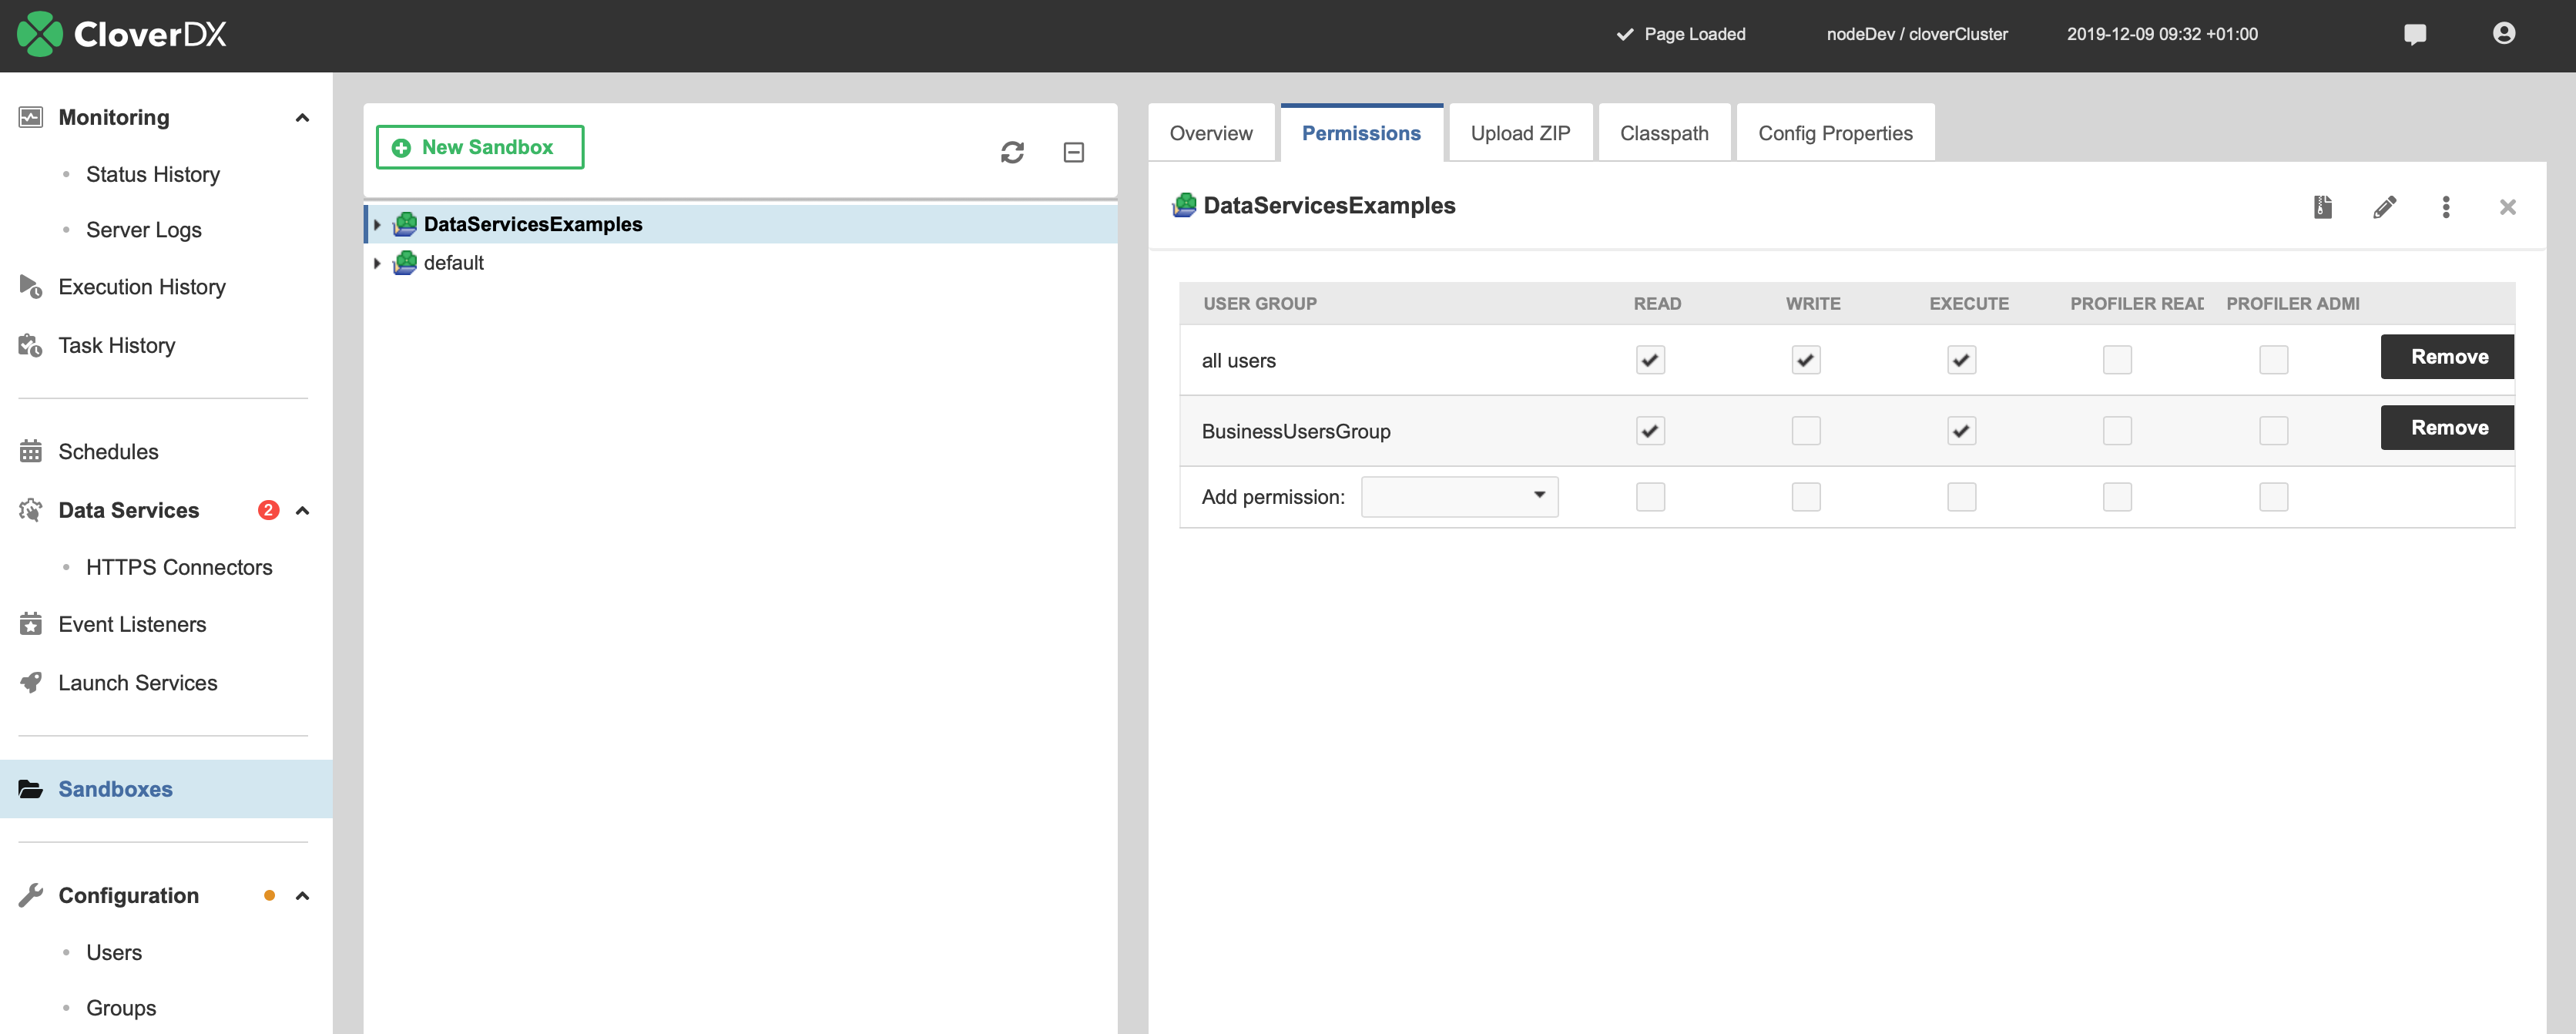
Use Sandboxes permissions to control access to a set of the Data Services located in one Sandbox.
Examples, How to, Best practices
How to process an input file
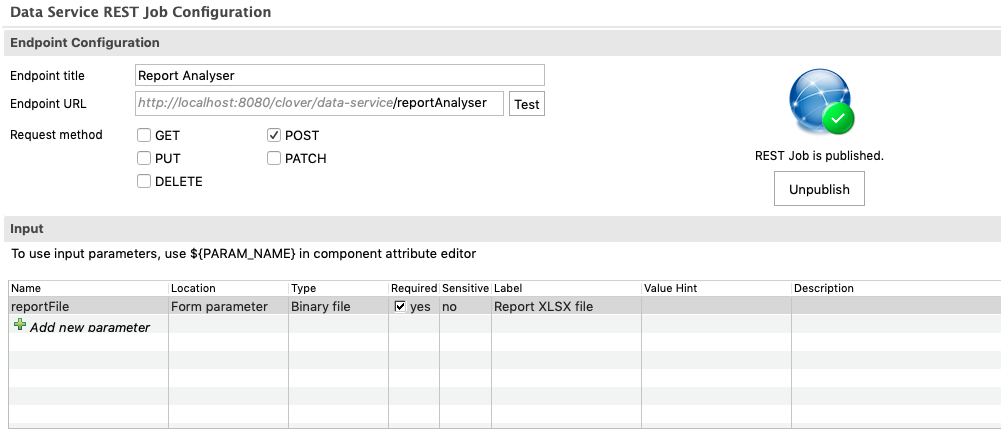
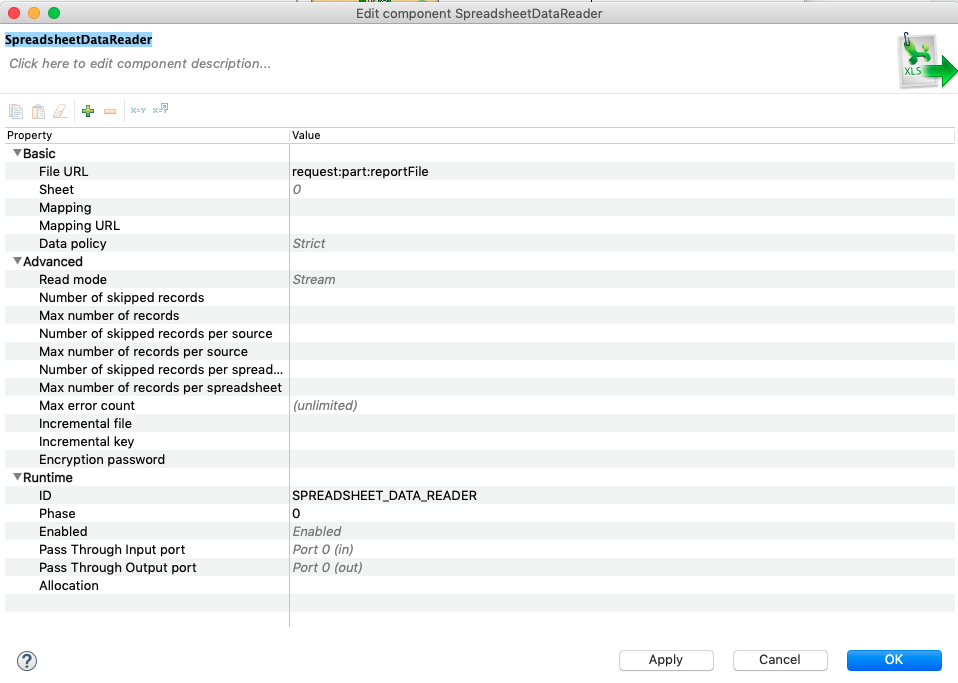
Data App allows using files as an input of data processing. In such a case, create an input parameter with the type "Binary file" or "Text file". (Both file parameters work similarly in CloverDX 5.5, different types are reserved for later use). Once you create such a parameter, Data Service jobs expect a multipart request. File sent as a multipart is available for reader components using request:part:[name] notation. For example, the parameter named reportFile is available via the URL request:part:reportFile.
The Data App generates a file input widget to upload file in such cases
Table 43.4. Input file processing
|
|
|
How to identify the invocation of Data Service from Data App
When executing a Data App it sends the request header 'X-CLOVER-DATA-APP' with the value 'true'
Since calling the REST API from other sources doesn't set the header you also have to handle the cases where the header is missing. The following code snippet set's the response message based on if the Data Service was called from Data App or not.
    setResponseContentType("text/plain");
    string header = getRequestHeader("X-CLOVER-DATA-APP");
    boolean isDataApp = false;
    if (header != null) {
        isDataApp = str2bool(header);
    }
    if (isDataApp) {
        setResponseBody("Service was called from Data App");
    } else {
        setResponseBody("Service was not called from Data App");
    }
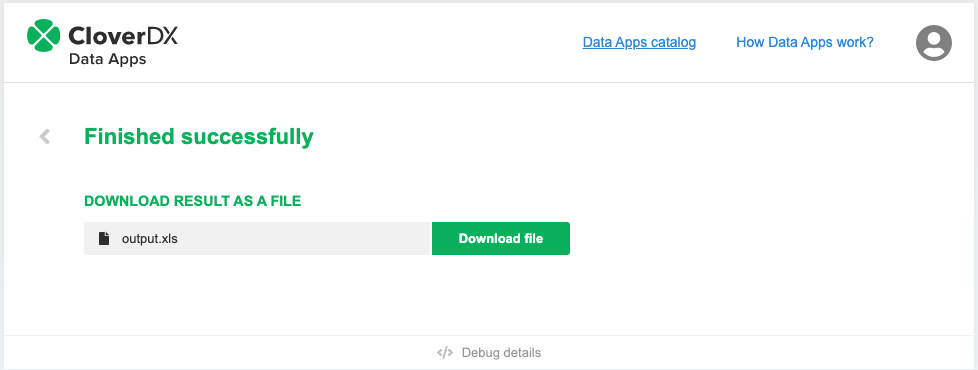
How to produce a file download as a response
In order to create a file download as a response, edit the configuration of the Data Service output, set format to '<file>', then fill in the File URL and Content-type fields then check 'Set Content-Disposition as attachment' checkbox.
With this configuration on the successful execution of the Data App, a file download is offered on the response page.
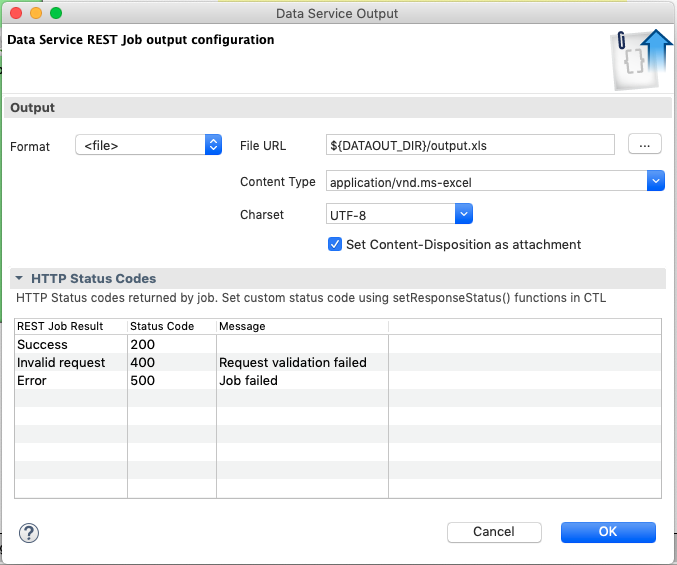 |
Figure 43.5. Data App file result