URL File Dialog
| Local Files |
| Workspace View |
| CloverDX Server |
| Hadoop HDFS |
| Remote Files |
| Port |
| Dictionary |
| Filtering Files and Tips |
The URL File Dialog serves to navigate through the file system and select input or output files.
In many components, you are asked to specify the URL of some files. These files can serve to locate the sources of data that should be read, the sources to which data should be written or the files that must be used to transform data flowing through a component and some other file URL. To specify the URL of such a file, you can use the URL File Dialog.
The URL File Dialog has several tabs on it.
Local Files
The Local files tab serves to locate files on a local file system. The combo contains local file system places and parameters. It can be used to specify both CloverDX projects and any other local files.
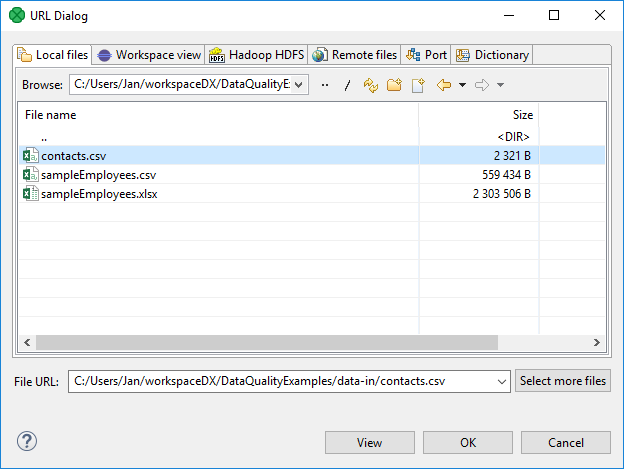
Figure 23.1. URL File Dialog - Local files
![[Note]](../figures/note.png) | Note |
|---|---|
Best practice is to specify the path to files with Workspace view instead of Local view. Workspace view with help of parameters provides you with better portability of your graphs. |
Workspace View
Workspace view tab serves to locate files in a workspace of a local CloverDX project.
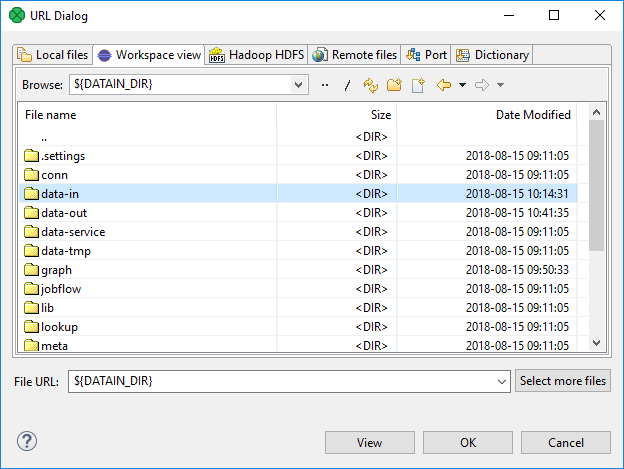
Figure 23.2. URL File Dialog - Workspace view
CloverDX Server
CloverDX Server dialog serves to locate files of all opened CloverDX Server projects. Available only for CloverDX Server projects.
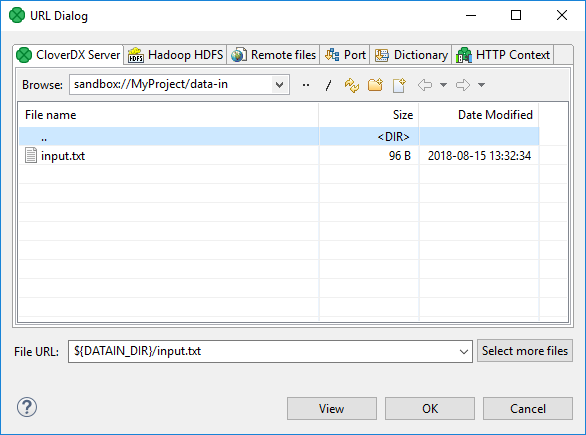
Figure 23.3. URL File Dialog - CloverDX Server
Hadoop HDFS
Hadoop HDFS tab serves to locate files on Hadoop Distributed File System.
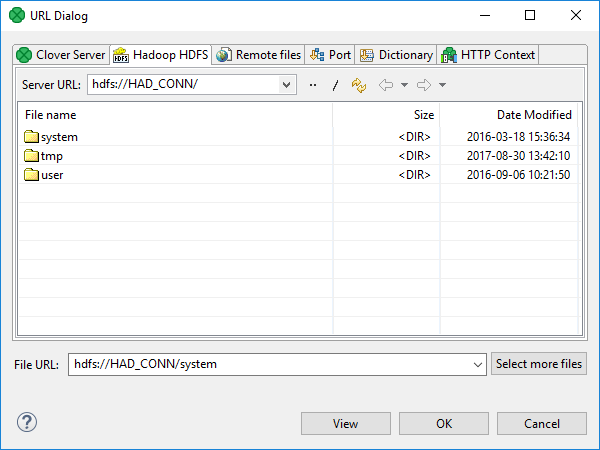
Figure 23.4. URL File Dialog - Hadoop HDFS
You need a working Hadoop Connection to choose the particular files.
Remote Files
The Remote files tab serves to locate files on a remote computer or on the Internet. You can specify properties of connection, proxy settings, and HTTP properties.
You can type the URL directly in the format described in Supported File URL Formats for Readers
or Supported File URL Formats for Writers,
or you can specify it with a help of Edit URL Dialog.
The Edit URL Dialog is accessible under the icon
![]() .
.
Edit URL Dialog
Edit URL Dialog lets you specify connection to a remote server in an easy way. Choose the protocol, specify a host name, port, credentials, and path.
The dialog lets you specify the connection using the following protocols:
HTTP
HTTPS
FTP
SFTP - FTP over SSH
Amazon S3
Azure Blob Storage
WebDav
WebDav over SSL
Windows Share - SMB1/CIFS
Windows Share - SMB 2.x, SMB 3.x
Click to save the connection settings. Click to use it.
The Load button serves to load a session from the list for subsequent editing.
The Delete button serves to delete the session from the list.
HTTP(S), (S)FTP, WebDav, and SMB
If the protocol is HTTP, HTTPS, FTP, SFTP - FTP over SSH, WebDav, WebDav over SSL, Windows Share - SMB1/CIFS or Windows Share - SMB 2.x or 3.x, the dialog allows you to specify the host name, port, username, password, and path on the server. It allows you to connect anonymously, as well.
SFTP Certificate in CloverDX
If you are reading from or writing into remote files and are connected via an SFTP protocol using a certificate-based authorization, you should do one of the following:
Create OpenSSH configuration file and specify path to it in the preferenses. The configuration file can hold multiple configurations for different hosts.
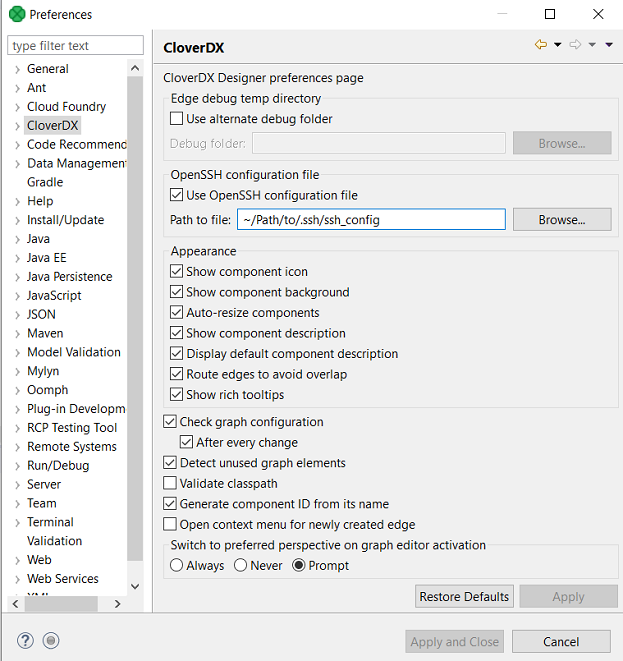
Figure 23.5. Configuration of OpenSSH file location.
Create a directory named
ssh-keysin your project;Put the private key files into this directory and choose a suitable filename with the
.keysuffix.Listed in order from the highest to lowest priority when resolving, the private key file can have the following names:
username@hostname.keyhostname.key*.key(the files are resolved in alphabetical order).
![[Tip]](../figures/tip.png) | Tip |
|---|---|
If you want to explicitly select a certificate for a specific location,
the best way is to use the name with the highest priority, i.e. |
Figure below shows the format of the OpenSSH private key generated by ssh-keygen.
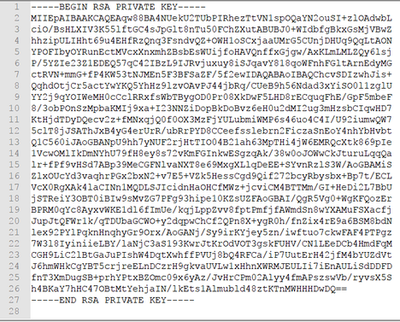
Figure 23.6. Example of Generated OpenSSH Private Key
URL Syntax for FTP Proxy
CloverDX is able to connect to FTP proxy using the following URL syntax:
ftp://username%40proxyuser%40ftphost:password%40proxypassword@proxyhost
where:
username- Your login on the FTP server.
proxyuser- Your login on the proxy server.
ftphost- The hostname of the FTP server.
password- Your FTP password.
proxypassword- Your proxy password.
proxyhost- The hostname of the proxy server.
Amazon S3
In the case of the Amazon S3 protocol, the dialog allows you to fill in access Key, secret key, bucket, and path. For better performance, you should fill in the corresponding region.
Having the connection specified, you can choose the particular file(s).
Amazon S3 URL
It is recommended to connect to S3 via endpoint-specific S3 URL:
s3://s3.eu-central-1.amazonaws.com/bucket.name/.
The end-point in URL should be the end-point corresponding to the bucket.
The URL with a specific endpoint has a much better performance than the generic one (
s3://s3.amazonaws.com/bucket.name/), but you can only access the buckets of the specific region.The endpoint affects the signature version that will be used. If you connect to the generic one, the signature version may not match the endpoint being used. Therefore the signature is sent twice and you can see an error message in the error log:
DEBUG [main] - Received error response: com.amazonaws.services.s3.model.AmazonS3Exception: The authorization mechanism you have provided is not supported. Please use AWS4-HMAC-SHA256. (Service: null; Status Code: 400; Error Code: InvalidRequest; Request ID: 2D7C4933BD5ED2F8), S3 Extended Request ID: 9wmejqgrZ0jRpgqvw43RXUBZOzm9rnd5/wVN19kSe0dHAF/k5rxq34jvRhy8bHd5JnqBcQTBwkM=
WARN [main] - Attempting to re-send the request to cloverdx.example.test.s3.eu-central-1.amazonaws.com with AWS V4 authentication. To avoid this warning in the future, please use region-specific endpoint to access buckets located in regions that require V4 signing.
For list of regions and endpoints, see AWS Regions and Endpoints (Amazon S3).
When the S3 URL does not contain Secret Key + Access Key
(e.g. s3://s3.eu-central-1.amazonaws.com/bucket.name/path),
CloverDX automatically searches for credentials in the following sources (in this order):
Environment Variables
AWS_ACCESS_KEY_IDandAWS_SECRET_ACCESS_KEYRecommended since they are recognized by all the AWS SDKs and CLI except for .NET
AWS_ACCESS_KEYandAWS_SECRET_KEYonly recognized by Java SDK
Java System Properties -
aws.accessKeyIdandaws.secretKeyCredential profiles file at the default location (
~/.aws/credentials)shared by all AWS SDKs and the AWS CLI
Credentials delivered through the Amazon EC2 container service
the
AWS_CONTAINER_CREDENTIALS_RELATIVE_URIenvironment variable must be set and the security manager must have permission to access the variableInstance profile credentials delivered through the Amazon EC2 metadata service
For detailed information, see the Walkthrough: Using IAM roles for EC2 instances.
| Tip |
|---|---|
These sources of credentials may be used for graph development in a local project;
for example, set |
Azure Blob Storage
Microsoft Azure Blob Storage is a cloud object storage service, similar to Amazon S3. CloverDX supports Azure Blob Storage since version 5.11.
There are multiple supported authentication schemes:
Storage Shared Key
https://docs.microsoft.com/en-us/rest/api/storageservices/authorize-with-shared-key
This authentication is the easiest to set up. It is similar to username/password authentication. You use the name of the storage account as the username and the Access Key as the password. The disadvantage is that all applications that use the Access Key have the same permissions.
You can find the key here: Azure Portal - Storage accounts - <storage account> - Access keys
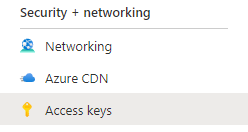
Figure 23.7. Storage Account Access Keys
az-blob://[account]:[key]@[account].blob.core.windows.net/container/path
or
az-blob://AccountName=[account]:AccountKey=[key]@[account].blob.core.windows.net/container/path
to avoid confusion with the Client Secret authentication.
Note that the key must be URL-encoded before you can use it in the URL. The Edit URL dialog encodes the key automatically.
Example
Plain key:
XFqGQY9/FRBucrRKldxykYUp9WmnzFHR9to/w2sP9+fXoDAKoTfWvdUOAzcaS3Wnon9mIgRbPcudtlwsNPtwzQ==Encoded key:
XFqGQY9%2FFRBucrRKldxykYUp9WmnzFHR9to%2Fw2sP9%2BfXoDAKoTfWvdUOAzcaS3Wnon9mIgRbPcudtlwsNPtwzQ%3D%3DClient Secret
This authentication scheme allows fine-grained access control, because you can set different permissions for each application that uses your storage.
First, create an "application" for your CloverDX processing in your Azure Active Directory: Azure Portal - Azure Active Directory - App registrations
The authentication scheme uses three values: Tenant ID, Client ID (also called Application ID) and Client Secret.
You can find the Tenant ID and Client ID in the Overview of your application.
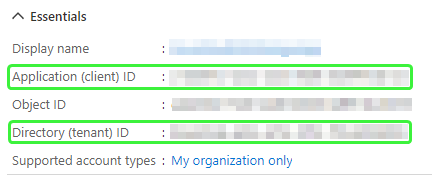
Figure 23.8. Tenant ID and Client ID
The Client Secret is in the Certificates & secrets section of your application.
Figure 23.9. Certificates & secrets
Create a new secret and copy the Value, not the Secret ID.
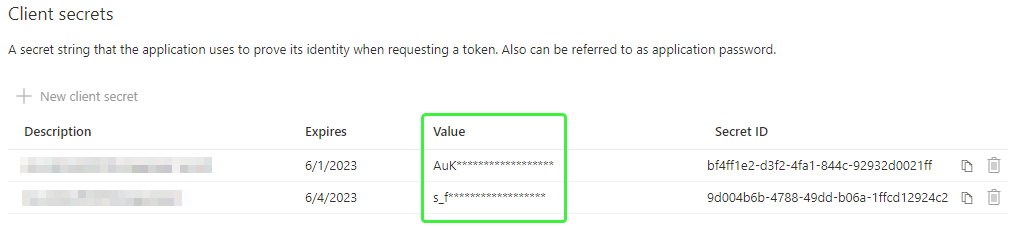
Figure 23.10. Client Secret
az-blob://TenantId=[TenantId]:ClientId=[ClientId]:ClientSecret=[ClientSecret]@[account].blob.core.windows.net
or just
az-blob://[TenantId]:[ClientId]:[ClientSecret]@[account].blob.core.windows.net
Environment Variables
Instead of putting the authentication information into the URL, you can configure the connection using the environment variables below.
The URL then contains only the storage account as a part of the host name:
az-blob://[account].blob.core.windows.net/container/pathConnection String
https://docs.microsoft.com/en-us/azure/storage/common/storage-configure-connection-string
You can find the connection string next to your Access Key: Azure Portal - Storage accounts - <storage account> - Access keys
- AZURE_STORAGE_CONNECTION_STRING
Example
export AZURE_STORAGE_CONNECTION_STRING="DefaultEndpointsProtocol=https;AccountName=[account];AccountKey=XFqGQY9/FRBucrRKldxykYUp9WmnzFHR9to/w2sP9+fXoDAKoTfWvdUOAzcaS3Wnon9mIgRbPcudtlwsNPtwzQ==;EndpointSuffix=core.windows.net"- Client Secret
See Client Secret Authentication.
- AZURE_CLIENT_ID
- AZURE_CLIENT_SECRET
- AZURE_TENANT_ID
- Client Certificate
You can also set up certificates in the Certificates & secrets section of your application in Azure Active Directory.
- AZURE_CLIENT_ID
- AZURE_TENANT_ID
- AZURE_CLIENT_CERTIFICATE_PATH
- Username and Password
- AZURE_CLIENT_ID
- AZURE_USERNAME
- AZURE_PASSWORD
Managed Identity
If the application is deployed to an Azure host with Managed Identity enabled, CloverDX will authenticate with that account.
az-blob://[account].blob.core.windows.net/container/pathAnonymous
If none of the above applies, CloverDX attempts to connect anonymously.
Anonymous access must be explicitly enabled on the container. Clients can then read data from the container without authorization.
az-blob://[account].blob.core.windows.net/container/path
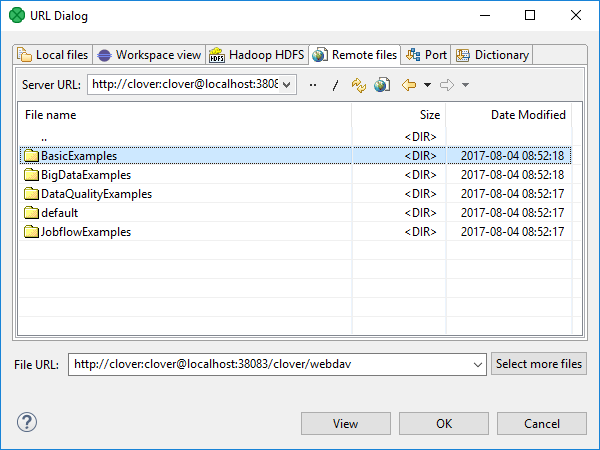
Figure 23.11. URL File Dialog - Remote files
Port
Serves to specify fields and processing type for port reading or writing. Opens only in components that allow such data source or target.
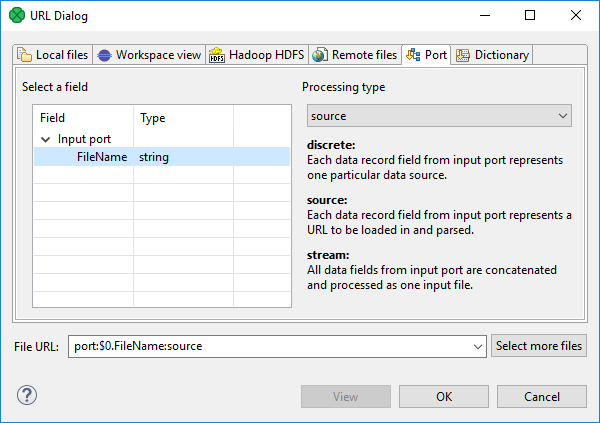
Figure 23.12. URL File Dialog - Input Port
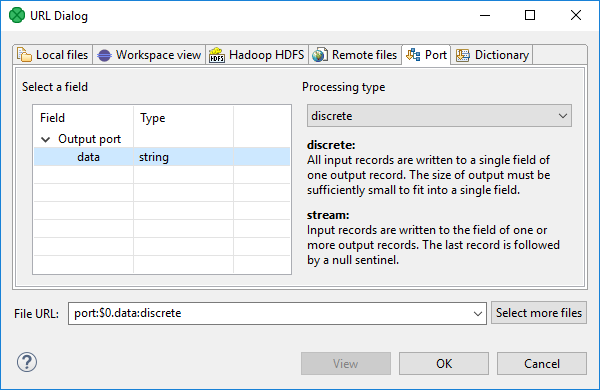
Figure 23.13. URL File Dialog - Output Port
See also: Input Port Reading or Output Port Writing
Dictionary
Dictionary tab serves to specify dictionary key value and processing type for dictionary reading or writing. Opens only in components that allow such data source or target.
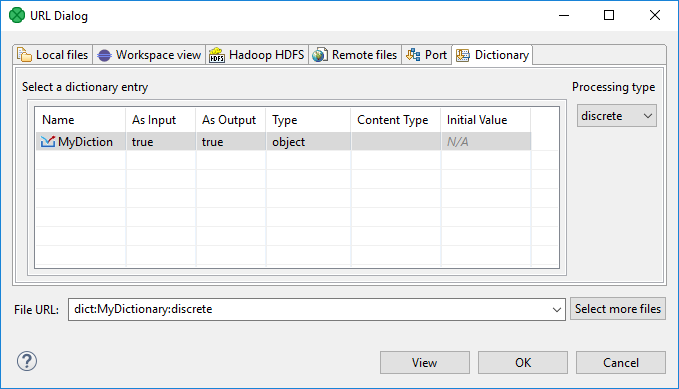
Figure 23.14. URL File Dialog - Dictionary
See also: Using a Dictionary in Graphs
Filtering Files and Tips
If you use File URL Dialog configured to display only some files according to the extension, you can see the File Extension below File URL.
![[Important]](../figures/important.png) | Important |
|---|---|
To ensure graph portability, forward slashes are used for defining the path in URLs (even on Microsoft Windows). |
| Note |
|---|---|
The New Directory action is available at the toolbar of Workspace View and the Local Files tab. F7 key can be used as a shortcut for the action. Newly created directory is selected at the dialog and its name can be edited in-line. Press F2 to rename the directory and DEL to delete it. |
More detailed information of URLs for each of the tabs described above is provided in sections: