Azure Marketplace
Overview
The CloverDX Server offering on Azure Marketplace provides an easy way to create a CloverDX Server instance in the Azure cloud infrastructure. The offering spins-up a recommended cloud architecture that contains a standalone CloverDX Server with good defaults and recommended environment. The server uses Azure Database for PostgreSQL as its system database, which is automatically created and configured. The server instance uses Azure resources of the user, who is charged for them by Azure.
The CloverDX Server Azure offering contains an ARM (Azure Resource Manager) template that deploys a virtual machine and other necessary resources. The ARM template is configured by an user interface with simple configuration options. All the resources are deployed to a single Resource Group chosen by the user.
The following software plans are provided:
- CloverDX Server - New - deploys a new instance of CloverDX Server, see Quickstart.
- CloverDX Server - Upgrade - upgrades a CloverDX instance to a new version of CloverDX Server, see Upgrade in Azure.
Quickstart
Prerequisites:
- basic familiarity with Azure Cloud VM infrastructure
- basic familiarity with Azure Database for PostgreSQL
- basic familiarity with Azure Portal
- Subscription on Azure Portal with a Resource Group where you can create resources
High-level overview of steps:
- Deploy the CloverDX Server on Azure Marketplace
- Activate and configure the server instance
Steps
Navigate to the CloverDX Server BYOL offering on the Azure Marketplace and use the GET IT NOW button on the offering’s marketplace page. Accept the Terms and Conditions and proceed with the Continue button.
You were redirected to the CloverDX Server BYOL offering inside Azure Portal. To proceed, click the Create button. This will launch the wizard where you can configure the server deployment.
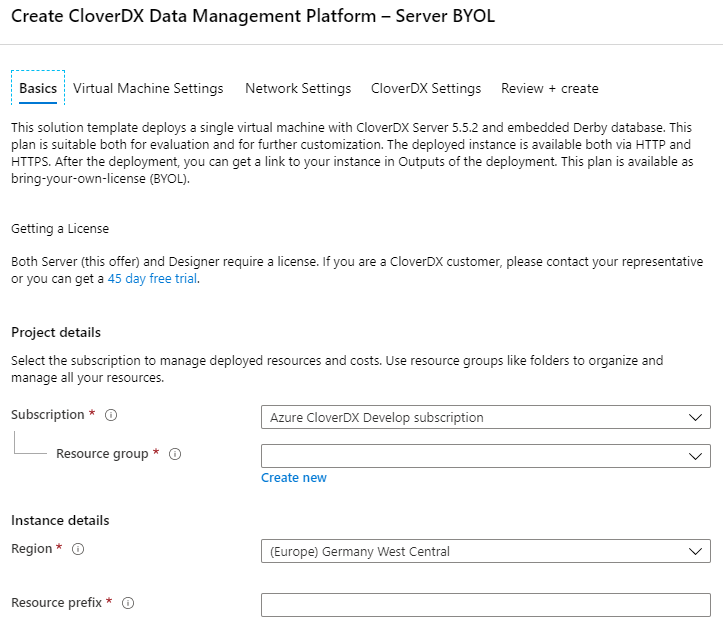
Figure 12.19. Azure Marketplace Configuration Wizard
- Basics
- Subscription - the top-level Azure subscription used for billing.
- Resource group - we recommend deploying to an empty resource group which won’t be shared with other deployments. Managing resources is easier when multiple deployments do not share resource groups.
- Region - the location where all resources are going to be deployed. Our offering is designed to work in all regions.
- Resource prefix - names of all resources created by our offering will start with this prefix. This makes identifying resources easier.
- Virtual Machine Settings
- Virtual machine size - the VM instance size. Default size is pre-selected, and you can pick from 4 different sizes that we support. If you want to change the size and can’t see any other sizes in the selector, make sure to disable filters. Larger instances have better performance but higher cost.
- Admin user name - the admin account name on the OS of the virtual machine.
- Authentication type - you can choose between password and ssh key authentication for the admin user.
- Network Settings
- Public IP address - pre-defined public IP resource. You don’t need to change this, the defaults work well for all deployments.
- Hostname prefix - the server will be available on an Azure hostname, and this is the prefix for that hostname. The hostname must be globally unique, which is immediately validated. If there’s a green validation check, the hostname is not taken.
- Virtual network - whether to create new or re-use an existing virtual network. When selecting an existing network, you can only select networks that are in the location you are deploying to.
- Allow connections from - this option is available only when creating a new virtual network. The ARM template creates a Network Security Group automatically which allows only connections from specific IP ranges to specific ports on the instance. We recommend that you provide a range of IP addresses from which the instance should be available - typically your offices or data centers. For evaluation purposes you can use your public IP, obtained e.g. from myip.com. We do not recommend making the instance visible to the whole internet.
- CloverDX Settings
- CloverDX admin user name - specify the user name of CloverDX Server administration user (or keep the default
clover). This user is the first user available in Server Console, for administration of the server itself. This is NOT the operating system user - you have already configured that on the Virtual Machine Settings page. - CloverDX admin user password - specify the password for the above admin user.
- Confirm password - re-type the above password to confirm it.
- Database admin user name - specify the admin user name of Azure Database for PostgreSQL that will be created as the server's system database. This user name and below password will be used by CloverDX Server to connect to the database.
- Database admin user password - specify the password for the above database admin user.
- Confirm password - re-type the above password to confirm it.
- CloverDX admin user name - specify the user name of CloverDX Server administration user (or keep the default
- Review + Create
-
On this page, all the configuration is validated and summarized.
If there are no problems, you can proceed by clicking on the
Createbutton. If any problems are found, you will see a red error with a description. The error description might not be descriptive enough to see what the problem really is. In that case, open up the Web Console of your browser (F12key) and see if the error messages logged there contain more information.
-
On this page, all the configuration is validated and summarized.
If there are no problems, you can proceed by clicking on the
- Basics
The deployment will start. You will be redirected to the page in Azure Portal where you can see the deployment progress. This process will take several minutes.
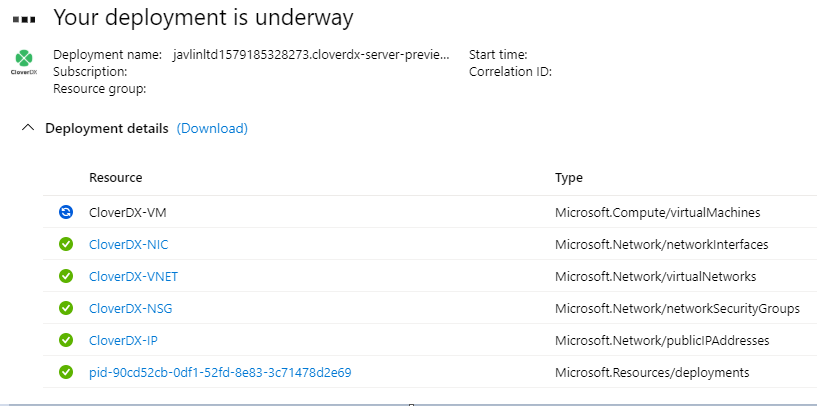
Figure 12.20. Azure Portal - Deployment in progress
Success. CloverDX Server is now available in Azure.
You can find its URL in the Outputs tab of the Deployment - the serverHttpsUrl entry.

Figure 12.21. Azure Portal - Deployment Outputs
On the Server’s URL you will see the login page where you can:
Activate the server - the Server is licensed in BYOL (Bring Your Own License) mode, so you need to get your license from us - start here.
To login, use the credentials set in the configuration wizard.

Figure 12.22. CloverDX Server login page
The Server is running with default settings, and is immediately usable. It can be configured further to get it into full production quality.
Architecture
The CloverDX Server Azure offering consists of a virtual machine image and of an ARM template that orchestrates the required cloud resources:
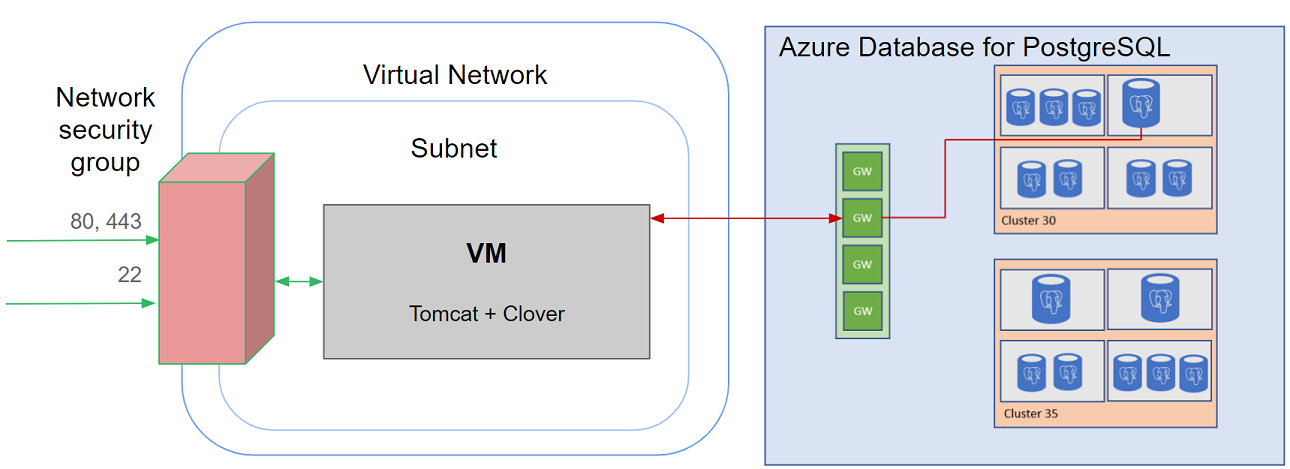
Figure 12.23. Architecture - CloverDX Server in Azure marketplace
Details of the Azure topology:
- The Virtual Machine (VM) runs in the Azure cloud, in the Region selected by the user.
- A new Virtual Network (VNET) is created to isolate the CloverDX instance from other resources present outside (on Azure Cloud or on the Internet).
- The Virtual Network uses a Network Security Group (NSG) to limit access only to specific ports (22, 80, 443) and only from IP addresses from a defined IP range.
- The Virtual Network contains a single subnet which is configured with service endpoint "Microsoft.Sql" to allow connections to Azure databases.
- A new Azure Database for PostreSQL is created to be used as the server's system database. The database contains a "VNET rule" referencing the subnet, which allows VMs in the subnet to connect to the database.
- The Virtual Machine is assigned a Network Interface Controller (NIC) connected to the subnet in Virtual Network, to allow network communication with outside.
- The Virtual Machine is assigned a Public IP Address with configured DNS label. The IP address is dynamic, so it may change between virtual machine restarts, but the DNS label is always the same, so the server is always available on the same hostname.
- The CloverDX Server is running on the Virtual Machine and connects to the PostreSQL database.
Virtual machine details (for additional information, see Common cloud architecture):
- Operating system: CentOS Linux 7.7
- AdoptOpenJDK 11
- Tomcat 9
- 2 disks - OS disk (30GB), data disk (128GB), both are Premium SSD type. It is possible to increase the size of the disks (which also affects the provisioned IOPS), just follow the steps in documentation.
Azure Database for PostgreSQL details:
- Database type - PostgreSQL 11.5
- Pricing tier - Gen 5, 2 vCores, 10GB RAM
- Storage - 100GB allocated storage, autogrow enabled
- Automated backups enabled - performed every day, backups retained for 7 days
- Available only from the server's VM instance, not visible from the Internet
- Server uses SSL to communicate with the database
- Network connectivity between virtual machine and database is described in section Network traffic to database.
Configuration
For details about CloverDX Server configuration, see Common cloud configuration.
Memory
Heap sizes for Server Core and Worker are set automatically based on the instance memory size, see Common cloud memory configuration. It is possible to change the size of the VM and the memory sizes will be re-calculated - for this stop the VM instance in Azure Portal, change its size and start it again.
Server logs
By default, server logs are collected in /var/clover/cloverlogs directory, and Tomcat logs in
/var/clover/tomcatlogs.
It is possible to enable integration with Azure Monitor
service, in which case the logs can also be sent to Log Analytics workspace, where they can be saved and queried.
This lets you view the logs directly in Azure Portal, where they are kept for 30 days by default.
How to send logs to Azure Monitor
The integration with Azure Monitor service is not enabled by default. To start sending server logs to Log Analytics workspace, follow these steps:
Azure Monitor doesn't support circular log rolling. Reconfigure server logs to roll daily instead. You need to provide a modified log configuration file, which is described in section Main Logs.
This is an example of modified appender configuration for all.log. Logs will roll over to a new log file every day, file names will contain the date, and files will be kept for 7 days.
<RollingFile name="allAppender" filePattern="${sys:clover.clover.home}/cloverlogs/all.%d{yyyy-MM-dd}.log"> <PatternLayout pattern="%d{yyyy-MM-dd HH:mm:ss,SSS}[%15.15t] %-16.16c{1} %-5p %-3X{runId} %m%n" charset="UTF-8" /> <Policies> <TimeBasedTriggeringPolicy /> </Policies> <DirectWriteRolloverStrategy> <Delete basePath="${sys:clover.clover.home}/cloverlogs" followLinks="true"> <IfFileName glob="all*.log" /> <IfLastModified age="7d" /> </Delete> </DirectWriteRolloverStrategy> </RollingFile>- Create a Log Analytics workspace in Azure Portal.
Connect the virtual machine to the Log Analytics workspace. Select the VM in the portal, select Logs in the left menu and click Enable to make the connection. Choose the workspace you have created in the previous step. This will automatically install an extension on the VM. This will take several minutes, wait until the process finishes.
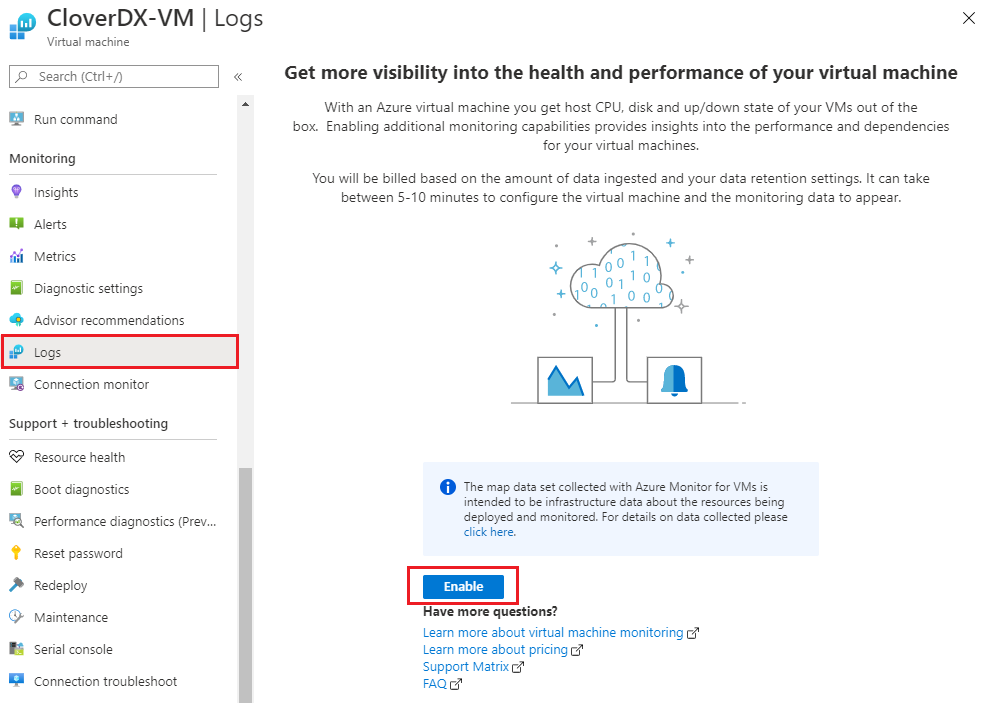
Figure 12.24. Azure VM - enabling Logs
Now we need to define which logs should be sent to Azure Monitor. We will use the provided Custom Log option. Follow steps to add Custom Log data sources in Azure documentation. You will need to add a separate source for every log type you want to collect.
The most important server log file is
alllog. To collect the main log, we recommend following setup for Custom Log:- Record delimiter: Timestamp
YYYY-MM-DD HH:MM:SS - Log collection path:
/var/clover/cloverlogs/all*
Another useful log to collect is performance log. For performance log we recommend following setup:
- Record delimiter: New line
- Log collection path:
/var/clover/cloverlogs/performance*
Do not forget to enable option Apply below configuration to my linux machines and to save the configuration.
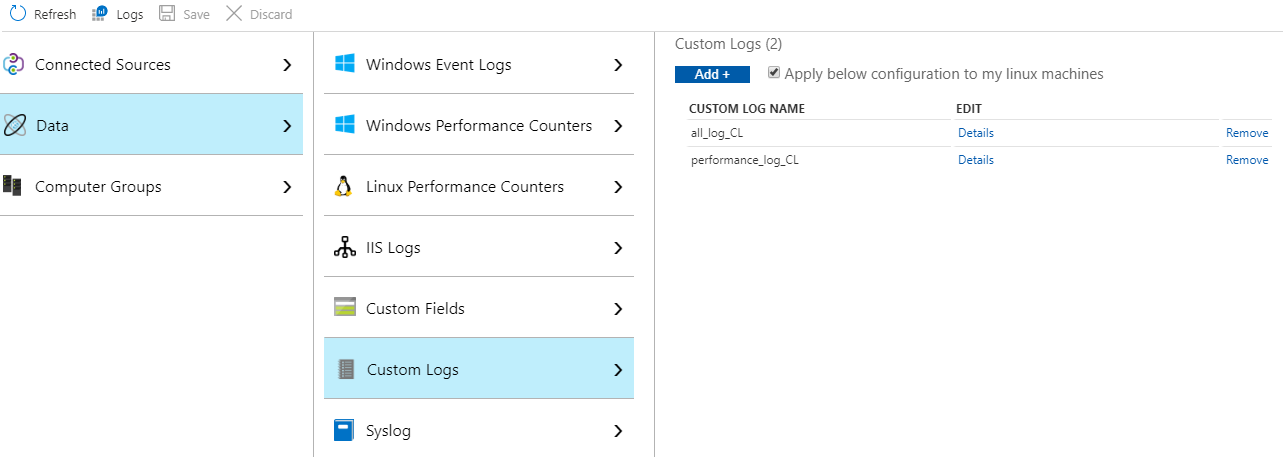
Figure 12.25. Two custom log data sources
- Record delimiter: Timestamp
After you save the above configuration, it might take several hours before the collected log content will be available to view in Azure Portal. After that, you can view and query the collected logs in Log Analytics workspace. To start exploring the logs, follow Log Analytics tutorial.
Users
Users available in the virtual machine:
<admin user>- the user configured in the wizard before deployment. Usesudoto run commands that require root privileges. Login via SSH using either password or public key defined in the configuration wizard.root- not recommended to be used, cannot login to it directly.clover- user that runs the CloverDX Server (i.e. it runs Tomcat). All files that CloverDX uses are owned by thecloveruser. It is not possible to login asclover.
Security
This section describes security related aspects of the CloverDX Marketplace offering.
Network Security Group
The ARM template creates a network security group that serves as a virtual firewall. The security group allows connections to the following ports:
22- SSH80- HTTP for Server Console and Server API443- HTTPS for Server Console and Server API
The connections are allowed only from the IP range specified in the wizard when configuring the deployment.
The security group settings can be modified - you can find the security group in the Resource Group where the server was deployed.
Network traffic to database
Network connectivity between virtual machine and the database is provided by service endpoint. The traffic is SSL encrypted and goes over Azure network backbone. The connectivity can be easily switched to use private link instead. The switch can be performed directly in Azure Portal, steps are following:
- Remove "Microsoft.Sql" service endpoint from the subnet.
- Remove VNET rule in the settings of the database.
- Create a private link for the database, with private DNS zone.
- Restart the virtual machine so it picks up new DNS entry of the database.
HTTPS
The CloverDX Server has both HTTP and HTTPS enabled by default.
You can find the server’s HTTPS URL in the Outputs section
of the Deployment under serverHttpsUrl key.
The HTTPS connector is running on port 443.
Let’s Encrypt Certificate
The default HTTPS connector is using a certificate issued by Let’s Encrypt. It is useful for encryption of communication between client (e.g. Designer) and the Server, and for server identity verification. The certificate is free, but it’s valid only for 90 days because Let’s Encrypt does not support longer validity.
When certificate expiry time is less than 30 days, the server deployed in Azure will automatically attempt a renewal every time it is started. The renewal process requires external access from Let’s Encrypt servers, which is blocked by default by the Network Security Group. To renew the certificate, you must first allow external network access, then restart the virtual machine and then block external network access again.
The full process to renew the certificate is:
Locate and open Network Security Group of the server. It’s in the same Resource Group where the server is deployed, next to all the other resources.
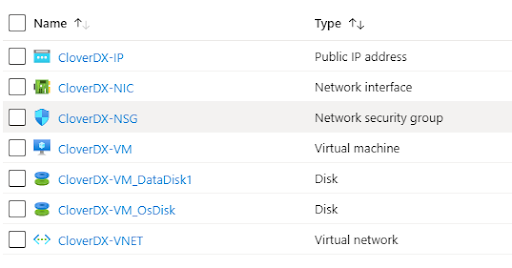
Figure 12.26. Azure resources - network security group
Add a new Inbound security rule to allow access from Let’s Encrypt servers. Set following properties:
- Source -
Any - Source port ranges -
* - Destination -
Any - Destination port ranges -
80 - Protocol -
Any - Action -
Allow
- Source -
Find the Virtual Machine resource and restart it. During its startup, the server automatically attempts a certificate renewal if the expiry time is 30 days or less.
Access the Server Console on HTTPS in your browser and verify that certificate has been renewed. You can check it by inspecting the lock icon next to the address box of the browser and checking the certificate validity. Your certificate should be valid for the next 90 days.
Remove the Inbound security rule you added in step 2. It is no longer necessary.
Using Your Own Certificate
In case you do not want to use the default Let’s Encrypt certificate for any reason, you can use your own production-quality certificate for the HTTPS connector and for JMX monitoring:
Create
/var/clover/conf/customCertificate.jkskeystore with your own server certificate. Do not use or modify the already existing fileserverCertificate.jks- it is used and overwritten by automation scripts.Modify the
/opt/clover/tomcat/conf/server.xmlTomcat configuration file to use yourcustomCertificate.jksfile instead ofserverCertificate.jks.Modify files
jmx-conf-core.propertiesandjmx-conf-worker.propertiesin directory/var/clover/conf/to use yourcustomCertificate.jksfile instead ofserverCertificate.jks.
To disable usage of plain HTTP connectivity, modify the network security group to block all connections to port 80.
Deployment Into Existing Infrastructure
If you are already operating services and instances in Azure and want to deploy CloverDX Server alongside them, e.g., to integrate several data sources or services, then you can use the option to re-use some of your network resources. Instead of creating a new Virtual Network and Network Security Group, you can choose an existing virtual network and connect the newly deployed CloverDX Server to it. The templates do not support re-using other resources than the virtual network.
Deployment steps and settings in this case are the same as described in Quickstart with one difference:
On page “Network Settings”, select option “Select existing or customize” for “Virtual network”. Using the additional controls, choose an existing virtual network you want to use. You will only be able to choose virtual networks in the same location as you chose at the start of the wizard. A subnet from the selected virtual network must be selected as well.
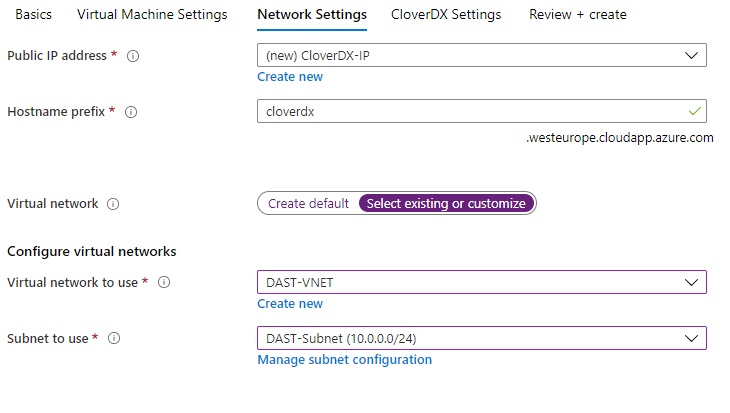
Figure 12.27. Azure - selecting an existing virtual network
Upgrade
To upgrade CloverDX Server to a new version in Azure Marketplace, use the “CloverDX Server - Upgrade” software plan. The upgrade template creates a new virtual machine with a new version of CloverDX and possibly updated cloud architecture. Configuration and data are re-used from the previous version by using a snapshot of the data disk and copy of the system database. The previous version has only minimal downtime and can run in parallel with the new version.
First, see an overview of the upgrade process in Common cloud upgrade. This section assumes familiarity with deploying a new CloverDX Server as described in Quickstart.
![[Note]](../figures/note.png) | Note |
|---|---|
The upgrade process is supported when upgrading from CloverDX version 5.6.1 or newer. |
High-level overview::
- Create a snapshot of the data disk of the previous version.
- Create a new deployment in Azure Portal using the “CloverDX Server - Upgrade” software plan.
- Configure the new version using the above snapshot and deploy it.
- Test the new version.
Upgrade steps
The below steps focus on the new or different actions done during the upgrade process and they assume knowledge of the deployment of a new CloverDX Server (see Quickstart).
Pause processing of jobs in the previous version - disable listeners and schedules, this starts downtime of the previous version.
Create a snapshot of the data disk of the previous version. Navigate to the virtual machine resource of the previous version in Azure Portal. Select “Disks” in the left menu.
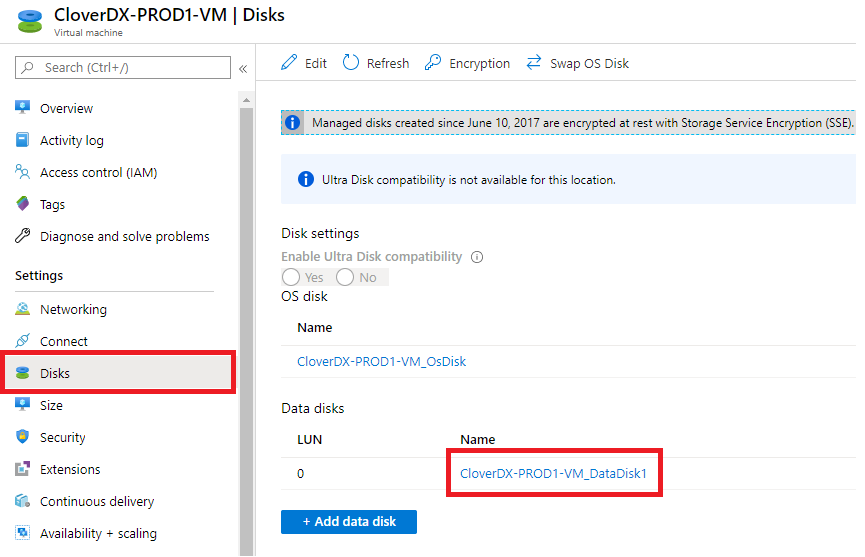
Figure 12.28. Selecting data disk of the virtual machine
Click on the data disk to open its details, then use the “Create snapshot” button. When creating the disk snapshot, selecting “Standard HDD” as storage type is sufficient.
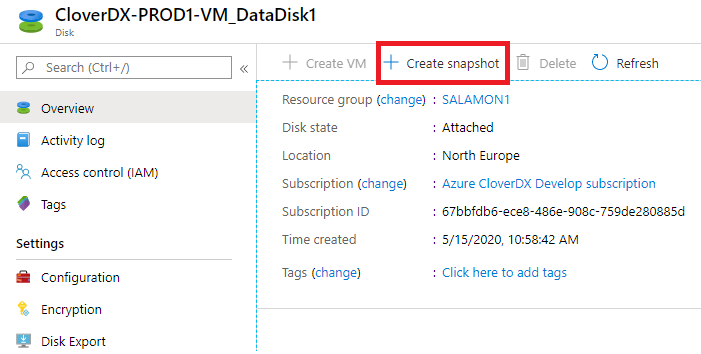
Figure 12.29. Creating snapshot of the data disk
Resume processing of jobs in the previous version - this ends the downtime of the previous version.
Now you can start deploying the new version. Open CloverDX offer in the Azure marketplace and select “CloverDX Server - Upgrade” software plan.
On page “Network Settings” you may re-use the virtual network of the previous version. This has the advantage of having network access already configured, e.g., any IPs that are allowed to have access to the previous server will also have access to the new version. See Deployment Into Existing Infrastructure in Azure.
Note Before deploying to an existing network, allow inbound network access from the Internet for the duration of the deployment - this is necessary to generate SSL certificate, see Let’s Encrypt Certificate. If you’re not using the default Let’s Encrypt certificate, you do not need to modify the network rules.
On page “CloverDX Settings”, select the resources with persistent data which will carry over data and configuration from your previous version.
- Data disk snapshot name - fill in the name of the data disk snapshot you created in Step 2. The snapshot must be in the same Resource Group as you are deploying the new server into.
- Origin database name - select the name of the database server of the previous version. This must be the name of your top level database resource. You can navigate to the Resource Group of the database and copy the name from there.
- Database copy timestamp - the timestamp from which the database for the new version will be copied from. Select a time during the downtime of the previous version - the same time as data disk snapshot was created is the best. Note that this timestamp must be filled in UTC (without timezone).
Note that you are not configuring the credentials of the CloverDX Server admin user and database credentials - they are the same as in the previous version.
Success. New version of CloverDX Server is now available in Azure. You can find its URL in the Outputs tab of the Deployment. Login credentials for the new version are the same as for the previous version. The new version is deployed in a new version of the cloud architecture, while re-using the data disk and system database of the previous version based on their snapshots. The previous version is left untouched and can be continued to be used.
Follow-up steps:
Activate the new server - you will probably need to provide a license for the new CloverDX Server version. You can do this on the login page.
Test the new version - perform thorough testing of the new version. If you disabled the listeners and schedules on the previous version, then the new version starts up and does not process new data. You need to carefully enable processing that can be enabled, e.g., if it doesn’t consume production data.
After finishing testing of the new version it is possible to switch the public IP address of the previous version to be used by the new version instance. This allows you to continue using the same hostname with the new version, e.g. for Server projects in CloverDX Designer.
If you want to perform the IP switch, first disassociate the IP address of the previous version. Navigate to Network Interface of the previous version, select “IP Configurations” in the left menu and then select “ipconfig1”.
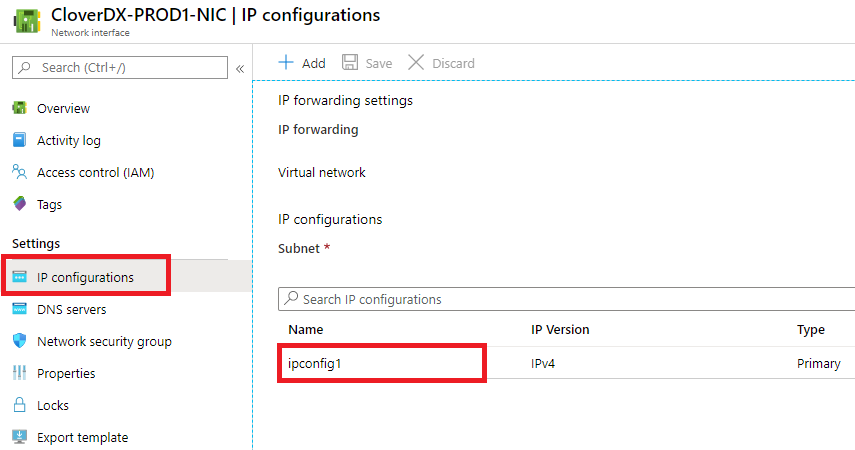
Figure 12.30. Selecting IP configuration
In the configuration details, select “Disassociate” and then “Save”. This will make the previous version inaccessible from outside. If you still want the previous version to be accessible, you can associate a different public IP instead.
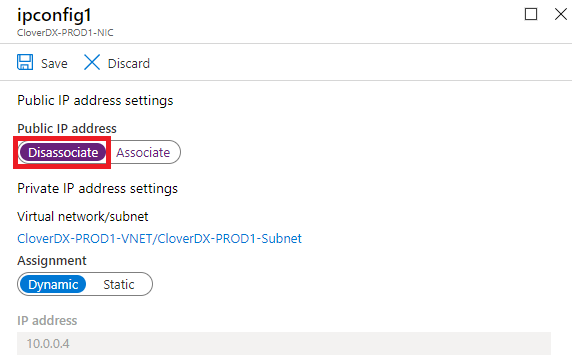
Figure 12.31. Disassociating the previous IP address
Now that the old IP is free, you can associate it with the new version. Navigate to the Network Interface of the new version, open its IP configuration and replace its associated Public IP by the IP of the old version that you previously disassociated.
For SSL connectivity to the new version to work correctly, we need to use the correct certificate - it must correspond to the new public hostname. If you’re using the default Let’s Encrypt certificate, you need to renew it - follow renewal steps in Let’s Encrypt Certificate.